Event Notifications
Event Notifications tell other systems when something changes, such as a consent being revoked or a user account being deleted. Subscribers receive each event at a webhook listener or by polling for it.
This page walks you through both, using three building blocks:
- Topic: the kind of change you want to hear about, such as
consent.revoke. The accelerator ships system topics for consent and user lifecycle changes. - Subscription: a processor signing up for a topic. Each event reaches the processor either at its webhook listener or when it polls for it.
- Event and delivery history: a record of every event published and every attempt to deliver it, which you can look through in the portal.
You'll manage topics and subscriptions, and look at events, in the Consent Portal. Events are triggered by actions in the Consent Portal or the tenant Console, and the receiver handles each delivery on its own side, outside the portal.
Here are the system topics and what triggers each one:
| System topic | Major trigger used in this guide |
|---|---|
consent.update | Approve or reject a consent in Flow 2 |
consent.revoke | Revoke a consent in Flow 2 |
consent.expire | Allow an eligible consent to expire through the configured expiry reconciler |
user.data.change | Update a user profile claim |
user.account.delete | Complete the disposable account deletion in Flow 7 |
Notify a processor when a consent is revoked
When a Data Principal revokes their consent, every Data Processor holding
their data has to stop using it. In this flow, a marketing processor's webhook
listener subscribes to consent.revoke. You'll start the listener, subscribe
it, revoke a consent as the Data Principal, and watch the event that tells the
processor to stop using the data arrive.
Portal: As the portal administrator, you register the subscription under Event Notifications → Subscriptions and check the result under Events. As the Data Principal, you revoke the consent from My Consents. The listener runs outside the portal.
You'll need two users in the tenant: an administrator with
dpdp-consent-admin, and a Data Principal with dpdp-consent-user. We'll
call the Data Principal Priya, with the username priya@example.com. It's the
same person you met in the Learn → Event Notifications
stories. Wherever you see priya@example.com, use your own user's username.
Step 1: Start the webhook listener
A webhook listener receives the subscription verification and each event
delivery from Identity Server. It must be reachable at a public URL, not
localhost. Its API contract is in
webhook-listener.openapi.yaml.
For this try-out, use one of the sample listeners below.
Each sample listener is a single file, with nothing to install. It answers the verification challenge, checks every delivery's signature with the shared secret, and prints whatever it receives.
Node.js (webhook-listener.mjs) needs Node.js 18 or later:
- Linux
- macOS
- Windows
node --version

curl -O https://raw.githubusercontent.com/wso2/dpdp-accelerator/main/docs/static/examples/webhook-listener.mjs

export SHARED_SECRET="carepulse-sample-secret-9d3e7b12"
node webhook-listener.mjs
node --version

curl -O https://raw.githubusercontent.com/wso2/dpdp-accelerator/main/docs/static/examples/webhook-listener.mjs

export SHARED_SECRET="carepulse-sample-secret-9d3e7b12"
node webhook-listener.mjs
node --version

curl.exe -O https://raw.githubusercontent.com/wso2/dpdp-accelerator/main/docs/static/examples/webhook-listener.mjs

$env:SHARED_SECRET = "carepulse-sample-secret-9d3e7b12"
node webhook-listener.mjs
Python (webhook-listener.py) needs Python 3.9 or later:
- Linux
- macOS
- Windows
python3 --version

curl -O https://raw.githubusercontent.com/wso2/dpdp-accelerator/main/docs/static/examples/webhook-listener.py

export SHARED_SECRET="carepulse-sample-secret-9d3e7b12"
python3 webhook-listener.py
python3 --version

curl -O https://raw.githubusercontent.com/wso2/dpdp-accelerator/main/docs/static/examples/webhook-listener.py

export SHARED_SECRET="carepulse-sample-secret-9d3e7b12"
python3 webhook-listener.py
python --version

curl.exe -O https://raw.githubusercontent.com/wso2/dpdp-accelerator/main/docs/static/examples/webhook-listener.py

$env:SHARED_SECRET = "carepulse-sample-secret-9d3e7b12"
python webhook-listener.py
Once it's running, the listener prints its address and confirms that signature checks are on:
=============================================================
  DPDP Reference Webhook Listener (Node.js)
  Listening on: http://127.0.0.1:8443/dpdp/events
  HMAC Verification: ENABLED (shared secret configured)
  Press Ctrl+C to stop.
=============================================================
Make sure to use a strong shared secret in a production environment.
The events you receive are signed, not encrypted. Anyone who gets hold of a delivery can decode it and read it, secret or no secret. What the signature gives you is trust. Identity Server signs each event with its own tenant key, and you check that signature against Identity Server's public keys to confirm the event is genuine and hasn't been changed.
The shared secret is known only to Identity Server and your receiver. It proves that a message belongs to your subscription:
- Webhook deliveries carry an
event-signatureheader, an HMAC of the request body made with the secret. Your listener checks it, so someone who stumbles on your callback URL can't send it fake events. - The signed event's
payloadHashis also made with the secret, so you can confirm the event was issued for your subscription and not copied from another subscriber's delivery. - Poll requests and completion reports from your receiver are signed with the secret, so Identity Server knows they come from the subscriber.
Keeping event contents private in transit is HTTPS's job. Outside local testing, use HTTPS callback URLs, and keep personal data out of event payloads.
Exposing a listener locally
No public server to run the listener on? Try one of these:
- An ngrok tunnel. Set up ngrok, run
ngrok http 8443in a second terminal, then add/dpdp/eventsto thehttps://forwarding address it prints. That's your callback URL for Step 3. Your test events travel through ngrok, so stick to sample data, and don't use a tunnel for a real receiver. - Your machine's network IP, if Identity Server can't reach the internet.
Start the listener with
HOSTset to that IP, and usehttp://<ip>:8443/dpdp/eventsas the callback URL. Identity Server turns away private network addresses by default, so also setallow_private_network_callback_targets = trueunder[dpdp_accelerator.event_notifications.webhook]indeployment.tomland restart it. Keep that settingfalsein production.
For the listeners' other options, see Run a sample reference listener.
Step 2: Create a consent to revoke
In a real deployment, applications create consents through the Consent Management API, not the portal. So to get a consent you can revoke, you'll call that API once yourself.
-
Get a purpose ID and an element ID. Sign in to the portal as the administrator, go to Definitions → Purposes, and open the purpose you want to use. This flow uses
marketing-email. No purpose yet? Create one with an element first, as described in Define a purpose and its data element. Copy the Purpose ID from the purpose page, then open one of its elements and copy its ID as well.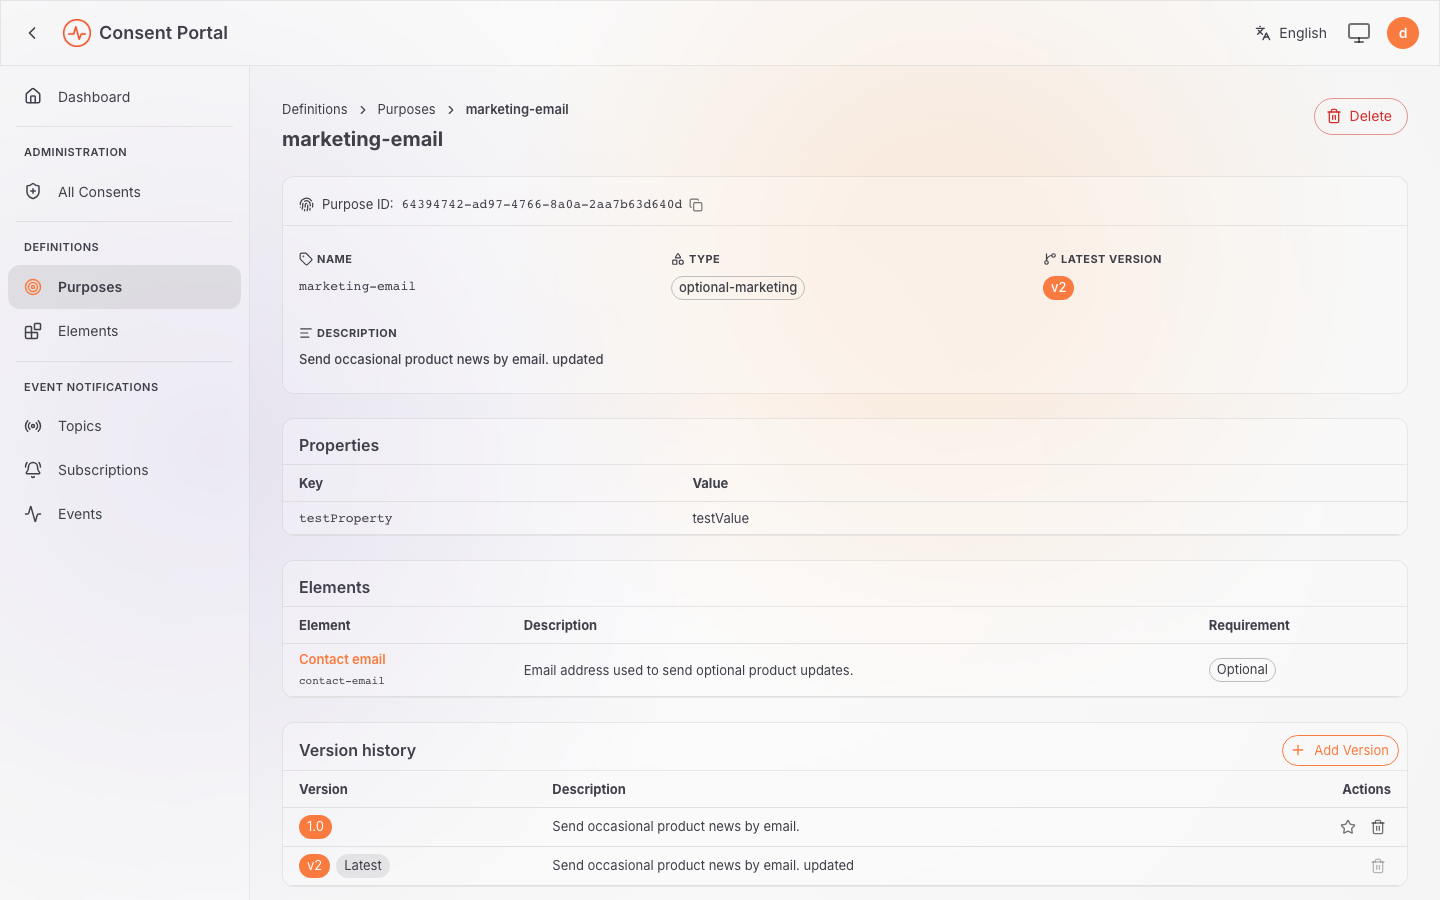
-
Get an access token with the
internal_consent_mgt_consent_createscope. Creating a consent needs it, and the accelerator provisions the DPDP Consent API Invoker application for exactly this. Consent API Invoker provisioning explains how to get its credentials. Get the token from the same tenant the consent belongs to, since one tenant won't accept another tenant's token. Then set it, along with your server and tenant, for the next step:- Linux
- macOS
- Windows
export BASE_URL="https://localhost:9443"export TENANT_DOMAIN="example.com"export TOKEN="<access-token>"export BASE_URL="https://localhost:9443"export TENANT_DOMAIN="example.com"export TOKEN="<access-token>"$env:BASE_URL = "https://localhost:9443"$env:TENANT_DOMAIN = "example.com"$env:TOKEN = "<access-token>"Change
TENANT_DOMAINto your own tenant's domain. -
Create an active consent for Priya.
subjectIdis the Data Principal's username,priya@example.com, and it has to belong to a user in the same tenant. On the highlighted line, swap in the<purpose-id>and<element-id>you copied in step 1:- Linux
- macOS
- Windows
curl -sk -X POST "${BASE_URL}/api/identity/consent-mgt/v2.0/consents" \-H "Authorization: Bearer ${TOKEN}" \-H "Content-Type: application/json" \-d '{"subjectId": "priya@example.com","serviceId": "carepulse-marketing","language": "en","state": "ACTIVE","purposes": [{ "id": "<purpose-id>", "elements": [ { "id": "<element-id>" } ] }]}'curl -sk -X POST "${BASE_URL}/api/identity/consent-mgt/v2.0/consents" \-H "Authorization: Bearer ${TOKEN}" \-H "Content-Type: application/json" \-d '{"subjectId": "priya@example.com","serviceId": "carepulse-marketing","language": "en","state": "ACTIVE","purposes": [{ "id": "<purpose-id>", "elements": [ { "id": "<element-id>" } ] }]}'$Body = @'{"subjectId": "priya@example.com","serviceId": "carepulse-marketing","language": "en","state": "ACTIVE","purposes": [{ "id": "<purpose-id>", "elements": [ { "id": "<element-id>" } ] }]}'@Invoke-RestMethod -SkipCertificateCheck -Method Post `-Uri "$env:BASE_URL/api/identity/consent-mgt/v2.0/consents" `-Headers @{ Authorization = "Bearer $env:TOKEN" } `-ContentType "application/json" `-Body $Body | ConvertTo-Json -Depth 10The response includes the new consent's
id. Hold on to it for Step 4.
-k (-SkipCertificateCheck on Windows) skips certificate checks. Only use
it against a local server with a self-signed certificate.
Step 3: Subscribe the listener to consent revocations
- Sign in to the portal as the administrator.
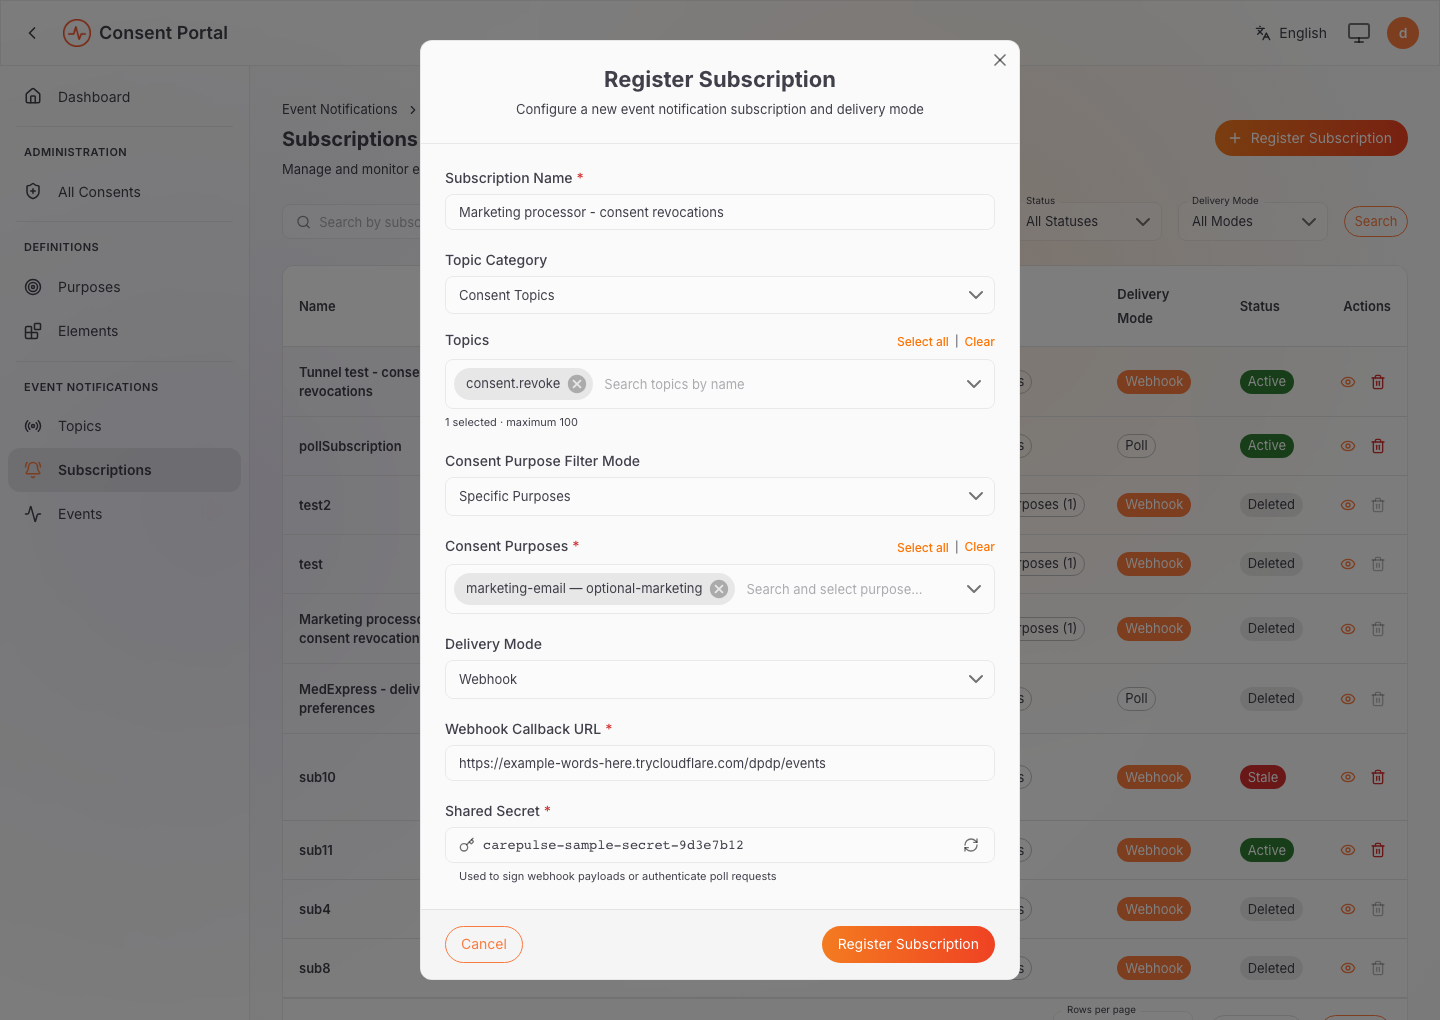
- Open Event Notifications → Subscriptions and select Register Subscription.
- Enter a Subscription Name, such as
Marketing processor - consent revocations. - Set Topic Category to Consent Topics, and select
consent.revokeunder Topics. - Set Consent Purpose Filter Mode to Specific Purposes, and select
marketing-emailunder Consent Purposes. The listener then hears only about revocations of consents that include this purpose. To hear about every revocation, choose All Purposes instead. - Set Delivery Mode to Webhook, enter your callback URL from Step 1
as the Webhook Callback URL (for example,
https://<your-ngrok-address>/dpdp/events), and entercarepulse-sample-secret-9d3e7b12as the Shared Secret. - Select Register Subscription.
Right away, Identity Server sends the listener a verification challenge. As soon as the listener answers it, the subscription turns Active:
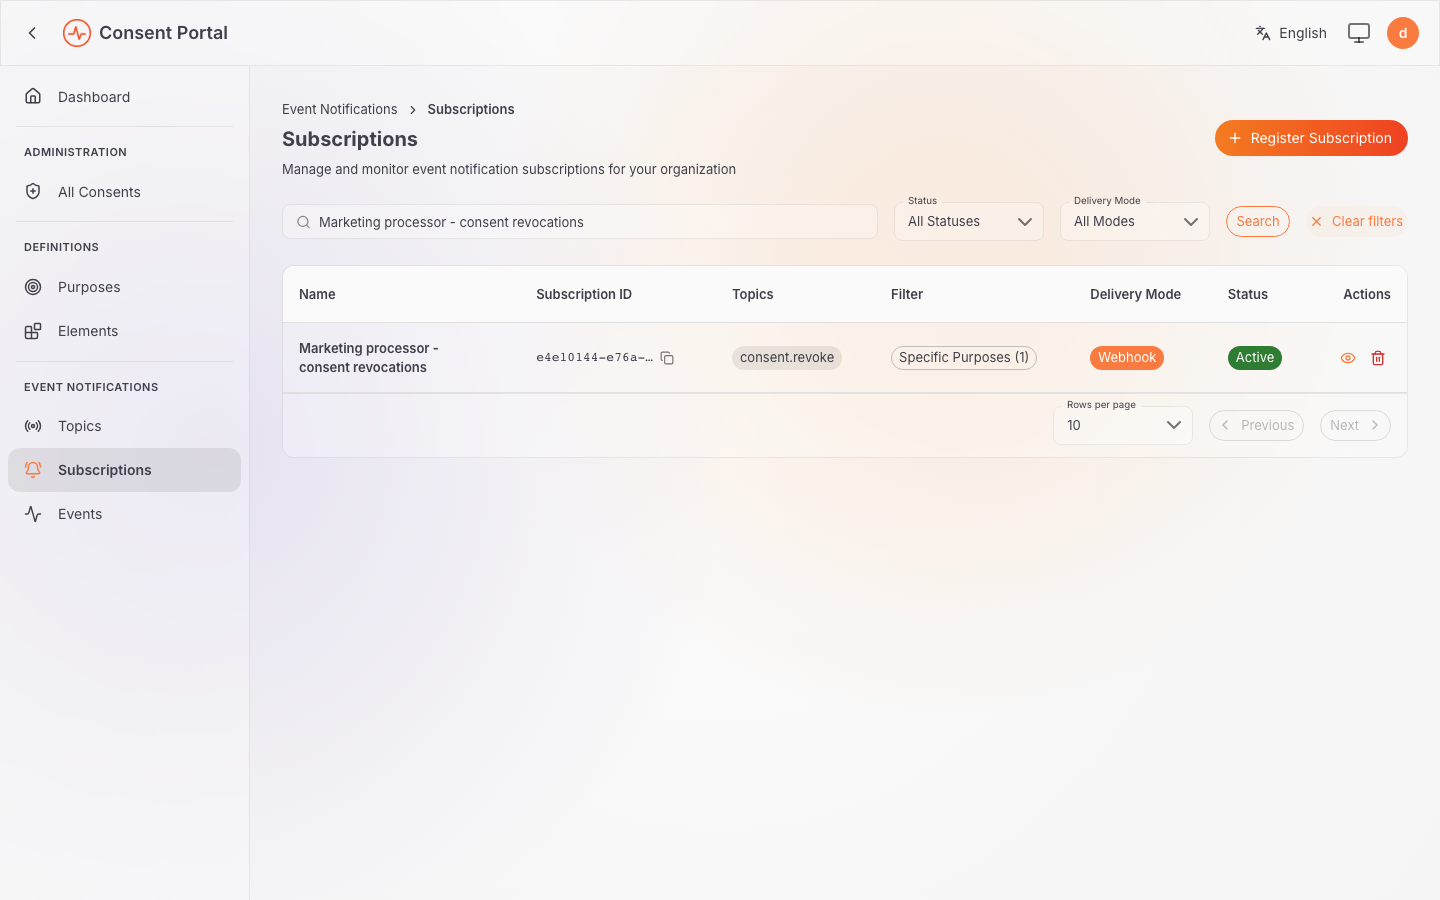
Over in the listener's terminal, you'll see the challenge it answered:
[INFO] ================ [SUBSCRIPTION VERIFICATION] ================
[INFO] Verification Payload:
{
  "type": "subscription.verification",
  "subscriptionId": "e4e10144-e76a-4d4b-9e80-70747df4f650",
  "topics": [
    "consent.revoke"
  ],
  "challenge": "ec09e7a8-fb5b-4eec-9670-c3c1fbe529b9"
}
[INFO] Verified subscription 'e4e10144-e76a-4d4b-9e80-70747df4f650' for topics: ["consent.revoke"]
[INFO] <-- Returned HTTP 200 OK with challenge: 'ec09e7a8-fb5b-4eec-9670-c3c1fbe529b9'
If you'd rather register the subscription through the API, here's the
equivalent request. It uses the administrator's access token, which carries
notifications:subscriptions:write:
- Linux
- macOS
- Windows
export ADMIN_TOKEN="<admin-access-token>"

curl -X POST \
  "${BASE_URL}/api/dpdp/event-notifications/v1/subscriptions" \
  -H "Authorization: Bearer ${ADMIN_TOKEN}" \
  -H "Content-Type: application/json" \
  -d '{
    "topics": ["consent.revoke"],
    "filter": {
      "type": "specific",
      "purposes": ["marketing-email"]
    },
    "delivery": {
      "mode": "webhook",
      "callbackUrl": "https://<your-ngrok-address>/dpdp/events",
      "sharedSecret": "<shared-secret>"
    }
  }'
export ADMIN_TOKEN="<admin-access-token>"

curl -X POST \
  "${BASE_URL}/api/dpdp/event-notifications/v1/subscriptions" \
  -H "Authorization: Bearer ${ADMIN_TOKEN}" \
  -H "Content-Type: application/json" \
  -d '{
    "topics": ["consent.revoke"],
    "filter": {
      "type": "specific",
      "purposes": ["marketing-email"]
    },
    "delivery": {
      "mode": "webhook",
      "callbackUrl": "https://<your-ngrok-address>/dpdp/events",
      "sharedSecret": "<shared-secret>"
    }
  }'
$env:ADMIN_TOKEN = "<admin-access-token>"

$Body = @'
{
  "topics": ["consent.revoke"],
  "filter": {
    "type": "specific",
    "purposes": ["marketing-email"]
  },
  "delivery": {
    "mode": "webhook",
    "callbackUrl": "https://<your-ngrok-address>/dpdp/events",
    "sharedSecret": "<shared-secret>"
  }
}
'@

Invoke-RestMethod -Method Post `
  -Uri "$env:BASE_URL/api/dpdp/event-notifications/v1/subscriptions" `
  -Headers @{ Authorization = "Bearer $env:ADMIN_TOKEN" } `
  -ContentType "application/json" `
  -Body $Body | ConvertTo-Json -Depth 10
Step 4: Revoke the consent
-
Sign in to the portal as Priya (
priya@example.com). -
Open My Consents and select the consent you created. It should show Active.
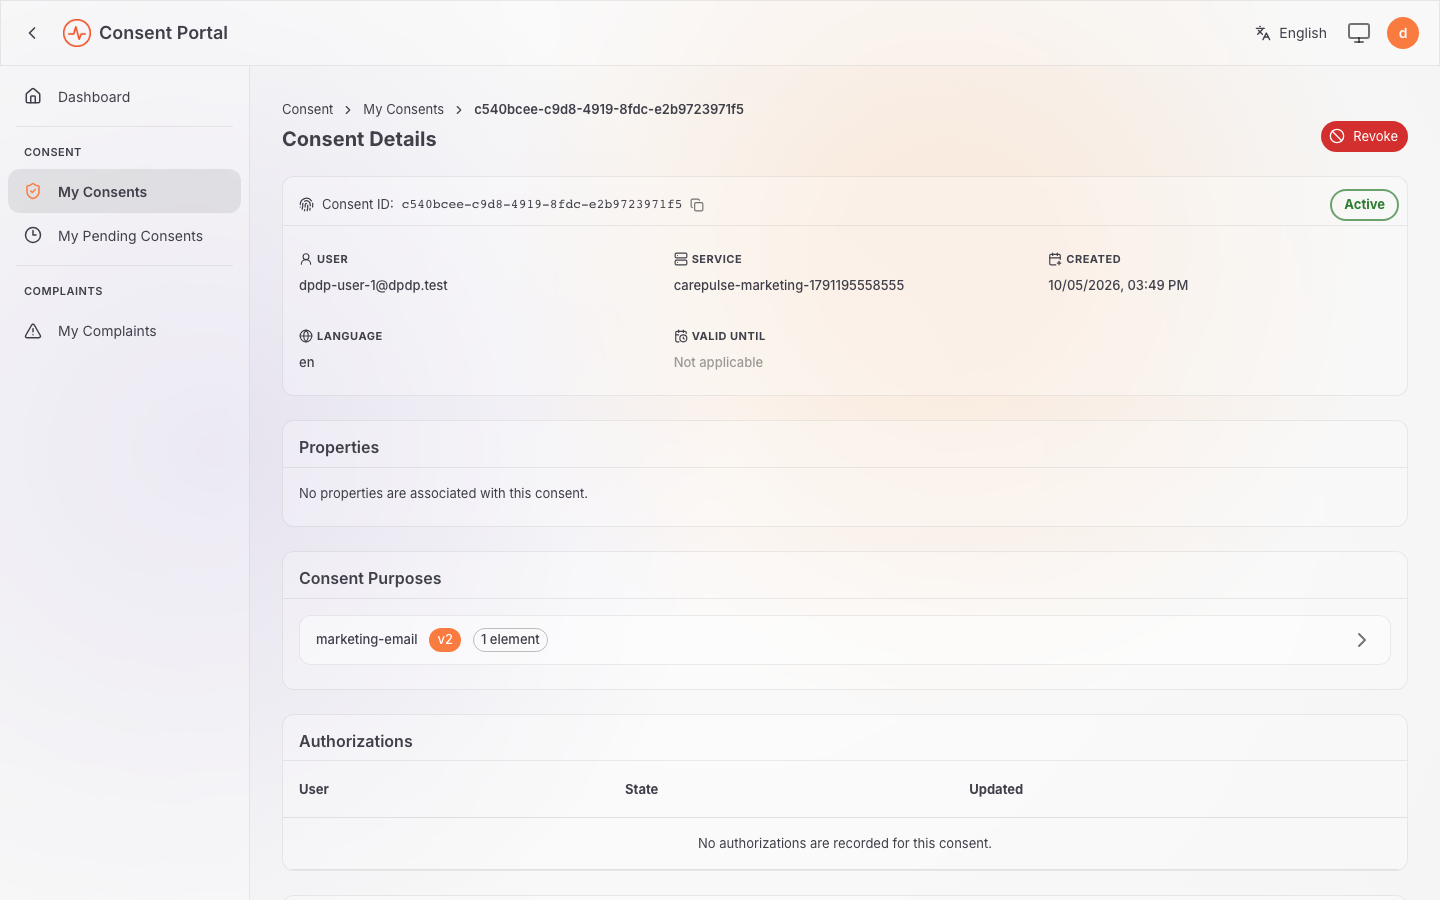
-
Select Revoke, then Revoke Consent to confirm.
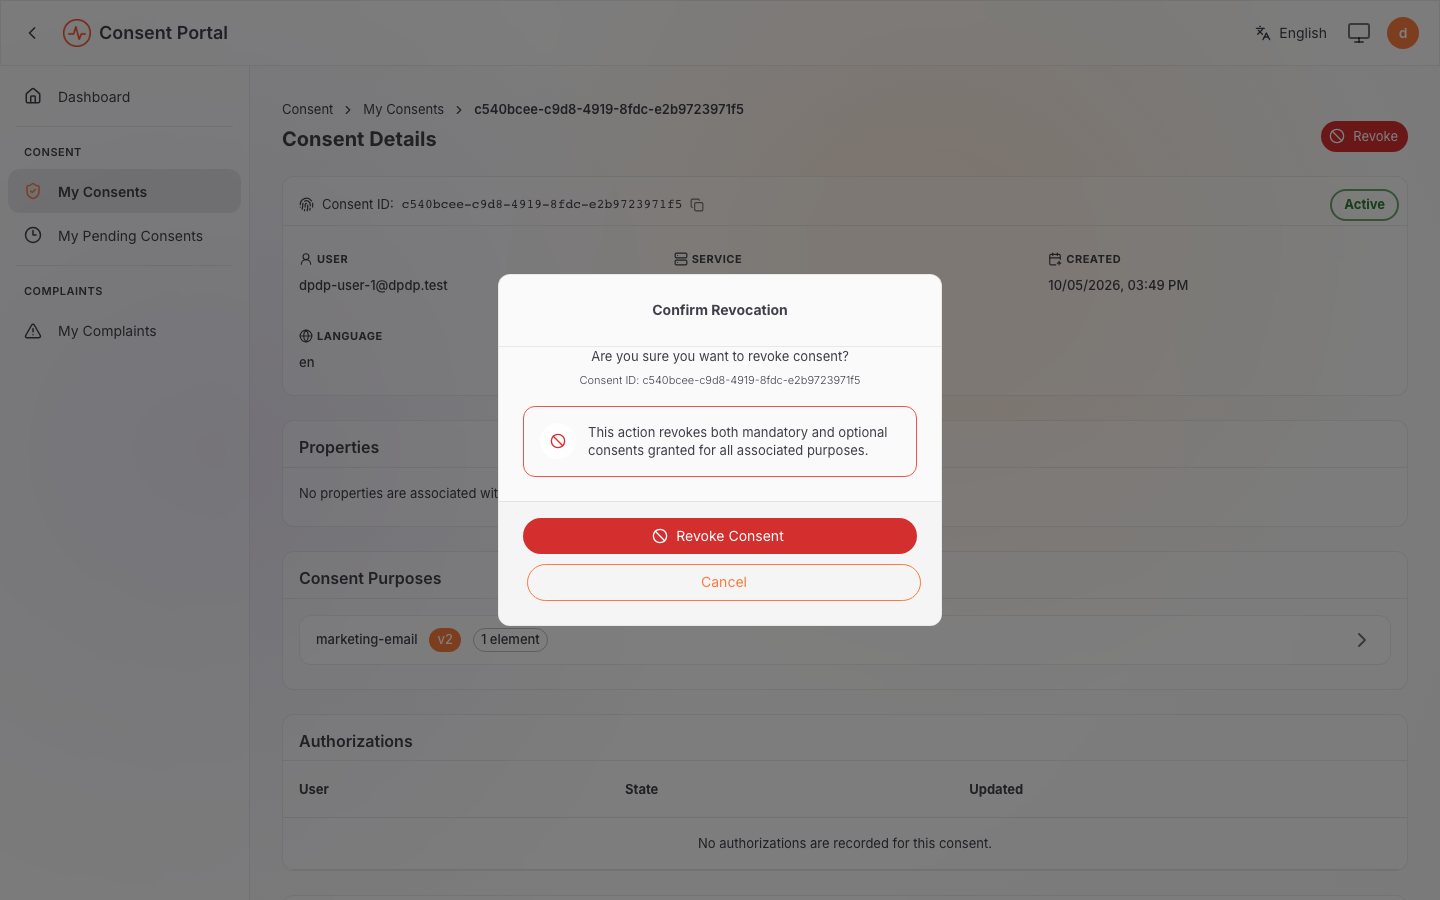
The consent now shows Revoked. Behind the scenes, the portal sends this request, with no request body:
- Linux
- macOS
- Windows
export PRIYA_TOKEN="<priya-access-token>"

curl -X POST \
  "${BASE_URL}/api/users/v1/me/consents/<consent-id>/revoke" \
  -H "Authorization: Bearer ${PRIYA_TOKEN}"
export PRIYA_TOKEN="<priya-access-token>"

curl -X POST \
  "${BASE_URL}/api/users/v1/me/consents/<consent-id>/revoke" \
  -H "Authorization: Bearer ${PRIYA_TOKEN}"
$env:PRIYA_TOKEN = "<priya-access-token>"

Invoke-RestMethod -Method Post `
  -Uri "$env:BASE_URL/api/users/v1/me/consents/<consent-id>/revoke" `
  -Headers @{ Authorization = "Bearer $env:PRIYA_TOKEN" }
If you send it yourself, use Priya's access token, not the administrator's.
Step 5: Confirm that the processor was notified
Within a few seconds, the delivery lands in the listener. It checks the signature and prints the decoded event, which names the consent Priya just revoked:
[INFO] ==================== [EVENT DELIVERY] ====================
[INFO] Delivery-Id:     58328a80-4e74-44c8-80cc-927414e4159a
[INFO] Event-Signature: sha256=e8c0443706bca2452875971e20bdc909867a12298bbd99907d36edcbf4092245
[INFO] HMAC-SHA256 signature verified successfully.
[INFO] Decoded Event Payload:
{
  "iss": "https://localhost:9443/t/example.com/oauth2/token",
  "sub": "example.com",
  "aud": "dpdp-event-notifications",
  ...
  "payload": {
    "deliveryId": "58328a80-4e74-44c8-80cc-927414e4159a",
    "eventId": "131b9ab4-c6f2-4652-ae70-023dafc35c8f",
    "subscriptionId": "e4e10144-e76a-4d4b-9e80-70747df4f650",
    "orgId": "example.com",
    "groupId": "example.com",
    "topic": "consent.revoke",
    "eventPayload": {
      "consentId": "c540bcee-c9d8-4919-8fdc-e2b9723971f5",
      "previousStatus": "ACTIVE"
    }
  }
}
[INFO] <-- Returned HTTP 202 Accepted
You can find the same event in the portal too. Sign in as the administrator,
open Event Notifications → Events, and search for the eventId from the
listener output, or just look for the newest consent.revoke event:
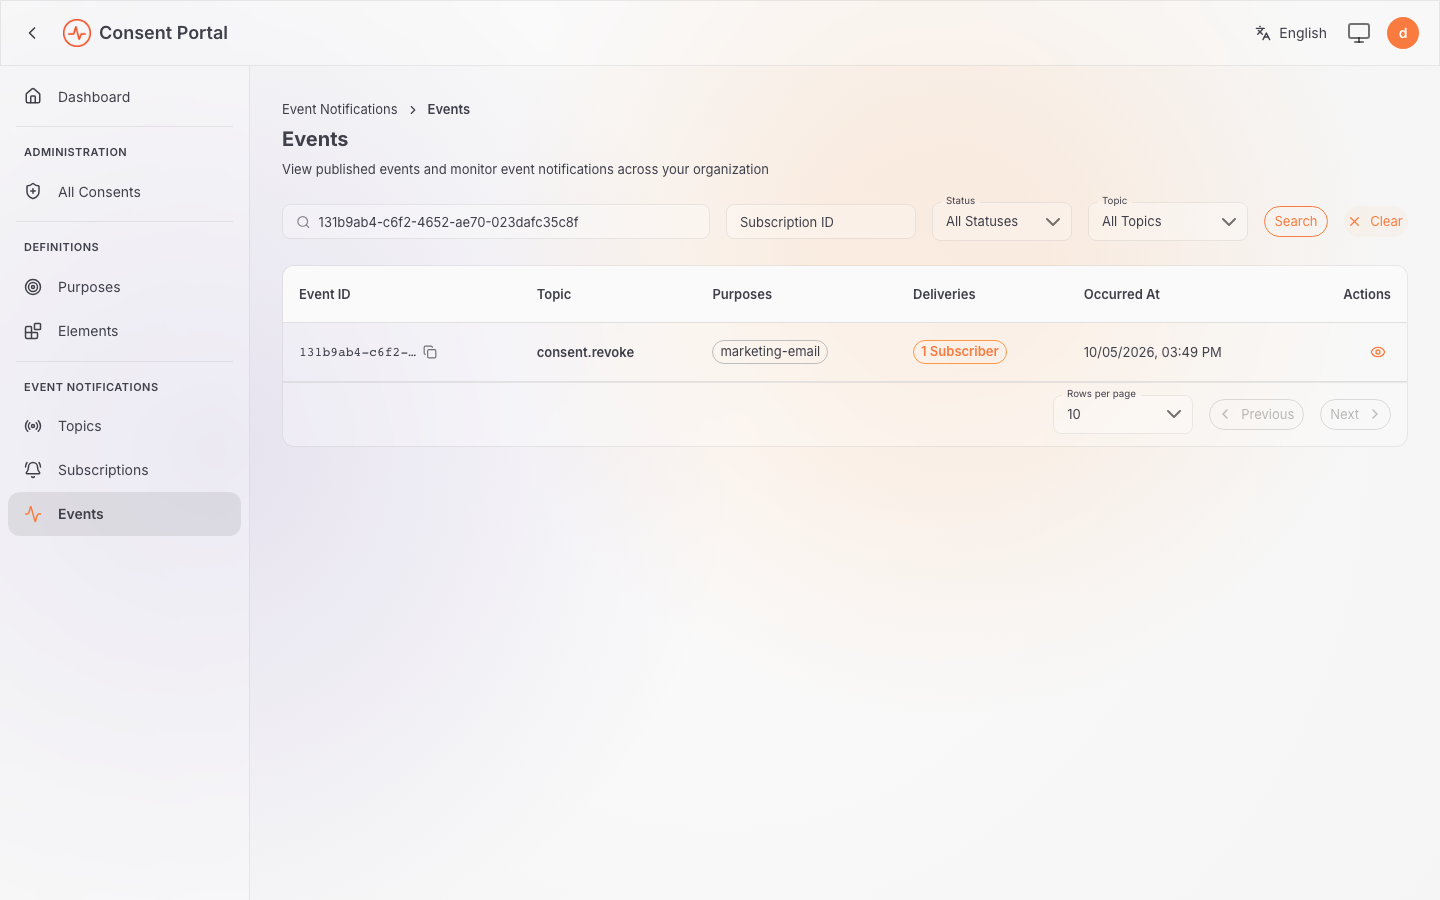
Open it to see the payload and the delivery to your subscription, marked Delivered:
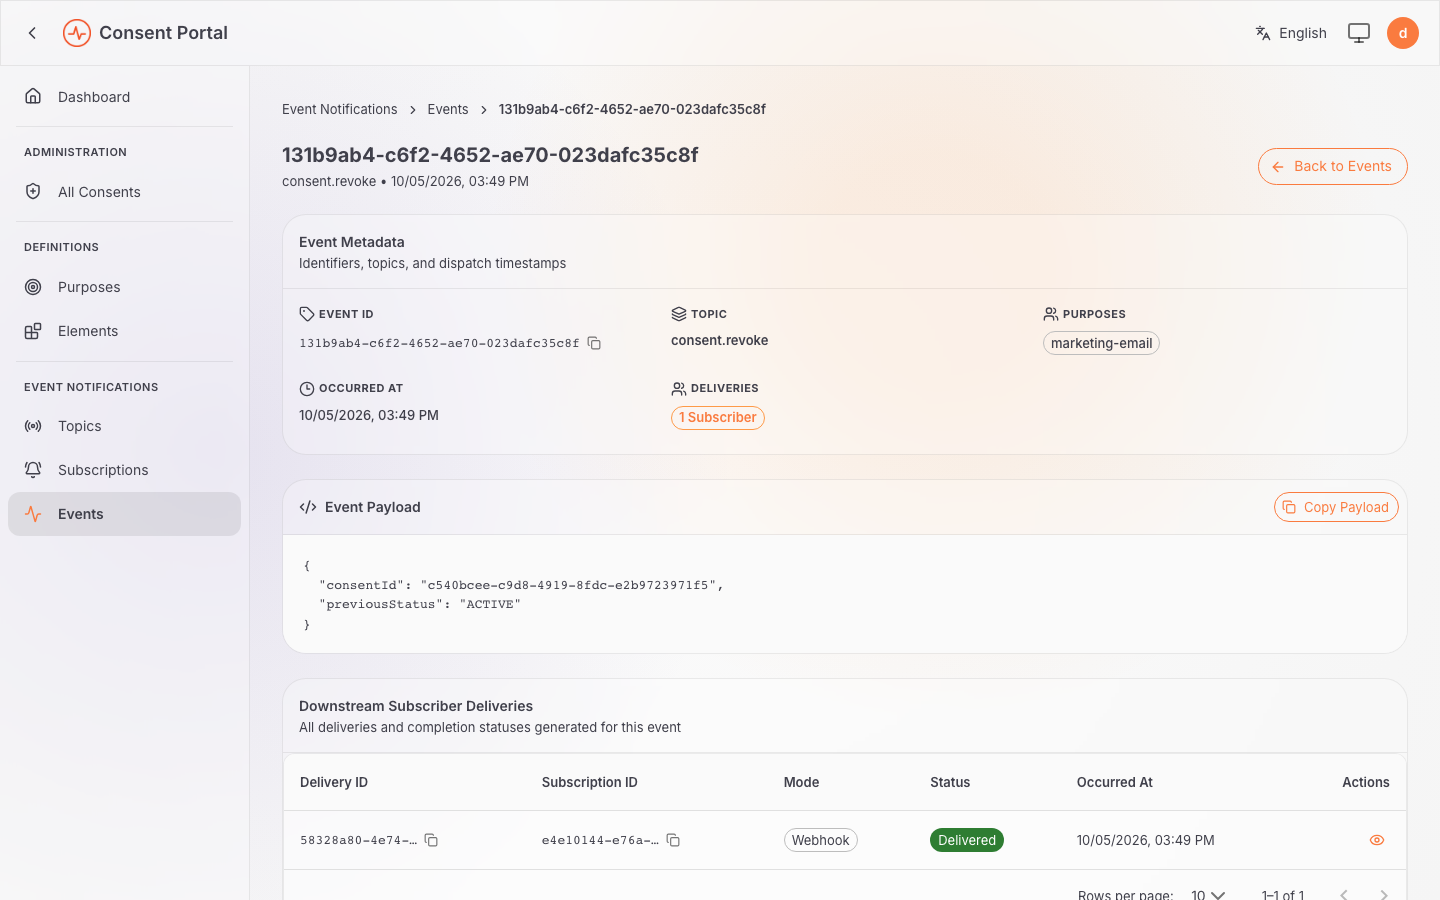
Notice that the event carries only the consent ID and its previous status,
none of Priya's personal data. A real processor would use consentId to find
the data it holds under that consent and stop using it.
Expected result: revoking the consent publishes one consent.revoke event, and
the listener receives it because its subscription matches both the topic and
the marketing-email purpose. Keep in mind that Delivered only means the
listener accepted the request. Actually stopping the use of the data is up to
the processor. For more on this, see
receiver responsibilities.
Publish your own event and poll for it
The accelerator publishes consent and user lifecycle events on its own. Your applications can publish events too, about their own business changes, on topics you define.
Say CarePulse's order system publishes an event whenever a customer updates their delivery preferences. MedExpress, the delivery processor, sits behind a firewall and can't expose a webhook. Instead, it polls for new events and acknowledges each one once it has processed it.
In this flow you'll do exactly that. You'll register a custom topic, subscribe a poll receiver to it, publish an event, and then poll for it and acknowledge it.
Portal: As the portal administrator, you register the topic and subscription and check the result. Publishing and polling are API calls that the integrating applications make, not portal actions.
You'll need two access tokens. Event Notification roles and scopes lists the roles that grant them:
| Token | Scope | Used by |
|---|---|---|
| Publisher | notifications:events:write | The application that publishes the event. Users with dpdp-consent-admin already have this scope. |
| Receiver | notifications:events:poll | The polling receiver. No default role has this scope, so grant it to a dedicated receiver role or application. |
- Linux
- macOS
- Windows
export BASE_URL="https://localhost:9443"
export TENANT_DOMAIN="example.com"
export API_BASE="${BASE_URL}/api/dpdp/event-notifications/v1"
export PUBLISHER_TOKEN="<publisher-access-token>"
export RECEIVER_TOKEN="<receiver-access-token>"
export BASE_URL="https://localhost:9443"
export TENANT_DOMAIN="example.com"
export API_BASE="${BASE_URL}/api/dpdp/event-notifications/v1"
export PUBLISHER_TOKEN="<publisher-access-token>"
export RECEIVER_TOKEN="<receiver-access-token>"
$env:BASE_URL = "https://localhost:9443"
$env:TENANT_DOMAIN = "example.com"
$env:API_BASE = "$env:BASE_URL/api/dpdp/event-notifications/v1"
$env:PUBLISHER_TOKEN = "<publisher-access-token>"
$env:RECEIVER_TOKEN = "<receiver-access-token>"
Change TENANT_DOMAIN to your own tenant's domain, and get both tokens from
that same tenant.
Step 1: Register a custom topic
- Sign in to the portal as the administrator.
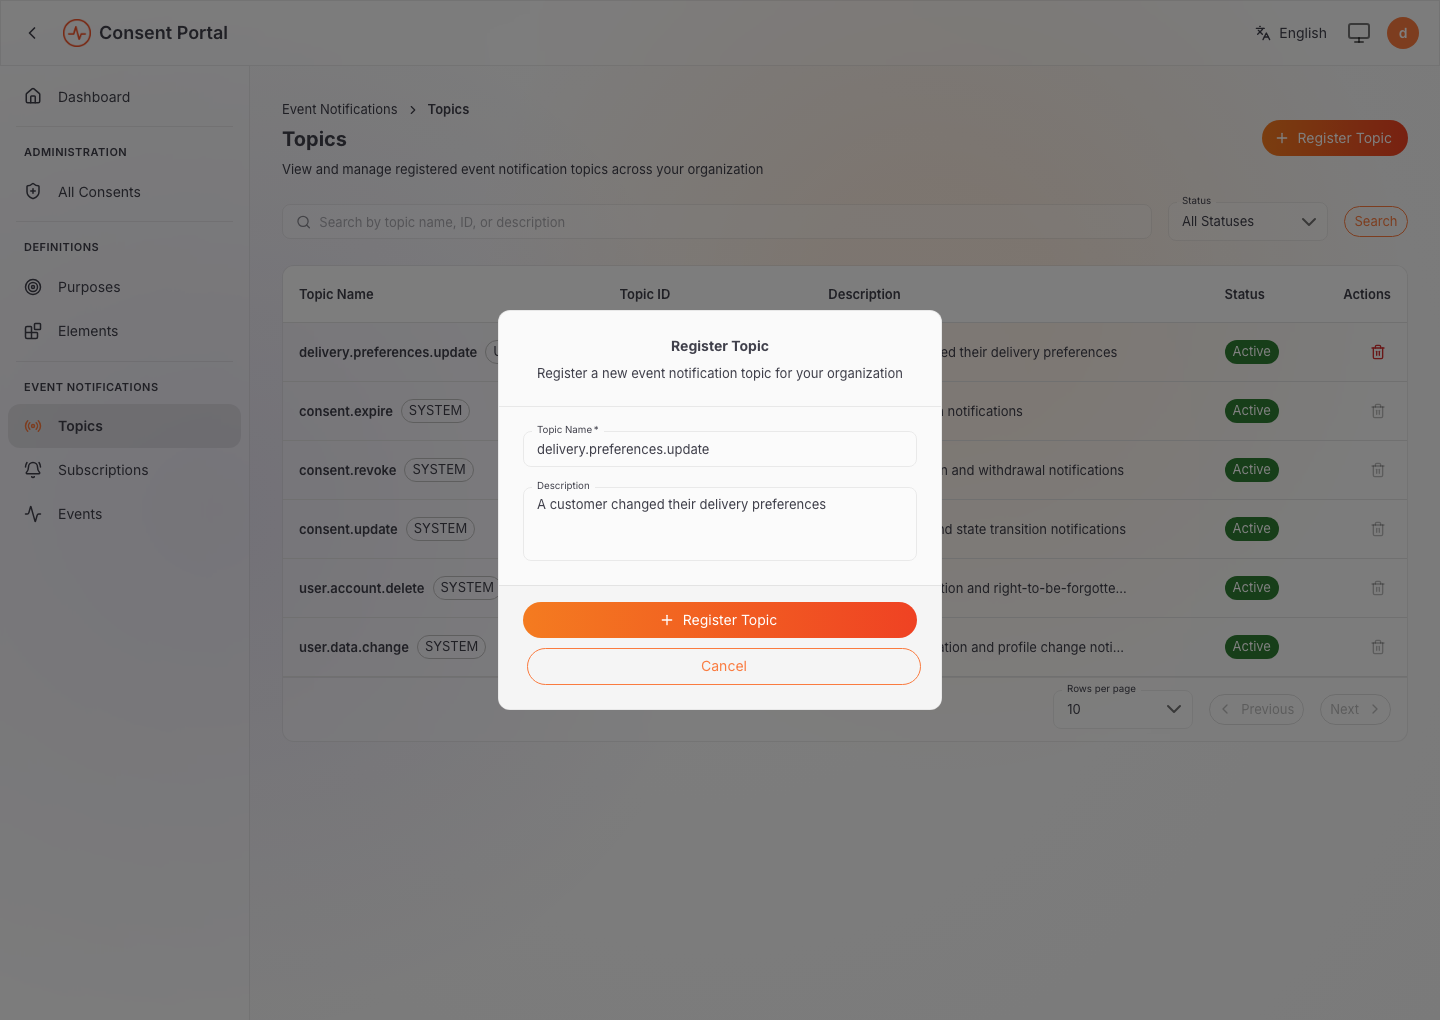
- Open Event Notifications → Topics and select Register Topic.
- Enter
delivery.preferences.updateas the Topic Name, add a Description, and select Register Topic.
Step 2: Subscribe a poll receiver
- Open Event Notifications → Subscriptions and select Register Subscription.
- Enter a Subscription Name, such as
MedExpress - delivery preferences. - Set Topic Category to Custom Topics, and select
delivery.preferences.updateunder Topics. - Keep Consent Purpose Filter Mode as All Purposes.
- Set Delivery Mode to Poll.
- Enter
medexpress-sample-secret-4f8a2c91as the Shared Secret. The receiver signs its poll requests with it. We use a sample value so the commands below work as they are. For a real receiver, select the generate icon at the end of the field instead, and keep the secret somewhere safe. - Select Register Subscription.
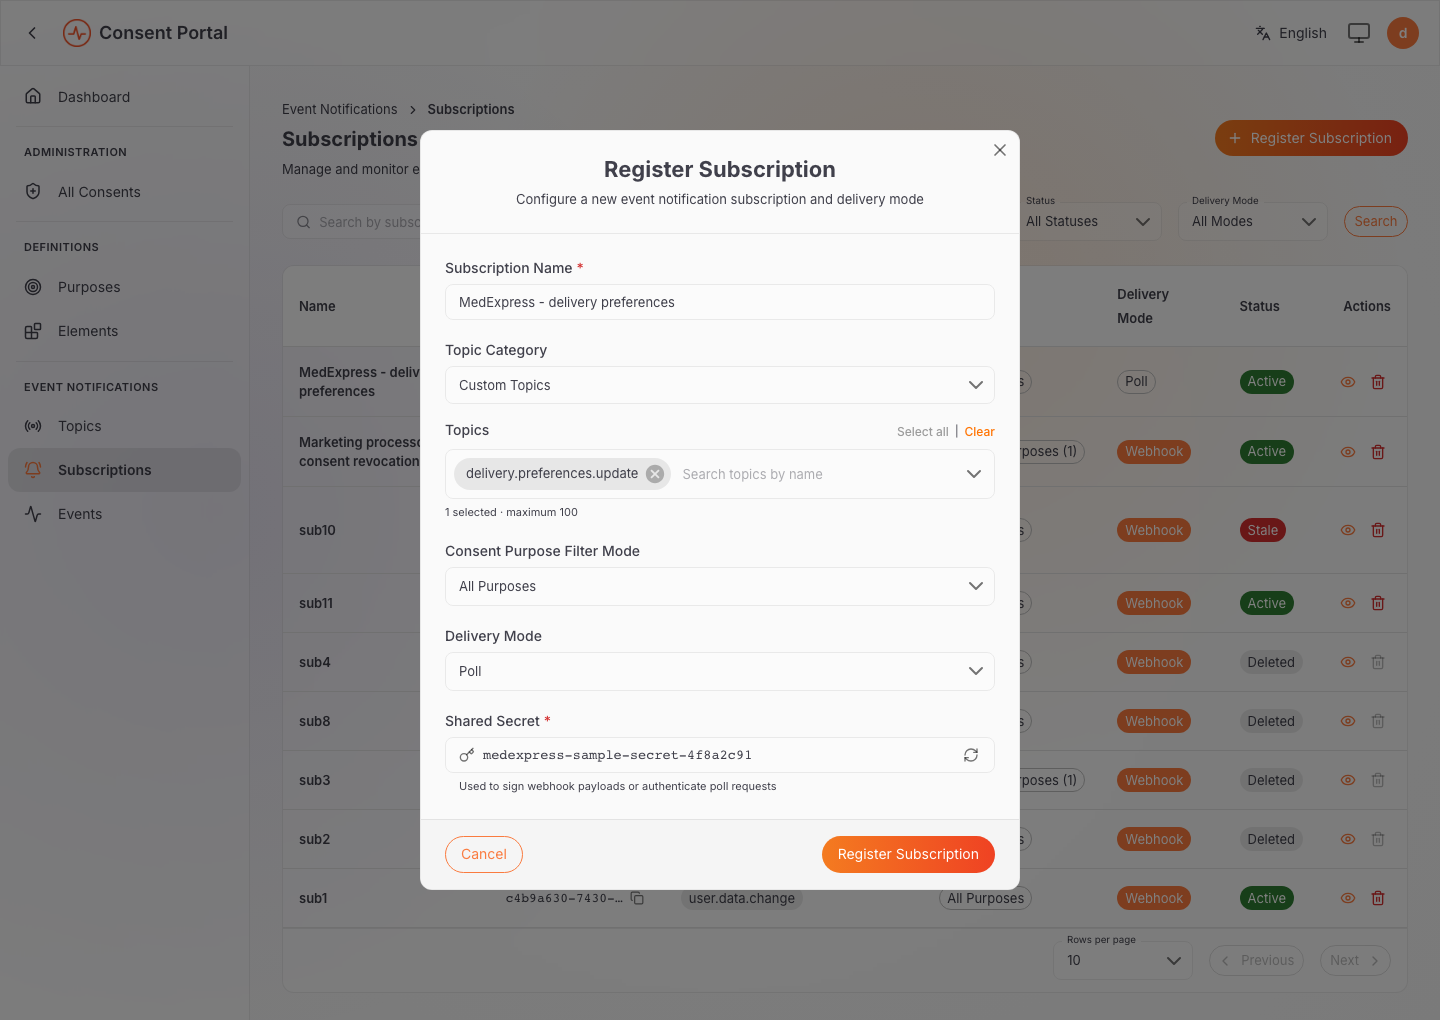
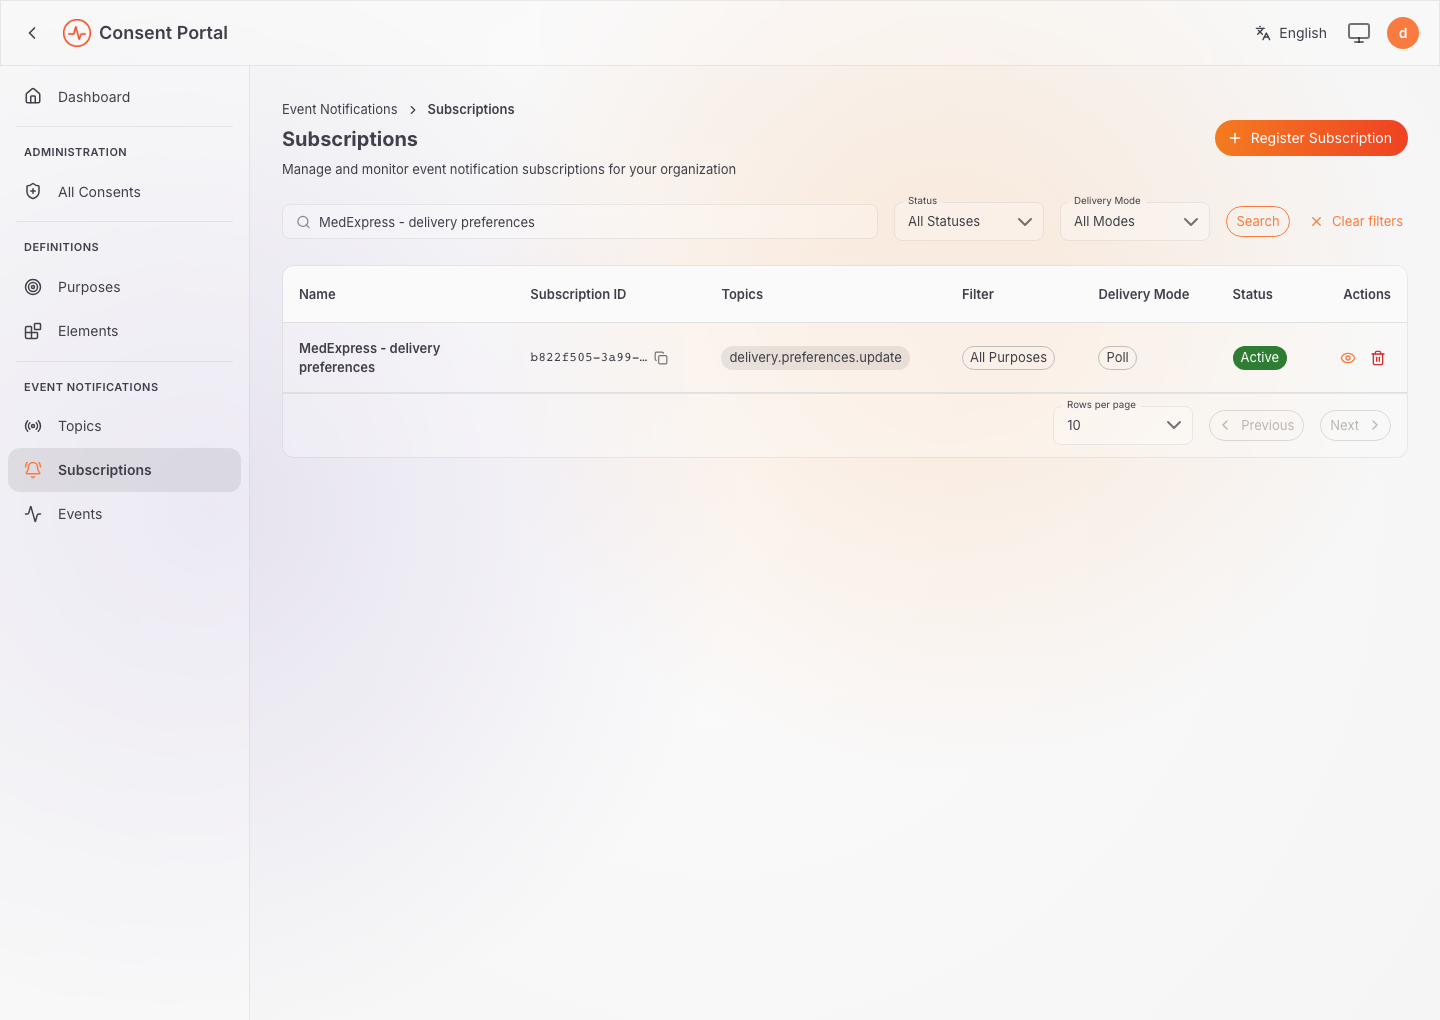
Poll subscriptions don't need verification, so this one is Active straight away. Copy its Subscription ID with the copy icon in the list:
- Linux
- macOS
- Windows
export SUBSCRIPTION_ID="<subscription-id>"
export SHARED_SECRET="medexpress-sample-secret-4f8a2c91"
export SUBSCRIPTION_ID="<subscription-id>"
export SHARED_SECRET="medexpress-sample-secret-4f8a2c91"
$env:SUBSCRIPTION_ID = "<subscription-id>"
$env:SHARED_SECRET = "medexpress-sample-secret-4f8a2c91"
Step 3: Publish an event
Now play the order system and publish the change with the publisher token.
The group-id header has to match the subscription's group, which is the
tenant domain:
- Linux
- macOS
- Windows
curl -sk -X POST "${API_BASE}/events" \
  -H "Authorization: Bearer ${PUBLISHER_TOKEN}" \
  -H "group-id: ${TENANT_DOMAIN}" \
  -H "Content-Type: application/json" \
  -d '{
    "topic": "delivery.preferences.update",
    "payload": {
      "customerReference": "cust-0001",
      "change": "DELIVERY_WINDOW_UPDATED"
    }
  }'
curl -sk -X POST "${API_BASE}/events" \
  -H "Authorization: Bearer ${PUBLISHER_TOKEN}" \
  -H "group-id: ${TENANT_DOMAIN}" \
  -H "Content-Type: application/json" \
  -d '{
    "topic": "delivery.preferences.update",
    "payload": {
      "customerReference": "cust-0001",
      "change": "DELIVERY_WINDOW_UPDATED"
    }
  }'
$Body = @'
{
  "topic": "delivery.preferences.update",
  "payload": {
    "customerReference": "cust-0001",
    "change": "DELIVERY_WINDOW_UPDATED"
  }
}
'@

Invoke-RestMethod -SkipCertificateCheck -Method Post -Uri "$env:API_BASE/events" `
  -Headers @{
    Authorization = "Bearer $env:PUBLISHER_TOKEN"
    "group-id"    = $env:TENANT_DOMAIN
  } `
  -ContentType "application/json" `
  -Body $Body | ConvertTo-Json -Depth 10
You'll get back the stored event and its eventId:
{
  "eventId": "f0b66a0d-edcb-4d94-94ee-70ce33b34f20",
  "orgId": "example.com",
  "groupId": "example.com",
  "topicId": "3064830b-7249-4fa6-9b83-59d7215af1c2",
  "payload": "{\"customerReference\":\"cust-0001\",\"change\":\"DELIVERY_WINDOW_UPDATED\"}",
  "occurredAt": 1791199075832,
  "createdAt": 1791199075832
}
Try to keep personal data out of the payload. Send a reference the receiver
can look up instead, the way customerReference does here.
Step 4: Poll for the event
Next, switch to MedExpress and poll with the receiver token. The first poll can have an empty body:
- Linux
- macOS
- Windows
POLL_BODY=''
POLL_SIGNATURE="sha256=$(printf %s "${POLL_BODY}" | openssl dgst -sha256 -hmac "${SHARED_SECRET}" -hex | awk '{print $2}')"

curl -sk -X POST "${API_BASE}/events/poll" \
  -H "Authorization: Bearer ${RECEIVER_TOKEN}" \
  -H "Content-Type: application/json" \
  -H "group-id: ${TENANT_DOMAIN}" \
  -H "subscription-id: ${SUBSCRIPTION_ID}" \
  -H "event-signature: ${POLL_SIGNATURE}" \
  -d "${POLL_BODY}"
POLL_BODY=''
POLL_SIGNATURE="sha256=$(printf %s "${POLL_BODY}" | openssl dgst -sha256 -hmac "${SHARED_SECRET}" -hex | awk '{print $2}')"

curl -sk -X POST "${API_BASE}/events/poll" \
  -H "Authorization: Bearer ${RECEIVER_TOKEN}" \
  -H "Content-Type: application/json" \
  -H "group-id: ${TENANT_DOMAIN}" \
  -H "subscription-id: ${SUBSCRIPTION_ID}" \
  -H "event-signature: ${POLL_SIGNATURE}" \
  -d "${POLL_BODY}"
$PollBody = ''
$Hmac = [System.Security.Cryptography.HMACSHA256]::new([Text.Encoding]::UTF8.GetBytes($env:SHARED_SECRET))
$PollSignature = 'sha256=' + [BitConverter]::ToString($Hmac.ComputeHash([Text.Encoding]::UTF8.GetBytes($PollBody))).Replace('-', '').ToLower()

Invoke-RestMethod -SkipCertificateCheck -Method Post -Uri "$env:API_BASE/events/poll" `
  -Headers @{
    Authorization     = "Bearer $env:RECEIVER_TOKEN"
    "group-id"        = $env:TENANT_DOMAIN
    "subscription-id" = $env:SUBSCRIPTION_ID
    "event-signature" = $PollSignature
  } `
  -ContentType "application/json" `
  -Body $PollBody | ConvertTo-Json -Depth 10
event-signature is an HMAC-SHA256 of the exact request body, made with the
subscription's shared secret. For an empty body, it's calculated over zero
bytes. The server only checks it when
request_hmac_validation_enabled = true under
[dpdp_accelerator.event_notifications.polling], and that's off by default.
Sign every request anyway, so your receiver keeps working when someone turns
the check on.
The response holds any pending deliveries, keyed by delivery ID. Each value is a signed event (a compact JWS) carrying the same contents as a webhook delivery:
{
  "moreAvailable": false,
  "sets": {
    "07f813ee-391a-4cd2-aa70-2ebe420fc0d0": "eyJhbGciOiJSUzI1NiIsInR5cCI6IkpXVCIs..."
  }
}
Before you trust an event, verify its signature against Identity Server's
JWKS endpoint. Once it checks out, you'll find your event in the payload
claim, under eventPayload:
"eventPayload": {
  "change": "DELIVERY_WINDOW_UPDATED",
  "customerReference": "cust-0001"
}
Step 5: Acknowledge the event
Once MedExpress has processed the event, it sends the delivery ID back in the
next poll's ack array, signing the new body the same way:
- Linux
- macOS
- Windows
DELIVERY_ID="<delivery-id-from-step-4>"
POLL_BODY="{\"ack\": [\"${DELIVERY_ID}\"], \"maxEvents\": 20}"
POLL_SIGNATURE="sha256=$(printf %s "${POLL_BODY}" | openssl dgst -sha256 -hmac "${SHARED_SECRET}" -hex | awk '{print $2}')"

curl -sk -X POST "${API_BASE}/events/poll" \
  -H "Authorization: Bearer ${RECEIVER_TOKEN}" \
  -H "Content-Type: application/json" \
  -H "group-id: ${TENANT_DOMAIN}" \
  -H "subscription-id: ${SUBSCRIPTION_ID}" \
  -H "event-signature: ${POLL_SIGNATURE}" \
  -d "${POLL_BODY}"
DELIVERY_ID="<delivery-id-from-step-4>"
POLL_BODY="{\"ack\": [\"${DELIVERY_ID}\"], \"maxEvents\": 20}"
POLL_SIGNATURE="sha256=$(printf %s "${POLL_BODY}" | openssl dgst -sha256 -hmac "${SHARED_SECRET}" -hex | awk '{print $2}')"

curl -sk -X POST "${API_BASE}/events/poll" \
  -H "Authorization: Bearer ${RECEIVER_TOKEN}" \
  -H "Content-Type: application/json" \
  -H "group-id: ${TENANT_DOMAIN}" \
  -H "subscription-id: ${SUBSCRIPTION_ID}" \
  -H "event-signature: ${POLL_SIGNATURE}" \
  -d "${POLL_BODY}"
$DeliveryId = "<delivery-id-from-step-4>"
$PollBody = '{"ack": ["' + $DeliveryId + '"], "maxEvents": 20}'
$Hmac = [System.Security.Cryptography.HMACSHA256]::new([Text.Encoding]::UTF8.GetBytes($env:SHARED_SECRET))
$PollSignature = 'sha256=' + [BitConverter]::ToString($Hmac.ComputeHash([Text.Encoding]::UTF8.GetBytes($PollBody))).Replace('-', '').ToLower()

Invoke-RestMethod -SkipCertificateCheck -Method Post -Uri "$env:API_BASE/events/poll" `
  -Headers @{
    Authorization     = "Bearer $env:RECEIVER_TOKEN"
    "group-id"        = $env:TENANT_DOMAIN
    "subscription-id" = $env:SUBSCRIPTION_ID
    "event-signature" = $PollSignature
  } `
  -ContentType "application/json" `
  -Body $PollBody | ConvertTo-Json -Depth 10
An acknowledged event isn't returned again, so with nothing else pending, the response comes back empty:
{"moreAvailable":false,"sets":{}}
If the receiver couldn't process an event, report it in setErrs instead of
ack. A delivery ID goes in one or the other, never both.
Step 6: Check the result in the portal
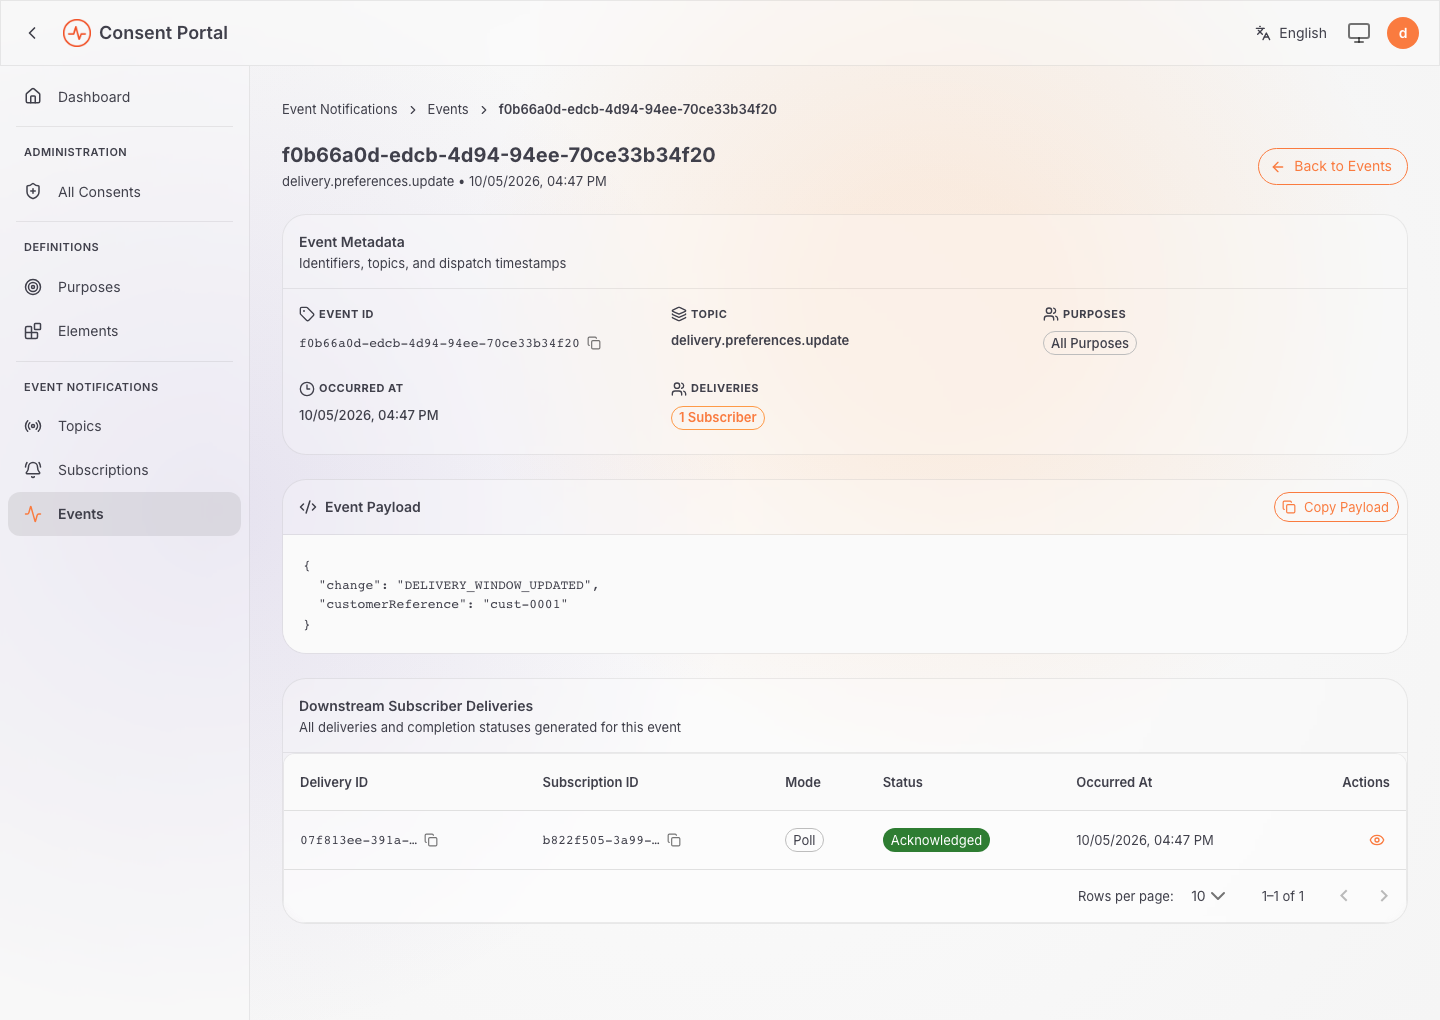
Back in the portal as the administrator, open Event Notifications →
Events and find the delivery.preferences.update event. Its delivery to the
poll subscription now shows Acknowledged:
When you're done, tidy up by deleting the subscription and deregistering the topic in the portal.
Expected result: the published event is queued for the poll subscription, the receiver picks it up on its first poll, and once it's acknowledged it no longer shows up in later polls. For the full request options, errors, and HMAC settings, see Register a poll subscription and Poll event deliveries.
Next Steps
- Learn: Event Notifications — the concepts and example behind these flows.
- Event Notification Guide — the full reference for topics, subscriptions, receivers, signatures, and troubleshooting.