Consent Management
The Consent Portal supports catalog administration, self-service consent review, authorization and revocation, tenant-wide administrative review, and consent history. It deliberately does not create consents: a connected application or the Consent Management API creates the consent before the Data Principal acts on it.
The curl examples below assume you already have an access token with the right scopes. See Managing Access for how to create an application, authorize it, and get a token.
Define a purpose and its data element
This flow shows how a Data Fiduciary can model why personal data is requested and which data element is involved.
Portal: Sign in as the portal administrator and use Elements and Purposes. The API examples show the requests made for the same operations.
Create an element
-
Sign in as the portal administrator.
-
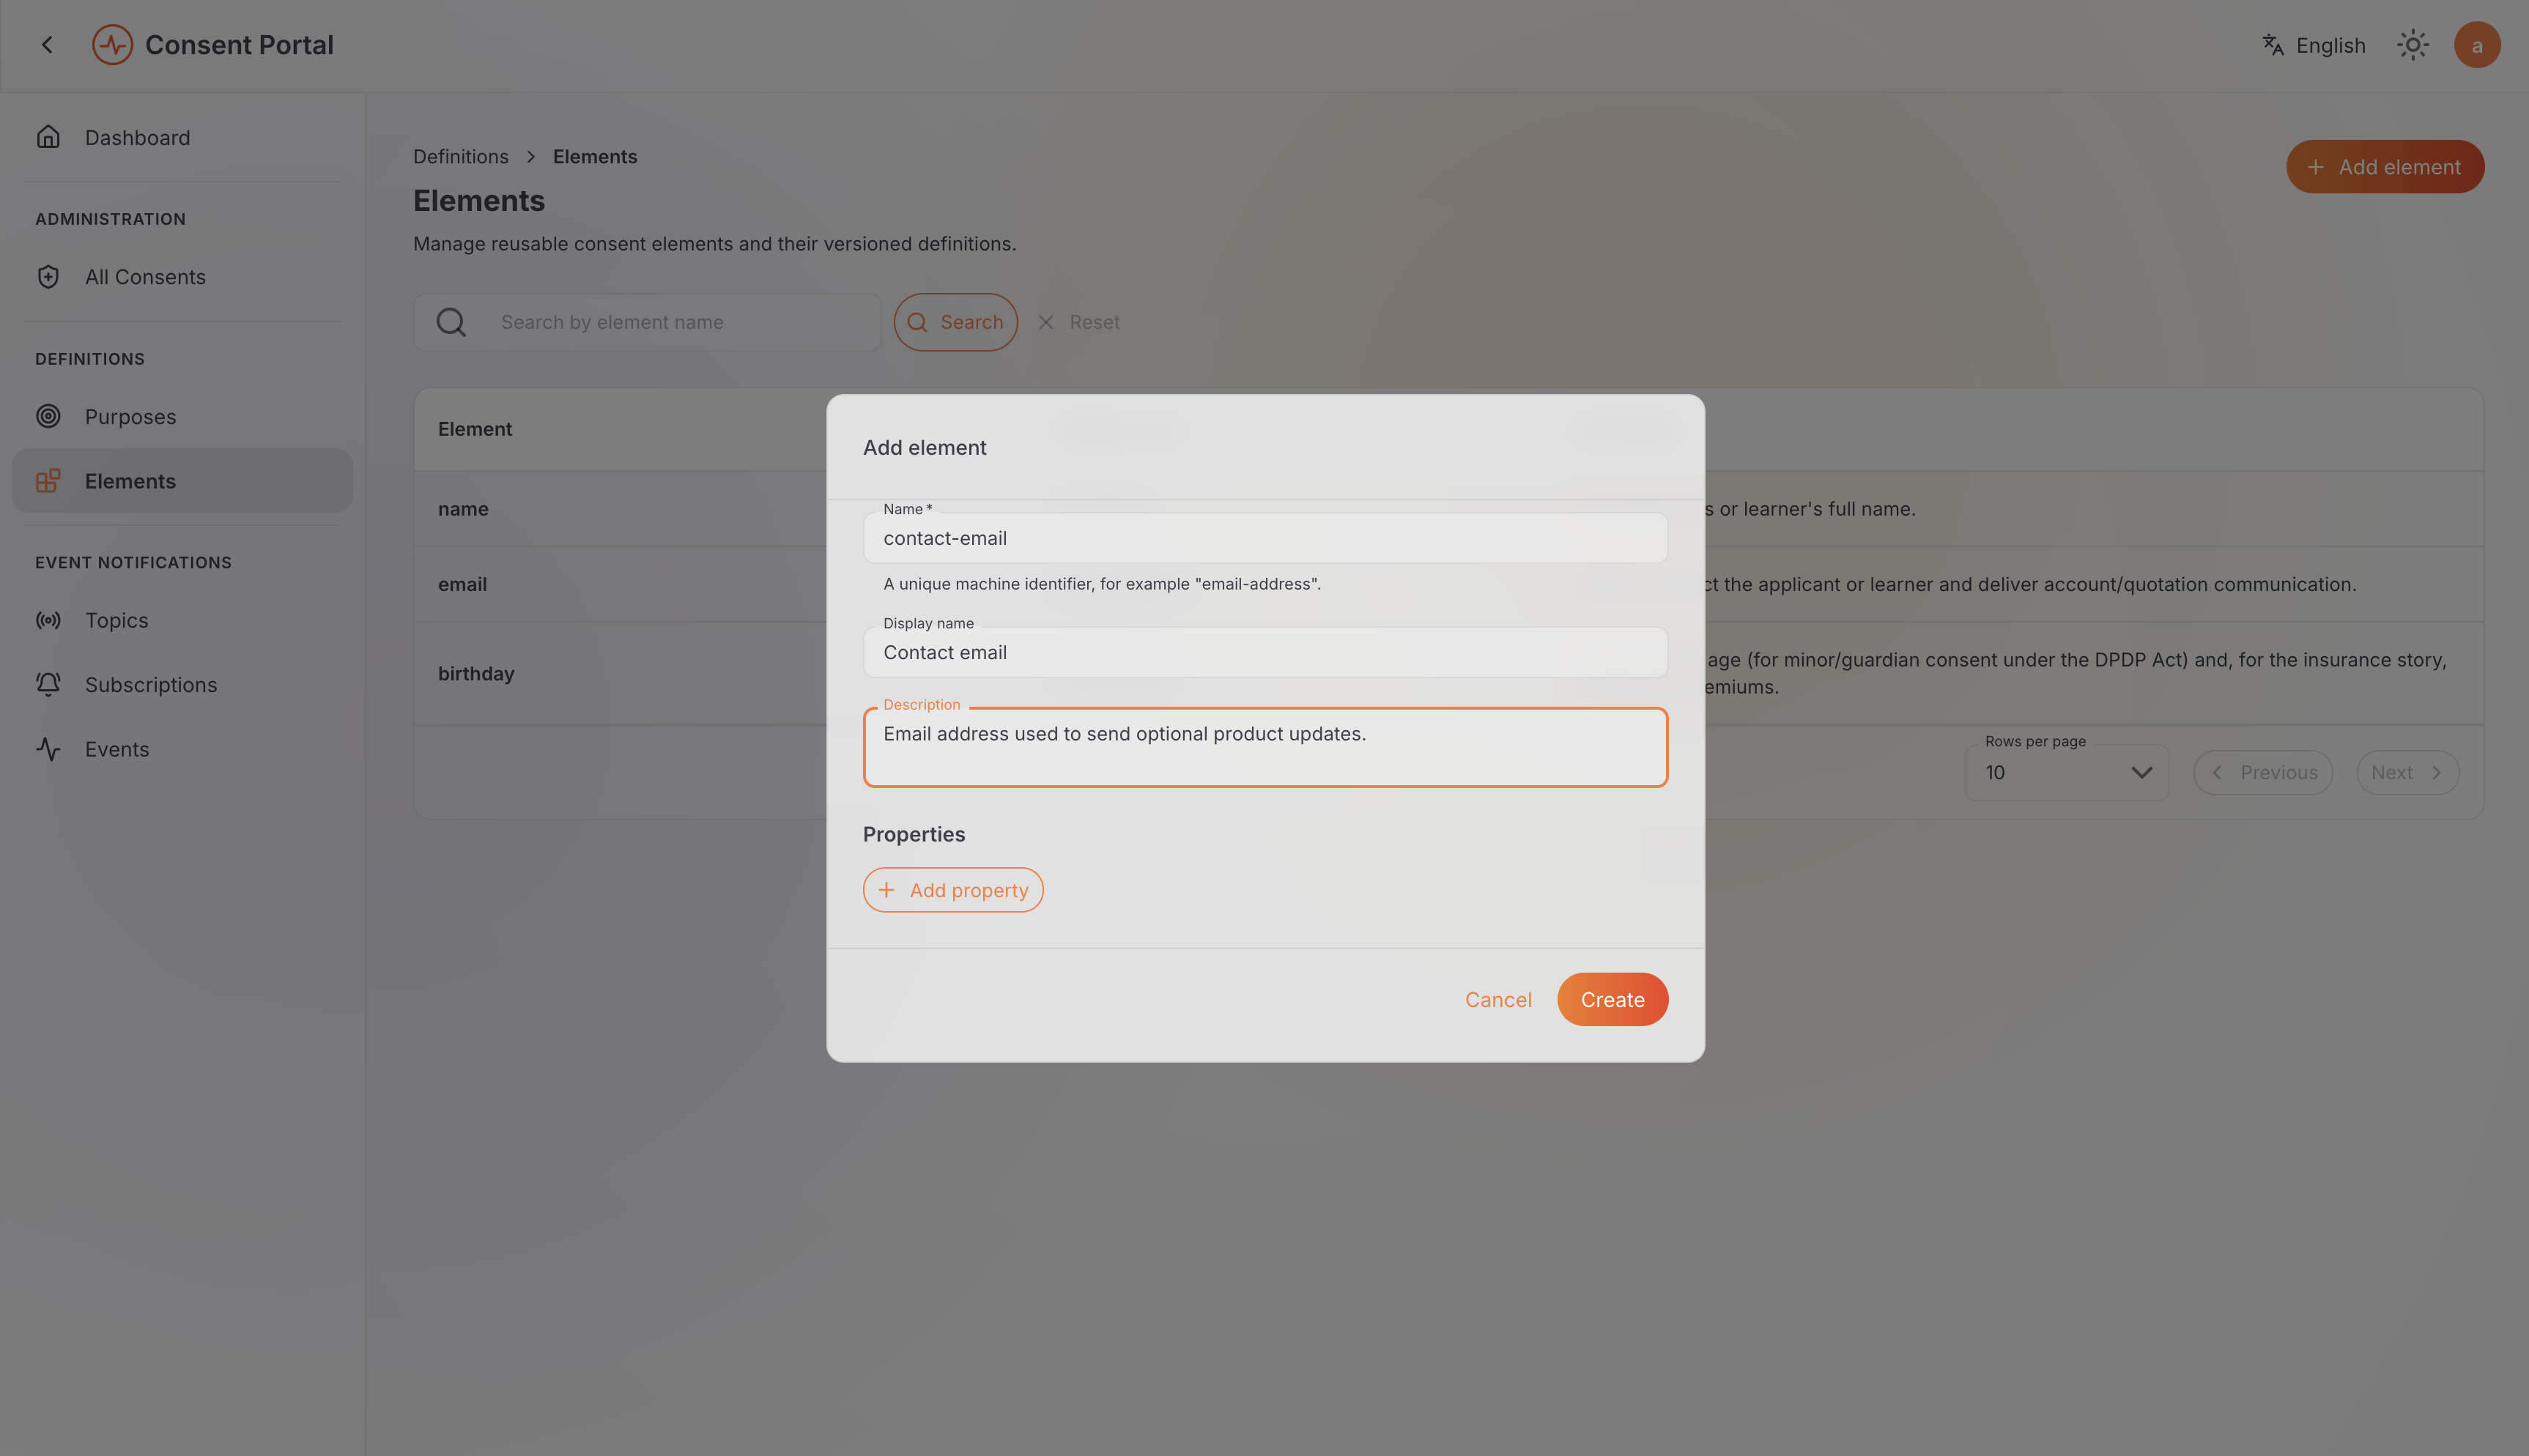
Open Elements and select Add Element.
-
Enter:
Field Example Name contact-emailDisplay name Contact emailDescription Email address used to send optional product updates. -
Select Create.
-
Open the resulting row and confirm its identifier, display name, description, and properties.
The equivalent request is (see Managing Access if you don't have an access token yet):
curl -X POST \
  "${BASE_URL}/api/identity/consent-mgt/v2.0/elements" \
  -H "Authorization: Bearer ${ACCESS_TOKEN}" \
  -H "Content-Type: application/json" \
  -d '{
    "name": "contact-email",
    "displayName": "Contact email",
    "description": "Email address used to send optional product updates."
  }'
Representative response:
{
  "id": "b9dd5f0d-4981-4d56-86b6-65b5d8d32e24",
  "name": "contact-email",
  "displayName": "Contact email",
  "description": "Email address used to send optional product updates."
}
Create a purpose
-
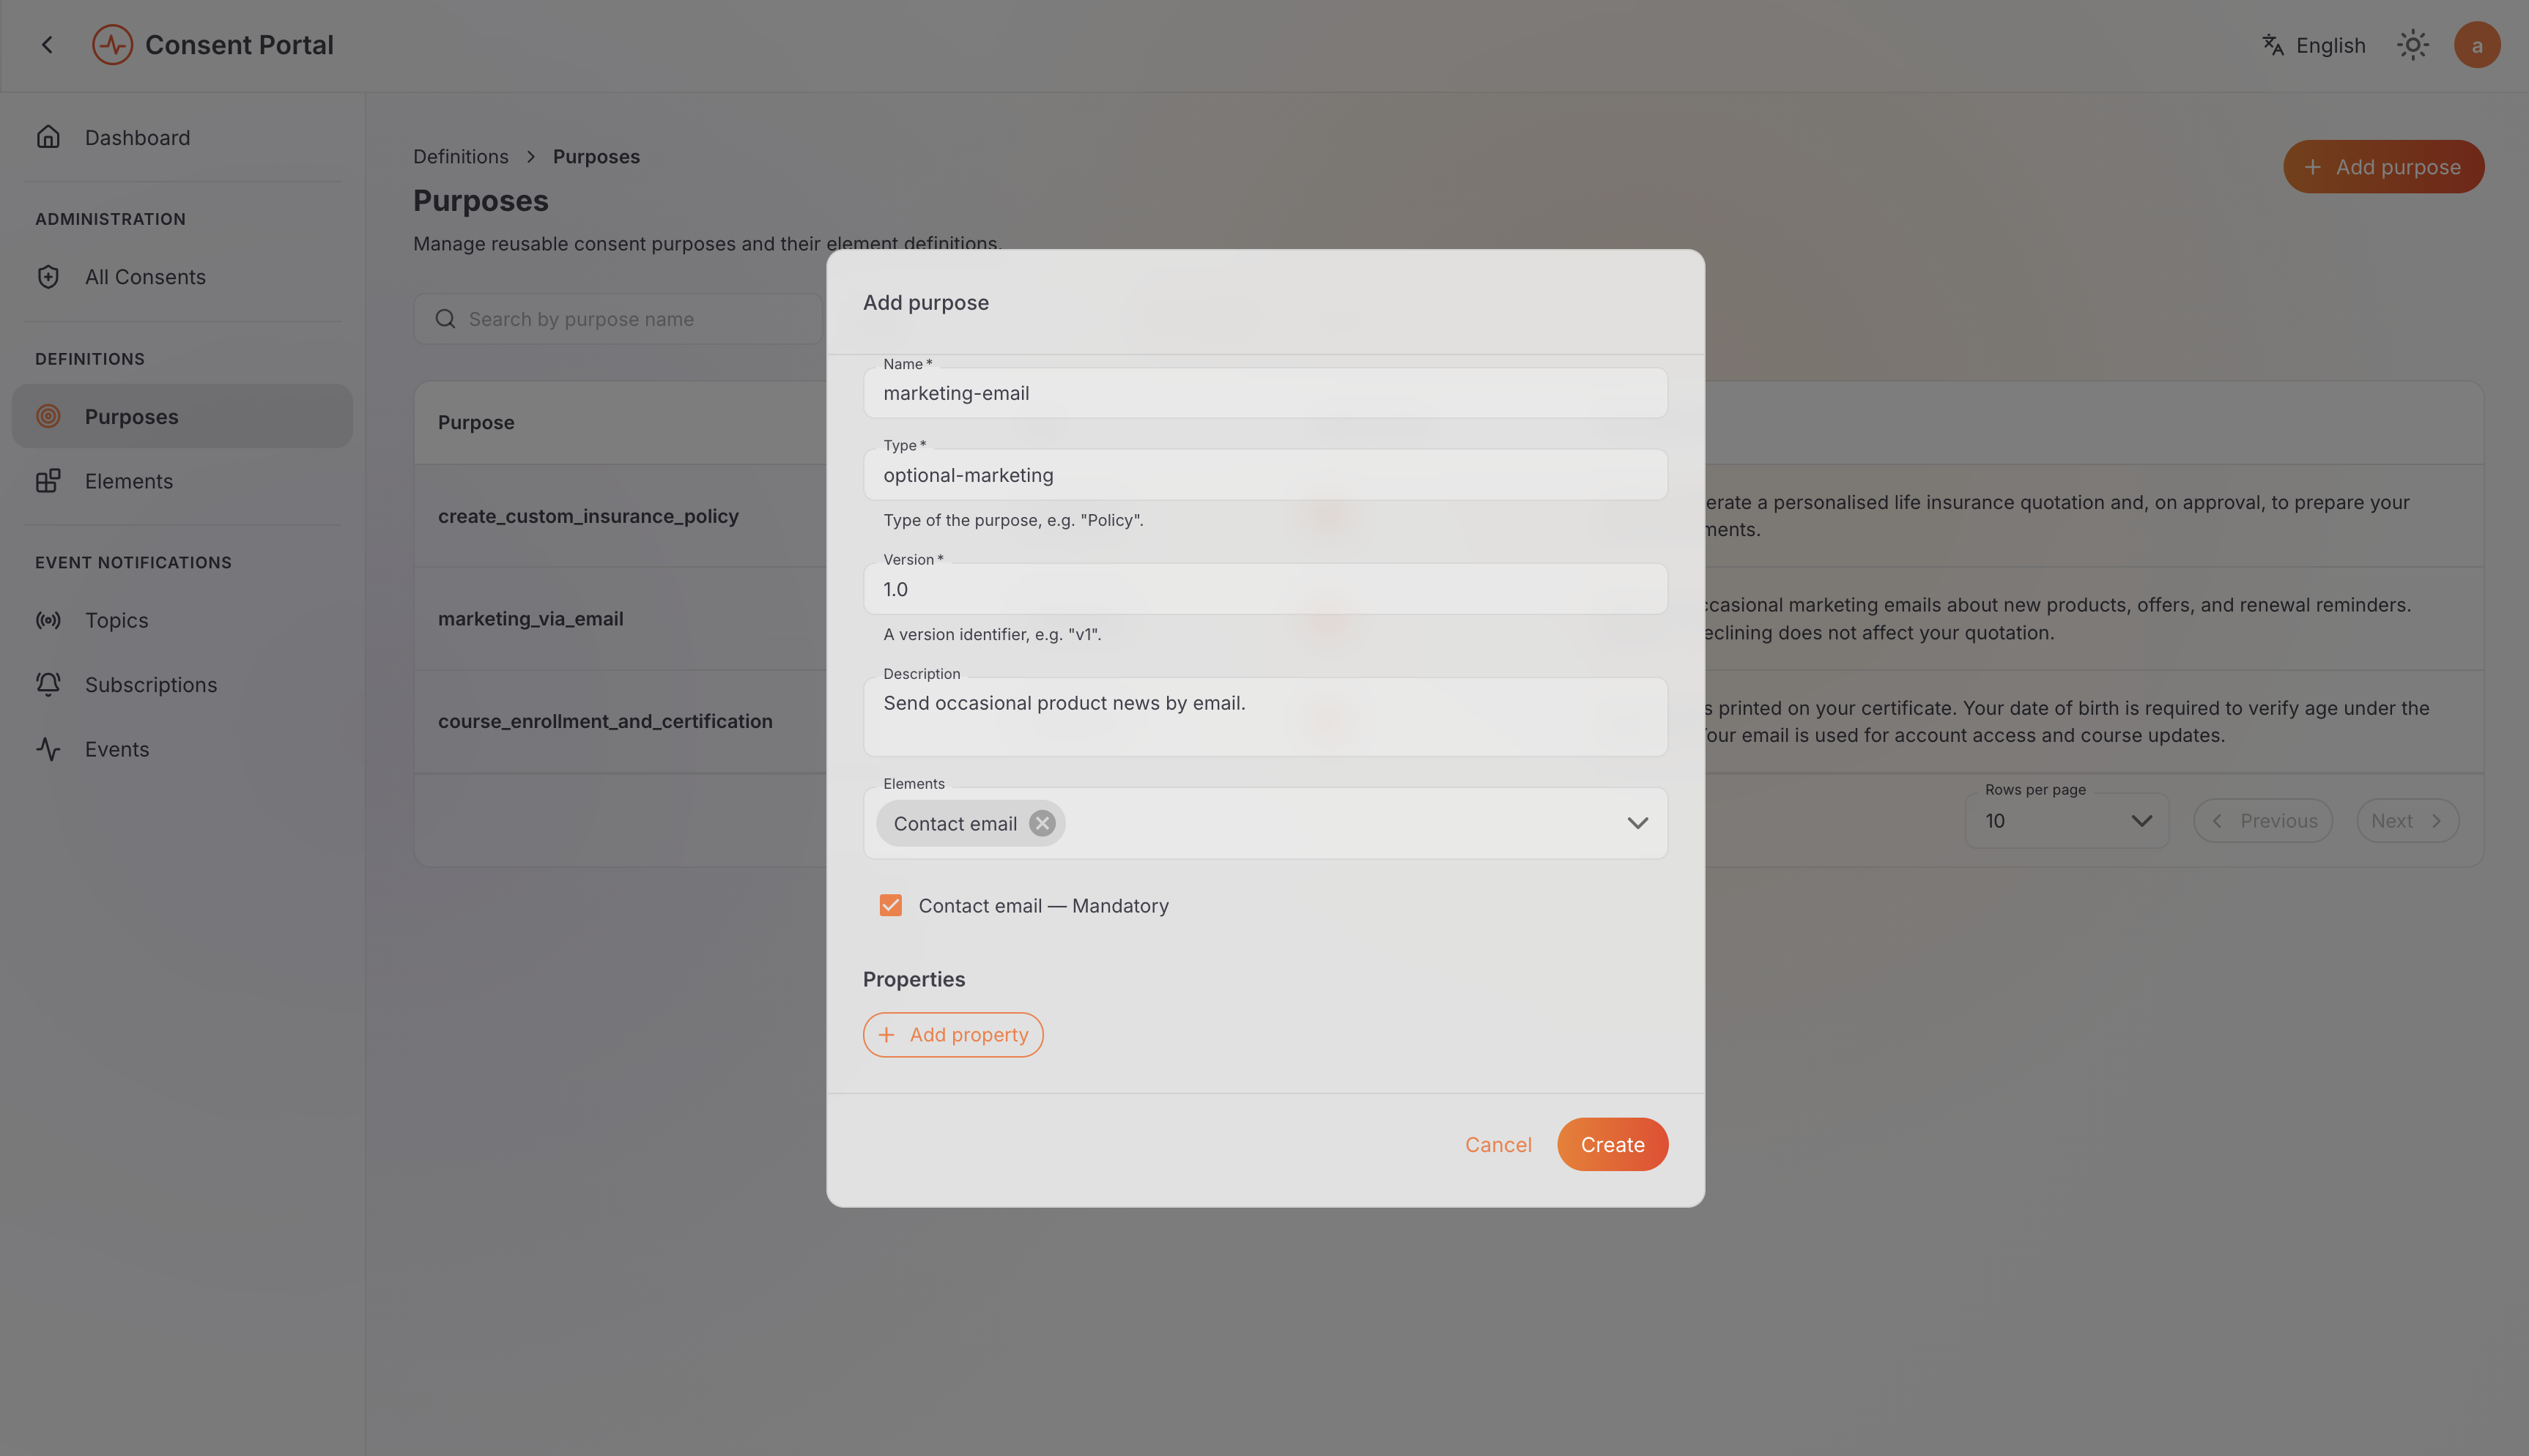
Open Purposes and select Add Purpose.
-
Enter:
Field Example Name marketing-emailType optional-marketingVersion 1.0Description Send occasional product news by email. -
In the element selector, add
contact-emailand choose whether it is mandatory for this purpose. -
Select Create.
-
Open the purpose and verify that version
1.0references the expected element.
Replace <element-id> with the id returned above. The equivalent request is:
curl -X POST \
  "${BASE_URL}/api/identity/consent-mgt/v2.0/purposes" \
  -H "Authorization: Bearer ${ACCESS_TOKEN}" \
  -H "Content-Type: application/json" \
  -d '{
    "name": "marketing-email",
    "type": "optional-marketing",
    "version": "1.0",
    "description": "Send occasional product news by email.",
    "elements": [
      {
        "id": "<element-id>",
        "mandatory": false
      }
    ]
  }'
Representative response:
{
  "id": "d223f77a-54ed-4099-99b2-9900795483ae",
  "name": "marketing-email",
  "description": "Send occasional product news by email.",
  "type": "optional-marketing",
  "latestVersion": {
    "id": "787c0c69-7a84-4a62-b5f1-3706ce818d72",
    "version": "1.0"
  },
  "elements": [
    {
      "id": "<element-id>",
      "name": "contact-email",
      "displayName": "Contact email",
      "mandatory": false
    }
  ]
}
Expected result: the purpose and element appear in the tenant's catalog and can be used by a connected application when it creates a consent.
The portal does not contain an Add Consent action. A consent is created by an application through WSO2 Identity Server's Consent Management v2 API or as part of its consent journey. The automatically provisioned DPDP Consent API Invoker application supports machine-to-machine access to the consents resource; see Consent API Invoker provisioning.
Review, authorize, revoke, and audit a consent
This flow requires a consent created for the Data Principal by a connected application or the Consent Management v2 API. Use a disposable consent because approval, rejection, and revocation change its state.
Portal: The Data Principal performs the self-service actions under Pending Consents and All Consents. An authorizer named on someone else's consent acts from their own My Consents, filtered to Managed. The administrator uses Administration → Consents. Creating the prerequisite consent is not a portal operation.
Create the consent using the Consent API Invoker's client-credentials token.
This is a Direct Consent — no named authorizers — so it starts ACTIVE
immediately, since Priya is consenting for herself:
curl -X POST \
  "${BASE_URL}/api/identity/consent-mgt/v2.0/consents" \
  -H "Authorization: Bearer ${ACCESS_TOKEN}" \
  -H "Content-Type: application/json" \
  -d '{
    "subjectId": "priya@example.com",
    "serviceId": "CarePulse-client",
    "purposes": [
      {
        "id": "<marketing-email-purpose-id>",
        "elements": [
          { "id": "<contact-email-element-id>" }
        ]
      }
    ],
    "language": "en",
    "expiryTime": 1990411096000,
    "authorizations": [],
    "properties": {}
  }'
See Authorize consent as a guardian or delegate below for a consent that instead names someone else as the authorizer.
Act on your own consent (Direct Consent)
- Sign in as the Data Principal.
- Open All Consents and select the Direct Consent created above.
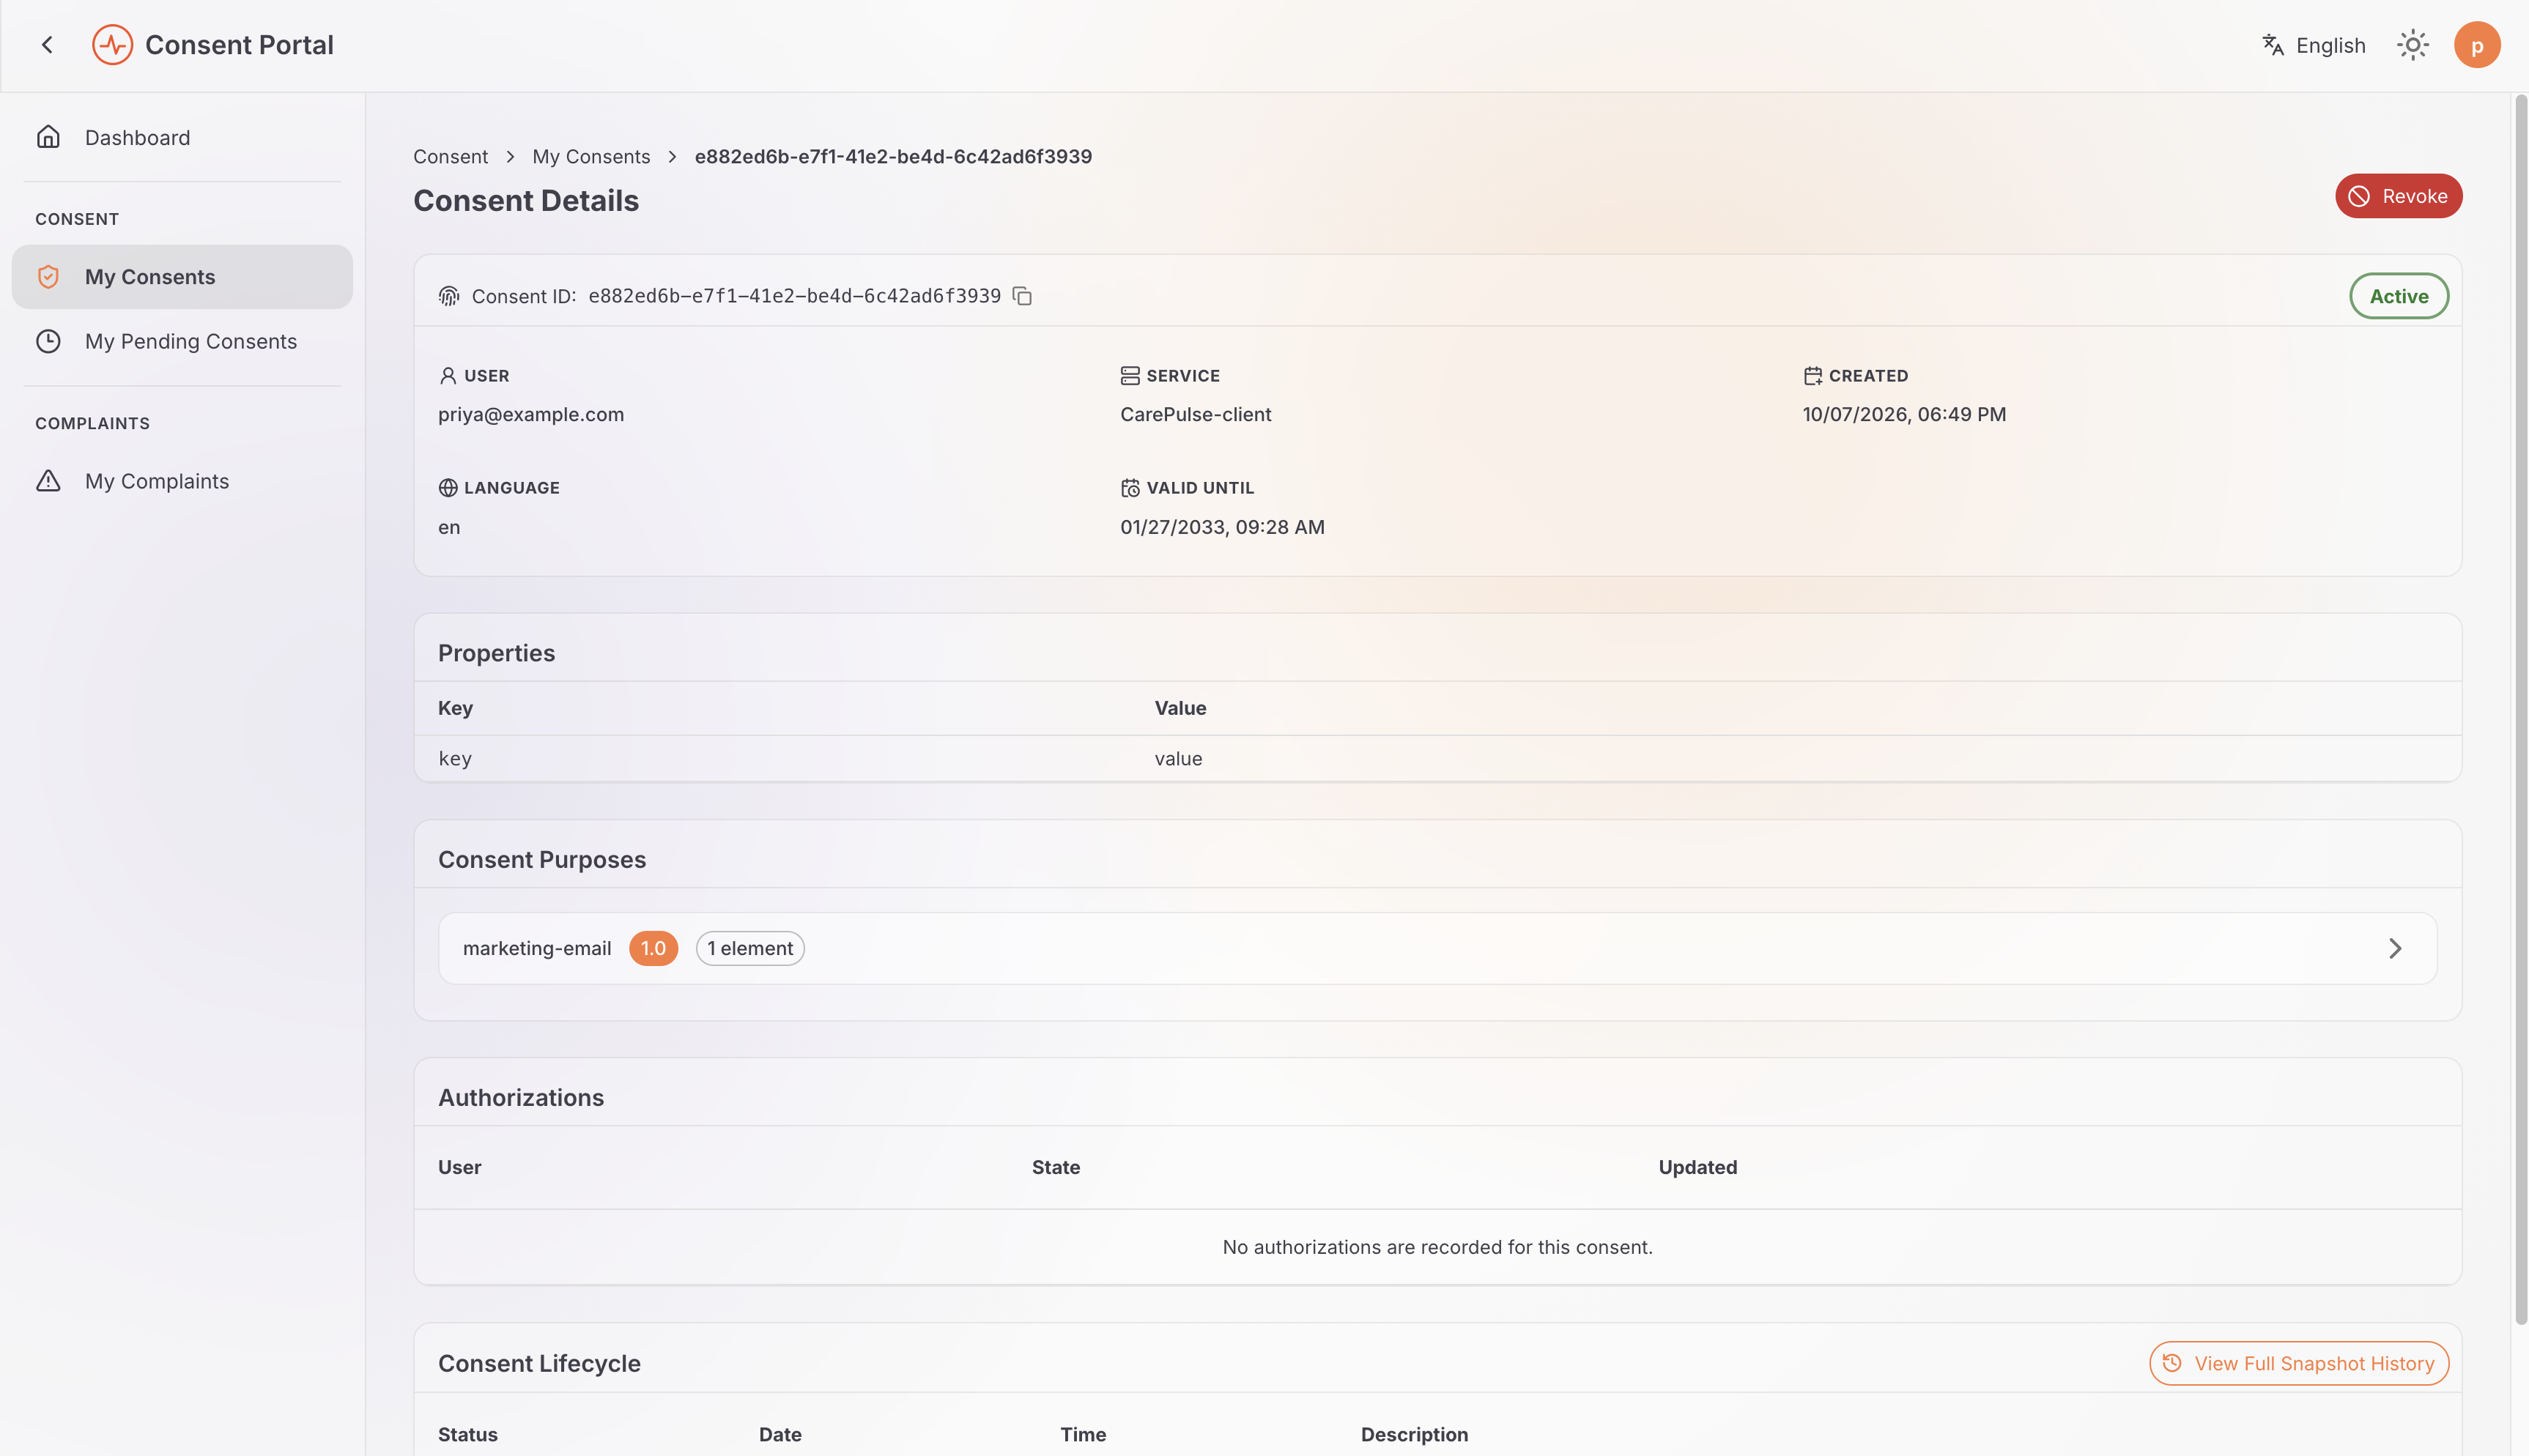
- Review its metadata, properties, purposes, and data elements. An empty authorizations table confirms it's a Direct Consent — no one else needed to approve it.
- In Consent Lifecycle, confirm that the status timeline records its creation.
- Select Revoke and confirm the action.
The equivalent API calls:
curl \
  "${BASE_URL}/api/users/v1/me/consents/<consent-id>" \
  -H "Authorization: Bearer ${ACCESS_TOKEN}"
curl -X POST \
  "${BASE_URL}/api/users/v1/me/consents/<consent-id>/revoke" \
  -H "Authorization: Bearer ${ACCESS_TOKEN}"
Revocation has no request or response body. Expected result: the consent
shows REVOKED, and the lifecycle section contains the corresponding audit
entry. With lifecycle event publication enabled, a supported revocation
lifecycle path publishes consent.revoke.
Inspect the same consent as an administrator
- Sign in as the portal administrator.
- Open Administration → Consents.
- Filter by consent ID, user, state, service, purpose, or the available advanced filters.
- Open the consent and compare the tenant-wide administrative view with the Data Principal's view.
The self-service view only returns consents involving the signed-in user. The administrative registry is tenant-wide and requires the administrative consent scopes.
To verify the lifecycle audit independently of the UI:
curl \
  "${BASE_URL}/api/dpdp/consent-mgt/v1/consents/<consent-id>/status-history?limit=100&offset=0" \
  -H "Authorization: Bearer ${ACCESS_TOKEN}"
Representative response after revocation:
{
  "consentId": "81c6dcb8-3df9-4b15-a43e-50f253792dbe",
  "statusHistory": [
    {
      "previousStatus": "ACTIVE",
      "currentStatus": "REVOKED",
      "actionType": "REVOKE",
      "actionBy": "priya@example.com",
      "actionTime": 1788230520000
    }
  ],
  "pagination": {
    "limit": 100,
    "offset": 0,
    "totalCount": 1
  }
}
Authorize consent as a guardian or delegate
A Delegated Consent names someone other than the data subject as the authorizer — the subject is not asked to decide, only notified. This is the pattern behind the parent-managed child-account use case described in the DPDP solution design, but the API itself only stores a subject and one or more separate authorizers; it does not establish that a person is actually a parent, lawful guardian, or other representative. A trusted Data Fiduciary system must verify that relationship before creating the delegated authorization.

Portal: The authorizer uses My Pending Consents and can filter My Consents by Managed. The data subject can filter the same page by Personal, where they'll see the consent explained as waiting on someone else, with no action available. A connected application creates the prerequisite consent using the Consent Management API — the portal has no Add Consent action. The purposes and elements it references, though, can be created either through the portal admin UI (see Define a purpose and its data element above) or directly via the REST API shown there.
Create a delegated consent
In this example, Priya and her spouse Raj are enrolling in a shared family health plan: CarePulse names Raj as the sole authorizer on Priya's consent, so he must approve it on her behalf.
- Create disposable user accounts for the data subject and the authorizer in the same tenant, and verify their relationship in the trusted system used for this test — the Consent Management API does not perform this verification.
- Obtain a client-credentials token for the automatically provisioned DPDP Consent API Invoker application.
- Use the purpose and element identifiers from
Define a purpose and its data element
to create a consent whose
subjectIdis Priya and whoseauthorizationslist contains Raj. - Retain the returned consent ID.
curl -X POST \
  "${BASE_URL}/api/identity/consent-mgt/v2.0/consents" \
  -H "Authorization: Bearer ${ACCESS_TOKEN}" \
  -H "Content-Type: application/json" \
  -d '{
    "subjectId": "priya@example.com",
    "serviceId": "CarePulse-client",
    "purposes": [
      {
        "id": "<marketing-email-purpose-id>",
        "elements": [
          { "id": "<contact-email-element-id>" }
        ]
      }
    ],
    "language": "en",
    "expiryTime": 1990411096000,
    "authorizations": [
      { "userId": "raj@example.com", "type": "USER" }
    ],
    "properties": {}
  }'
Do not send the data subject as another authorization entry. subjectId
already identifies the person whose data the consent concerns; the
authorizations array contains the other users who must decide on that
person's behalf. When at least one authorization is supplied, Identity Server
stores the new consent as PENDING even if the request omits state or sends
the normal ACTIVE default.
Observe as the data subject
-
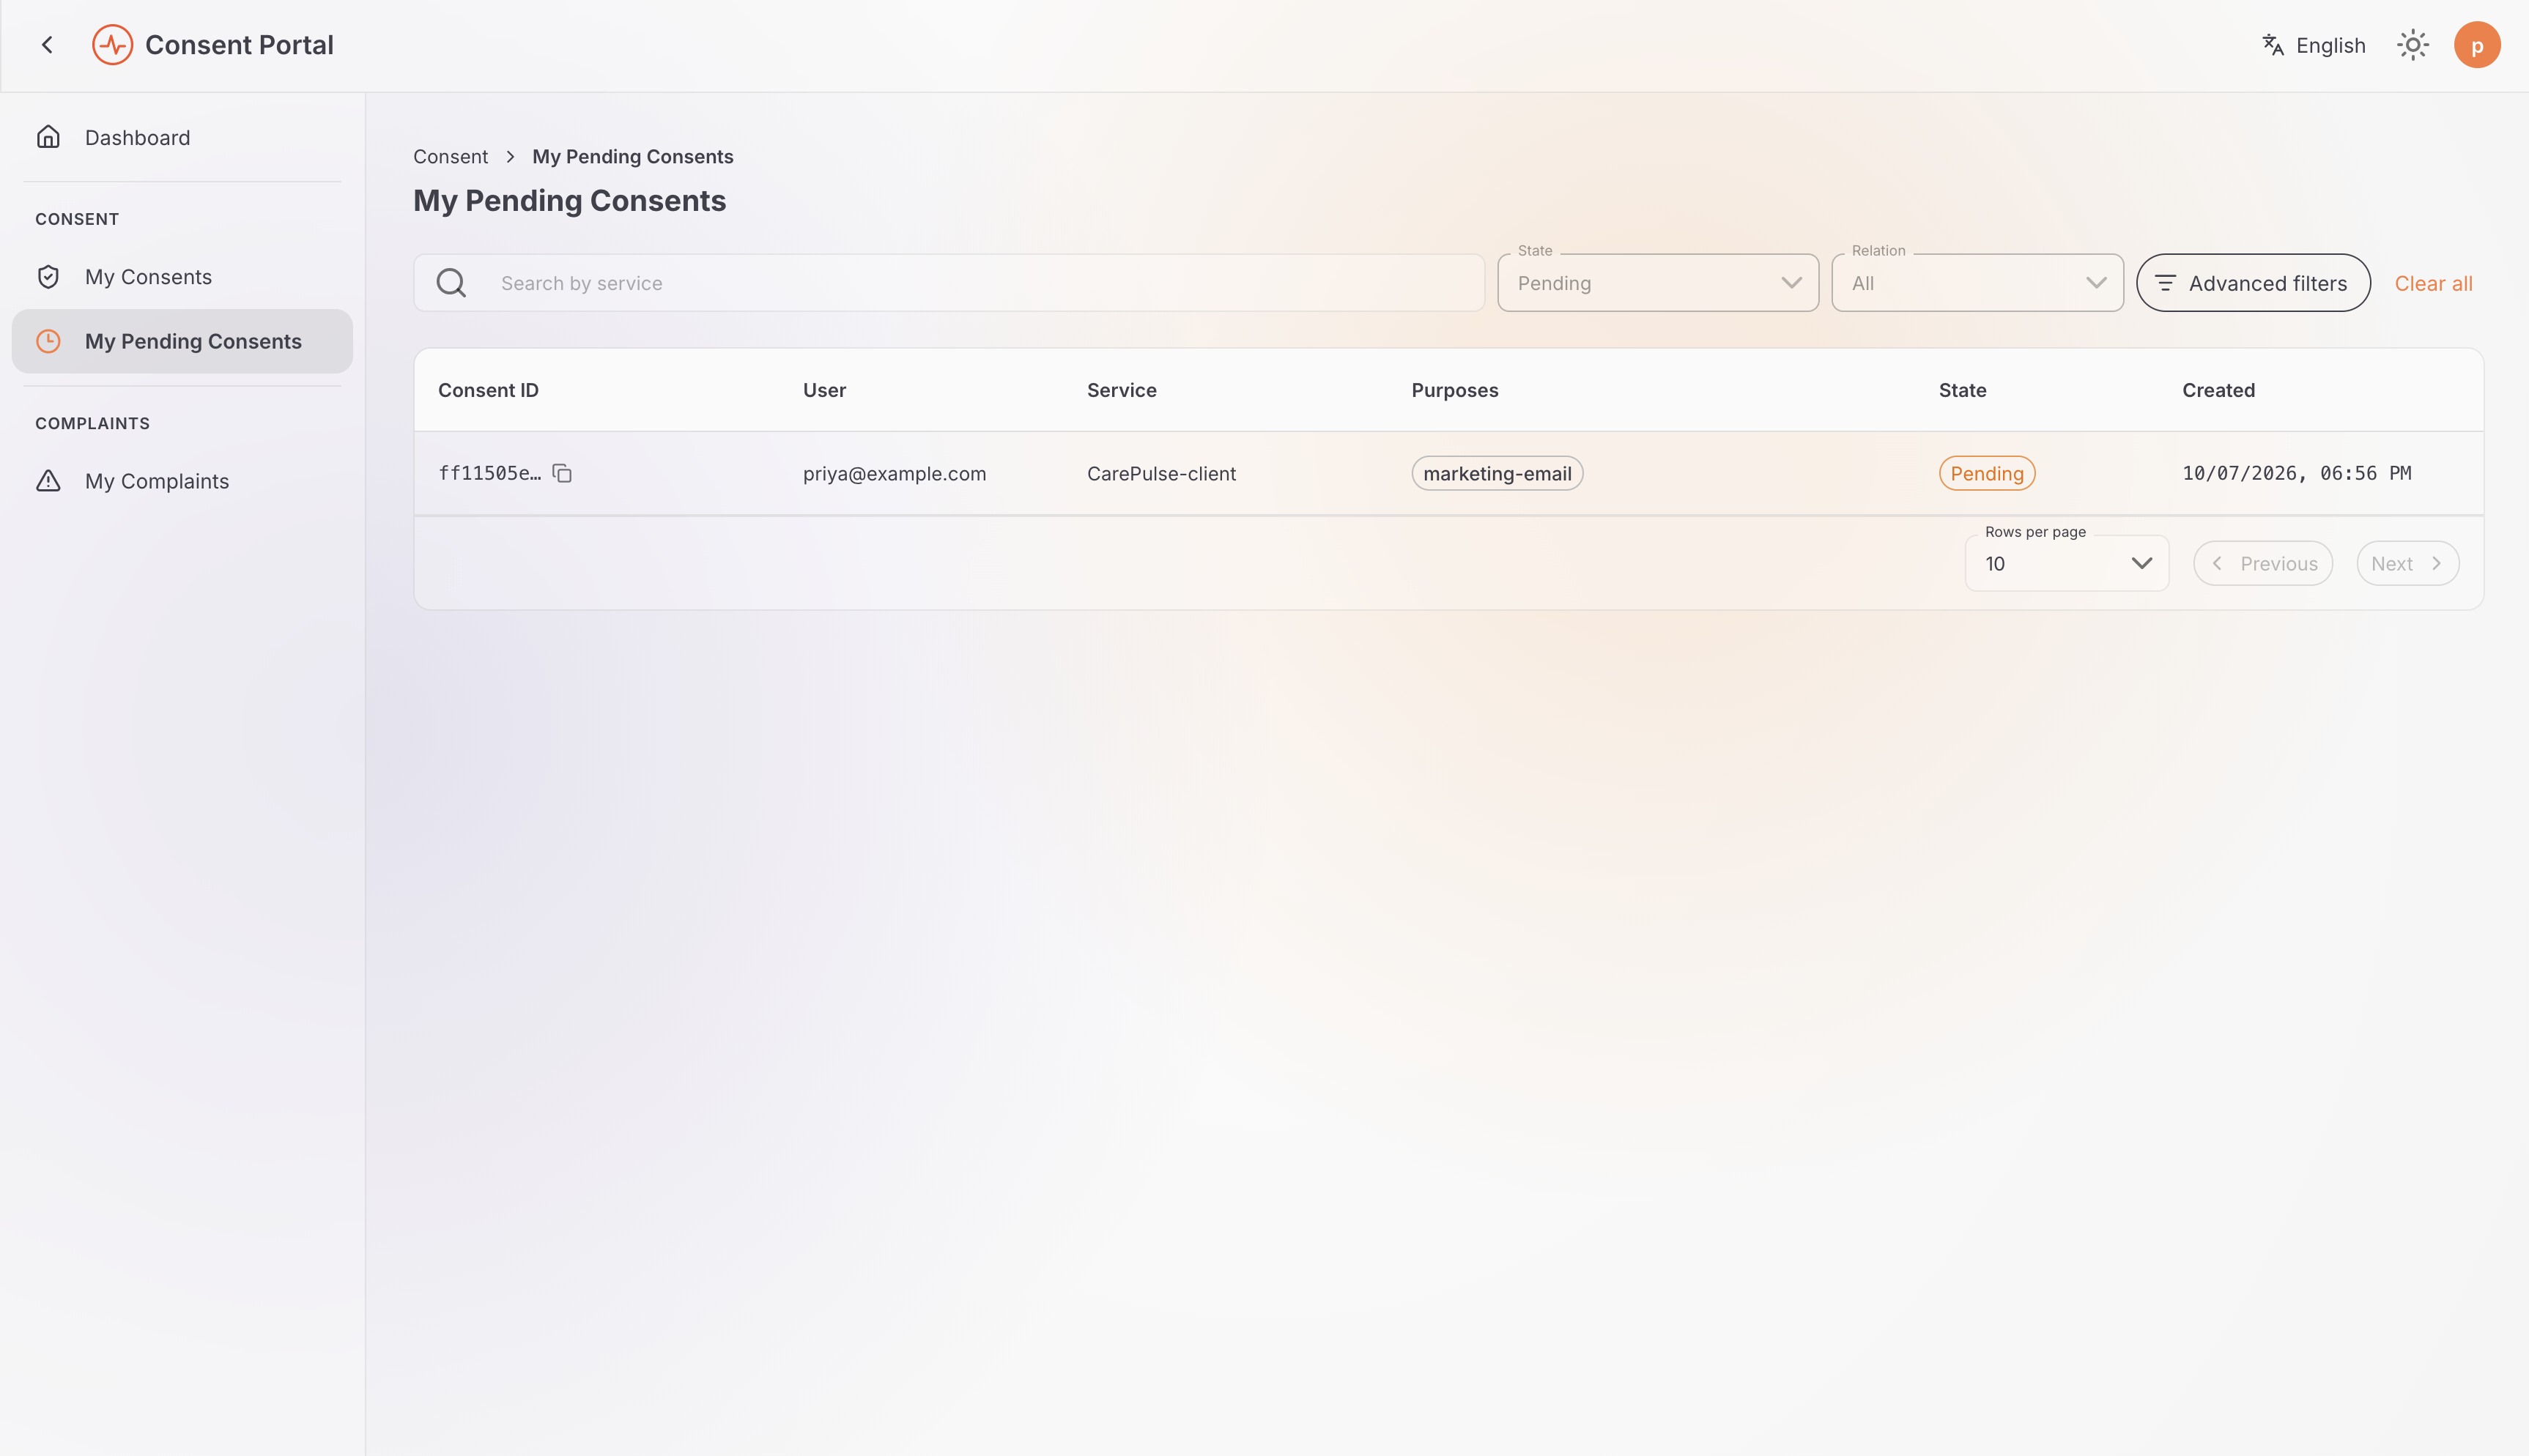
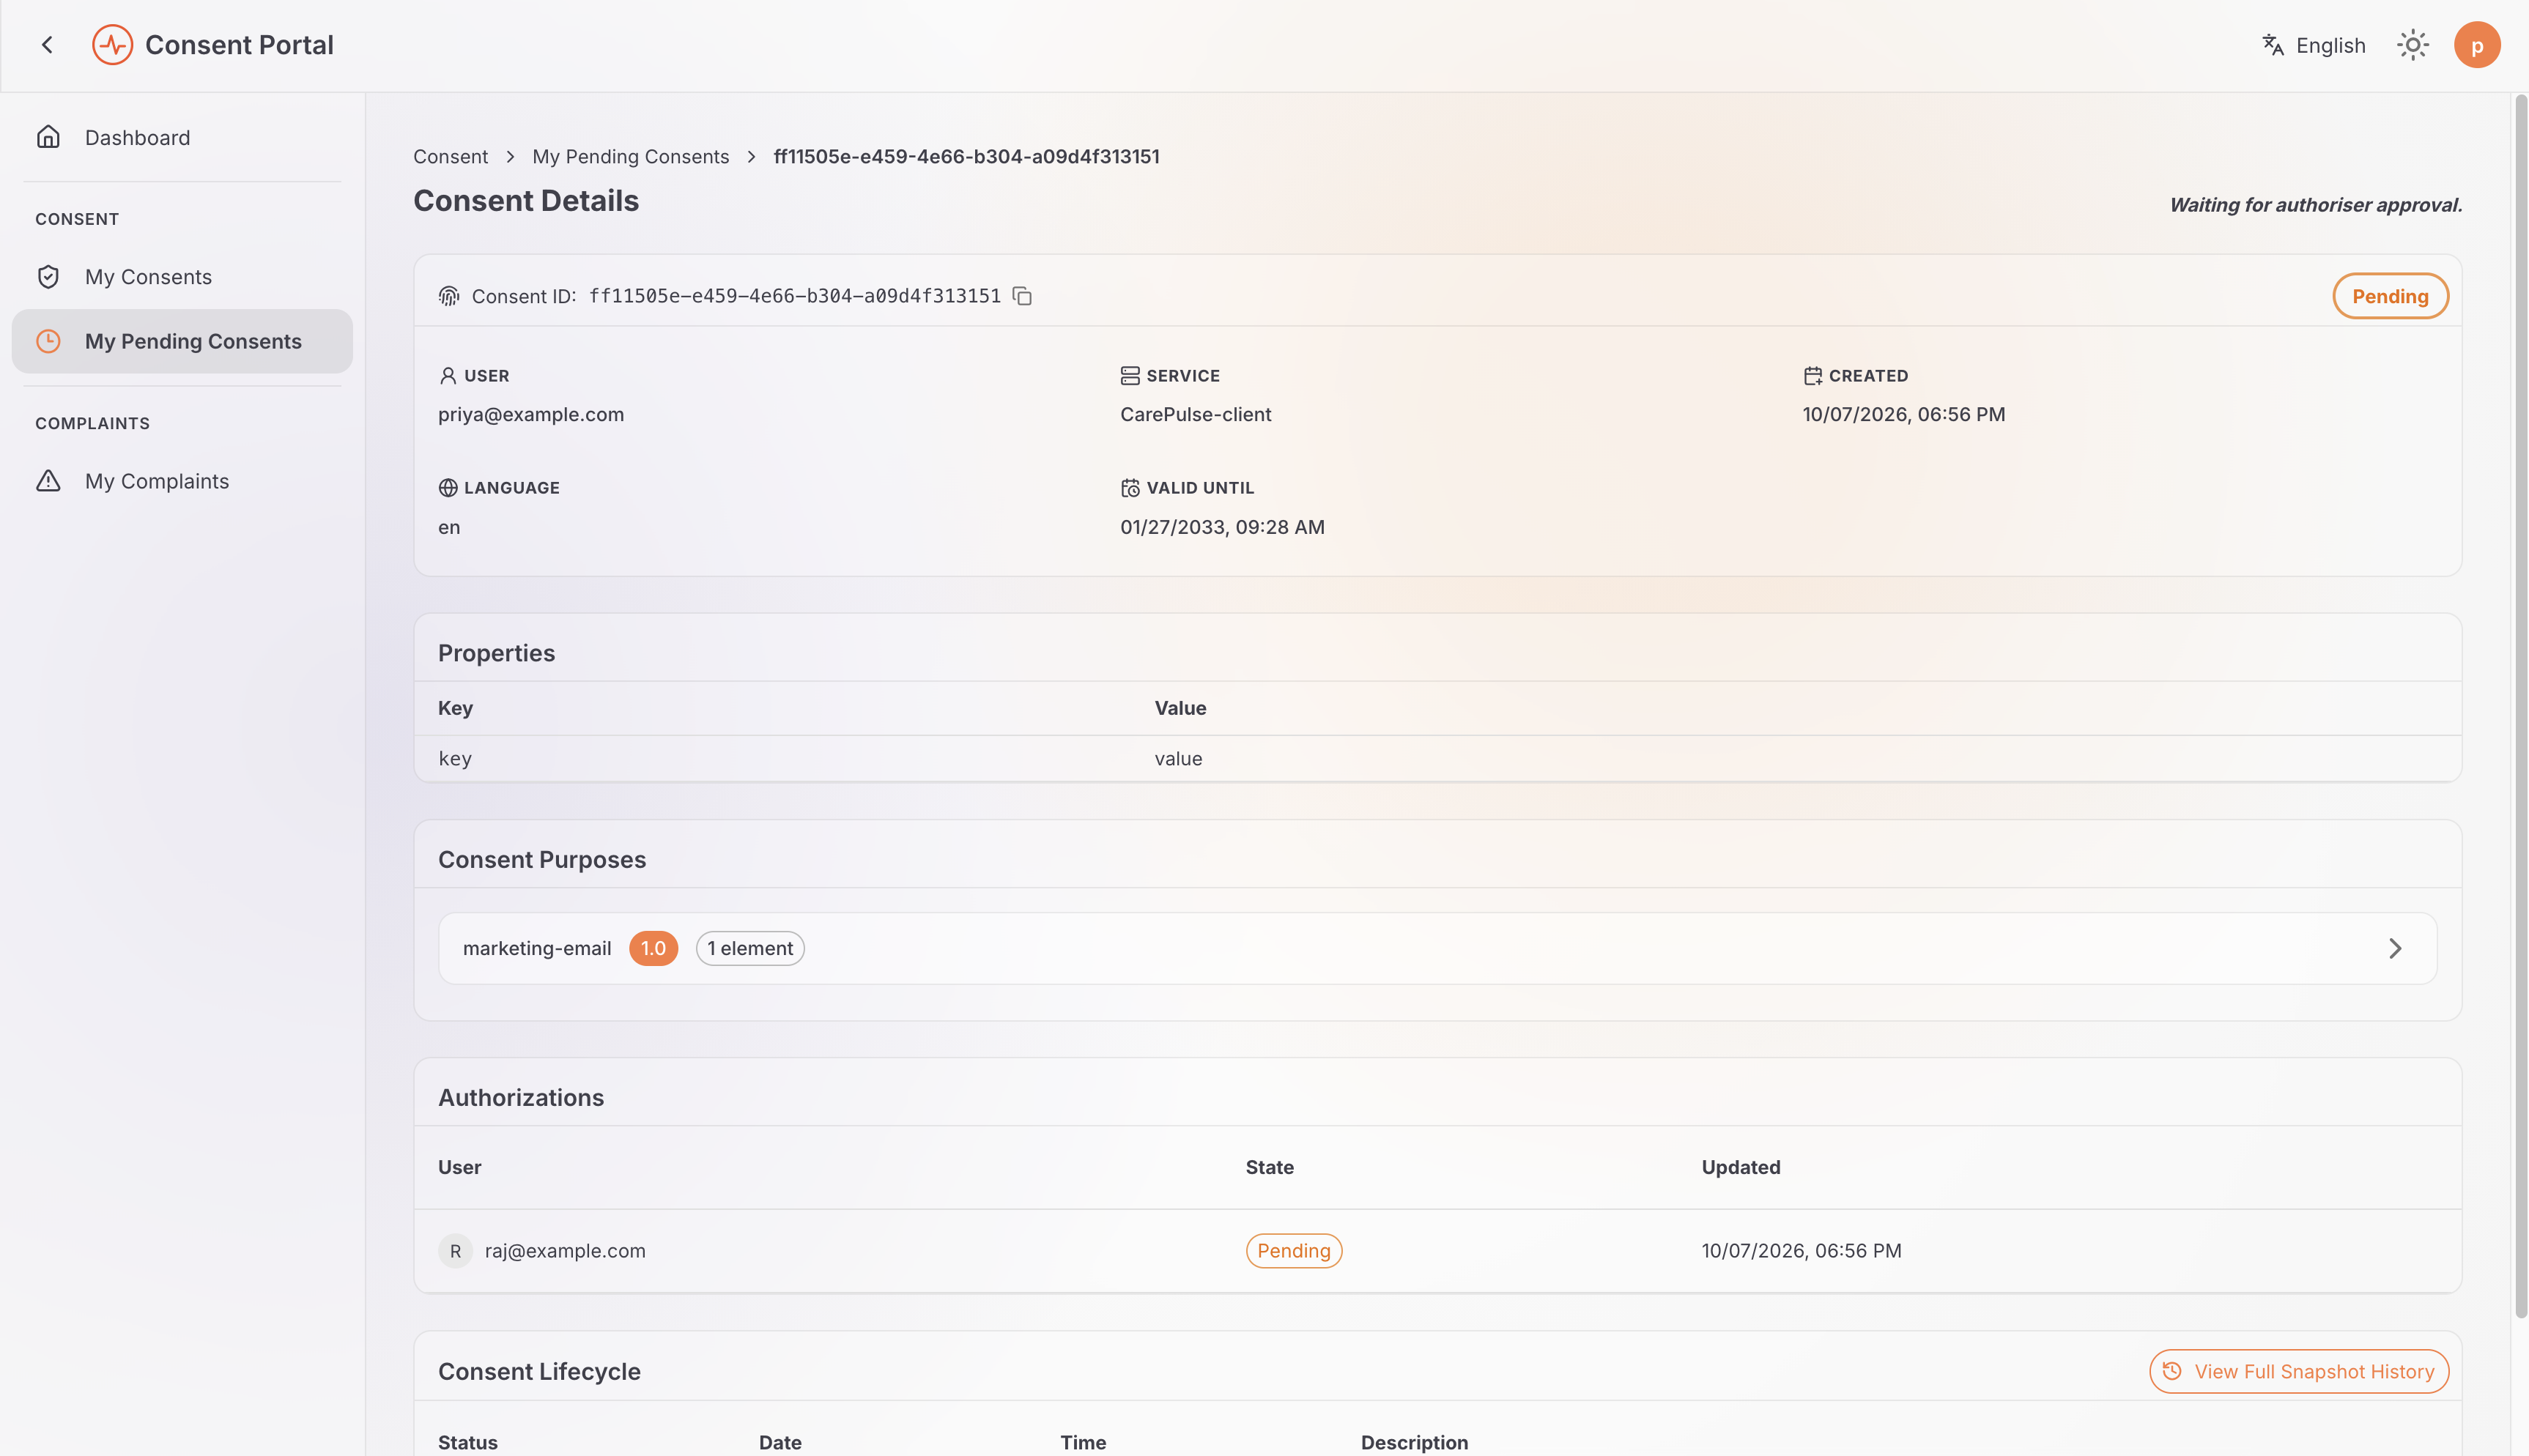
Sign in as Priya and open Pending Consents.
-
Open the consent. Because Priya is not a named authorizer, the page explains that it's waiting for authoriser approval instead of showing Approve/Reject actions.
Approve as the guardian or delegate
-
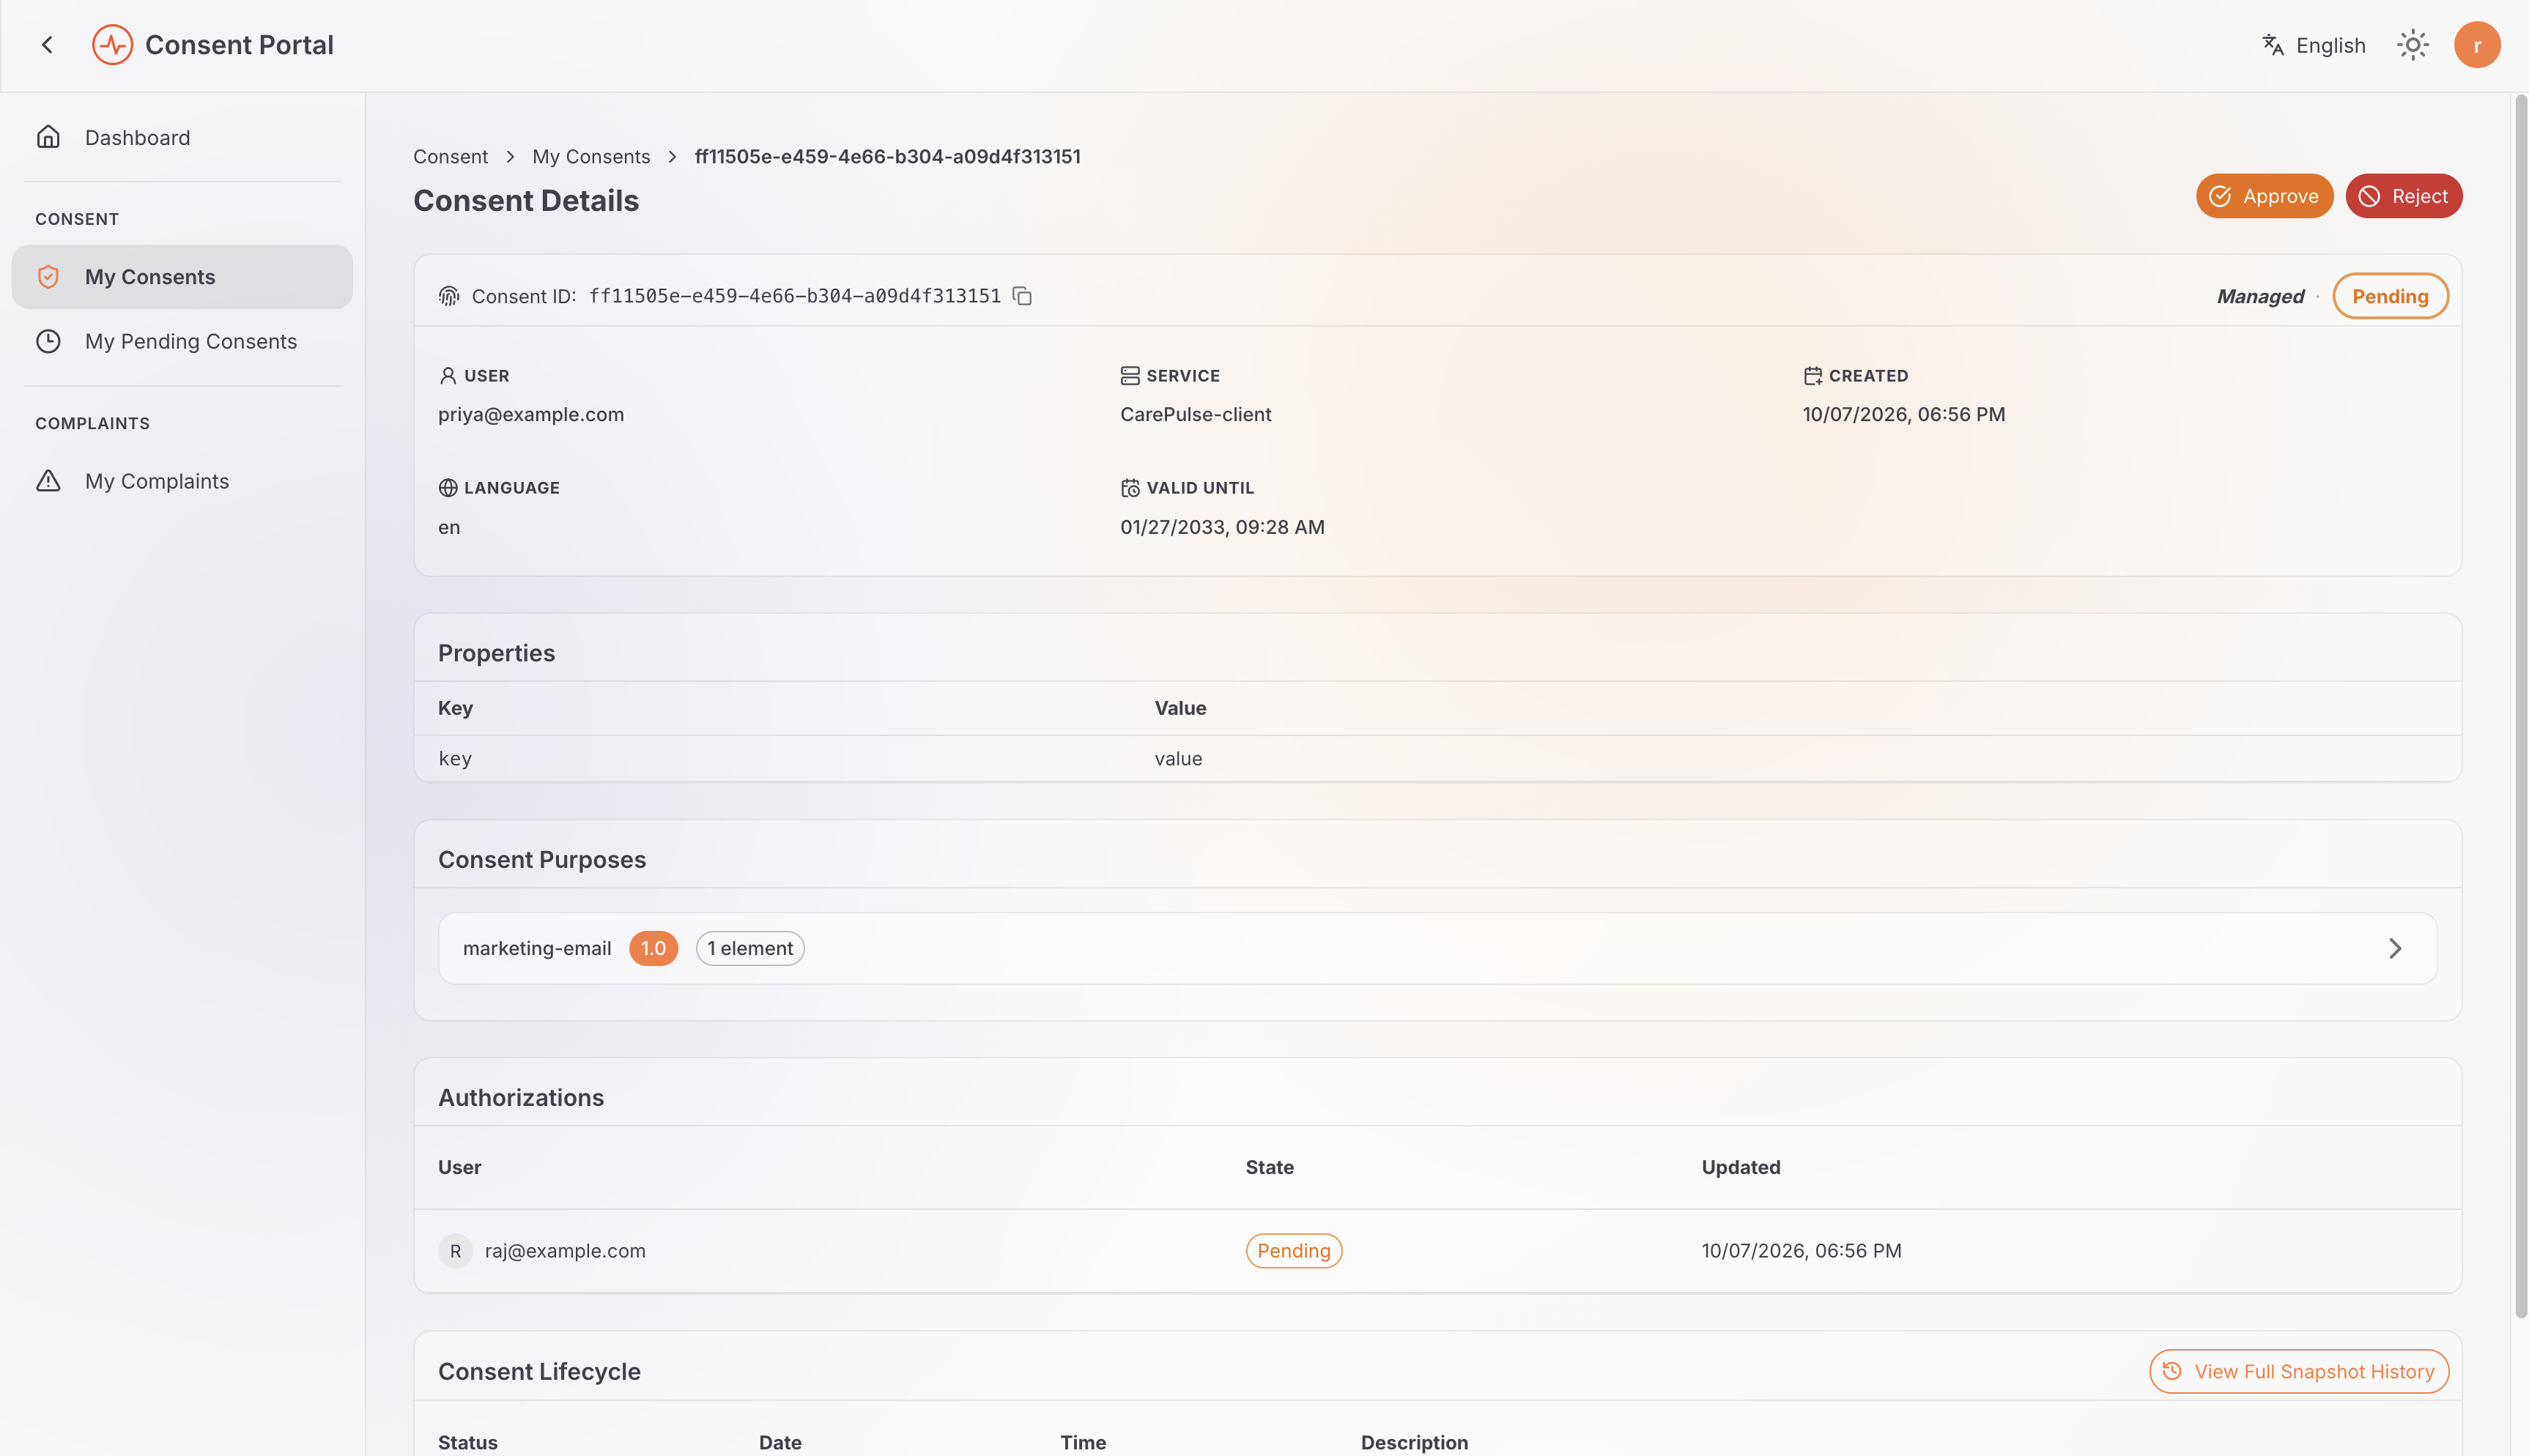
Sign in as Raj (the authorizer) and open the same consent from My Consents, filtered to Managed. Alternatively, open My Pending Consents.
-
Confirm the data subject, service, purposes, elements, and authorization entry. Raj sees Approve/Reject actions that Priya does not.
-
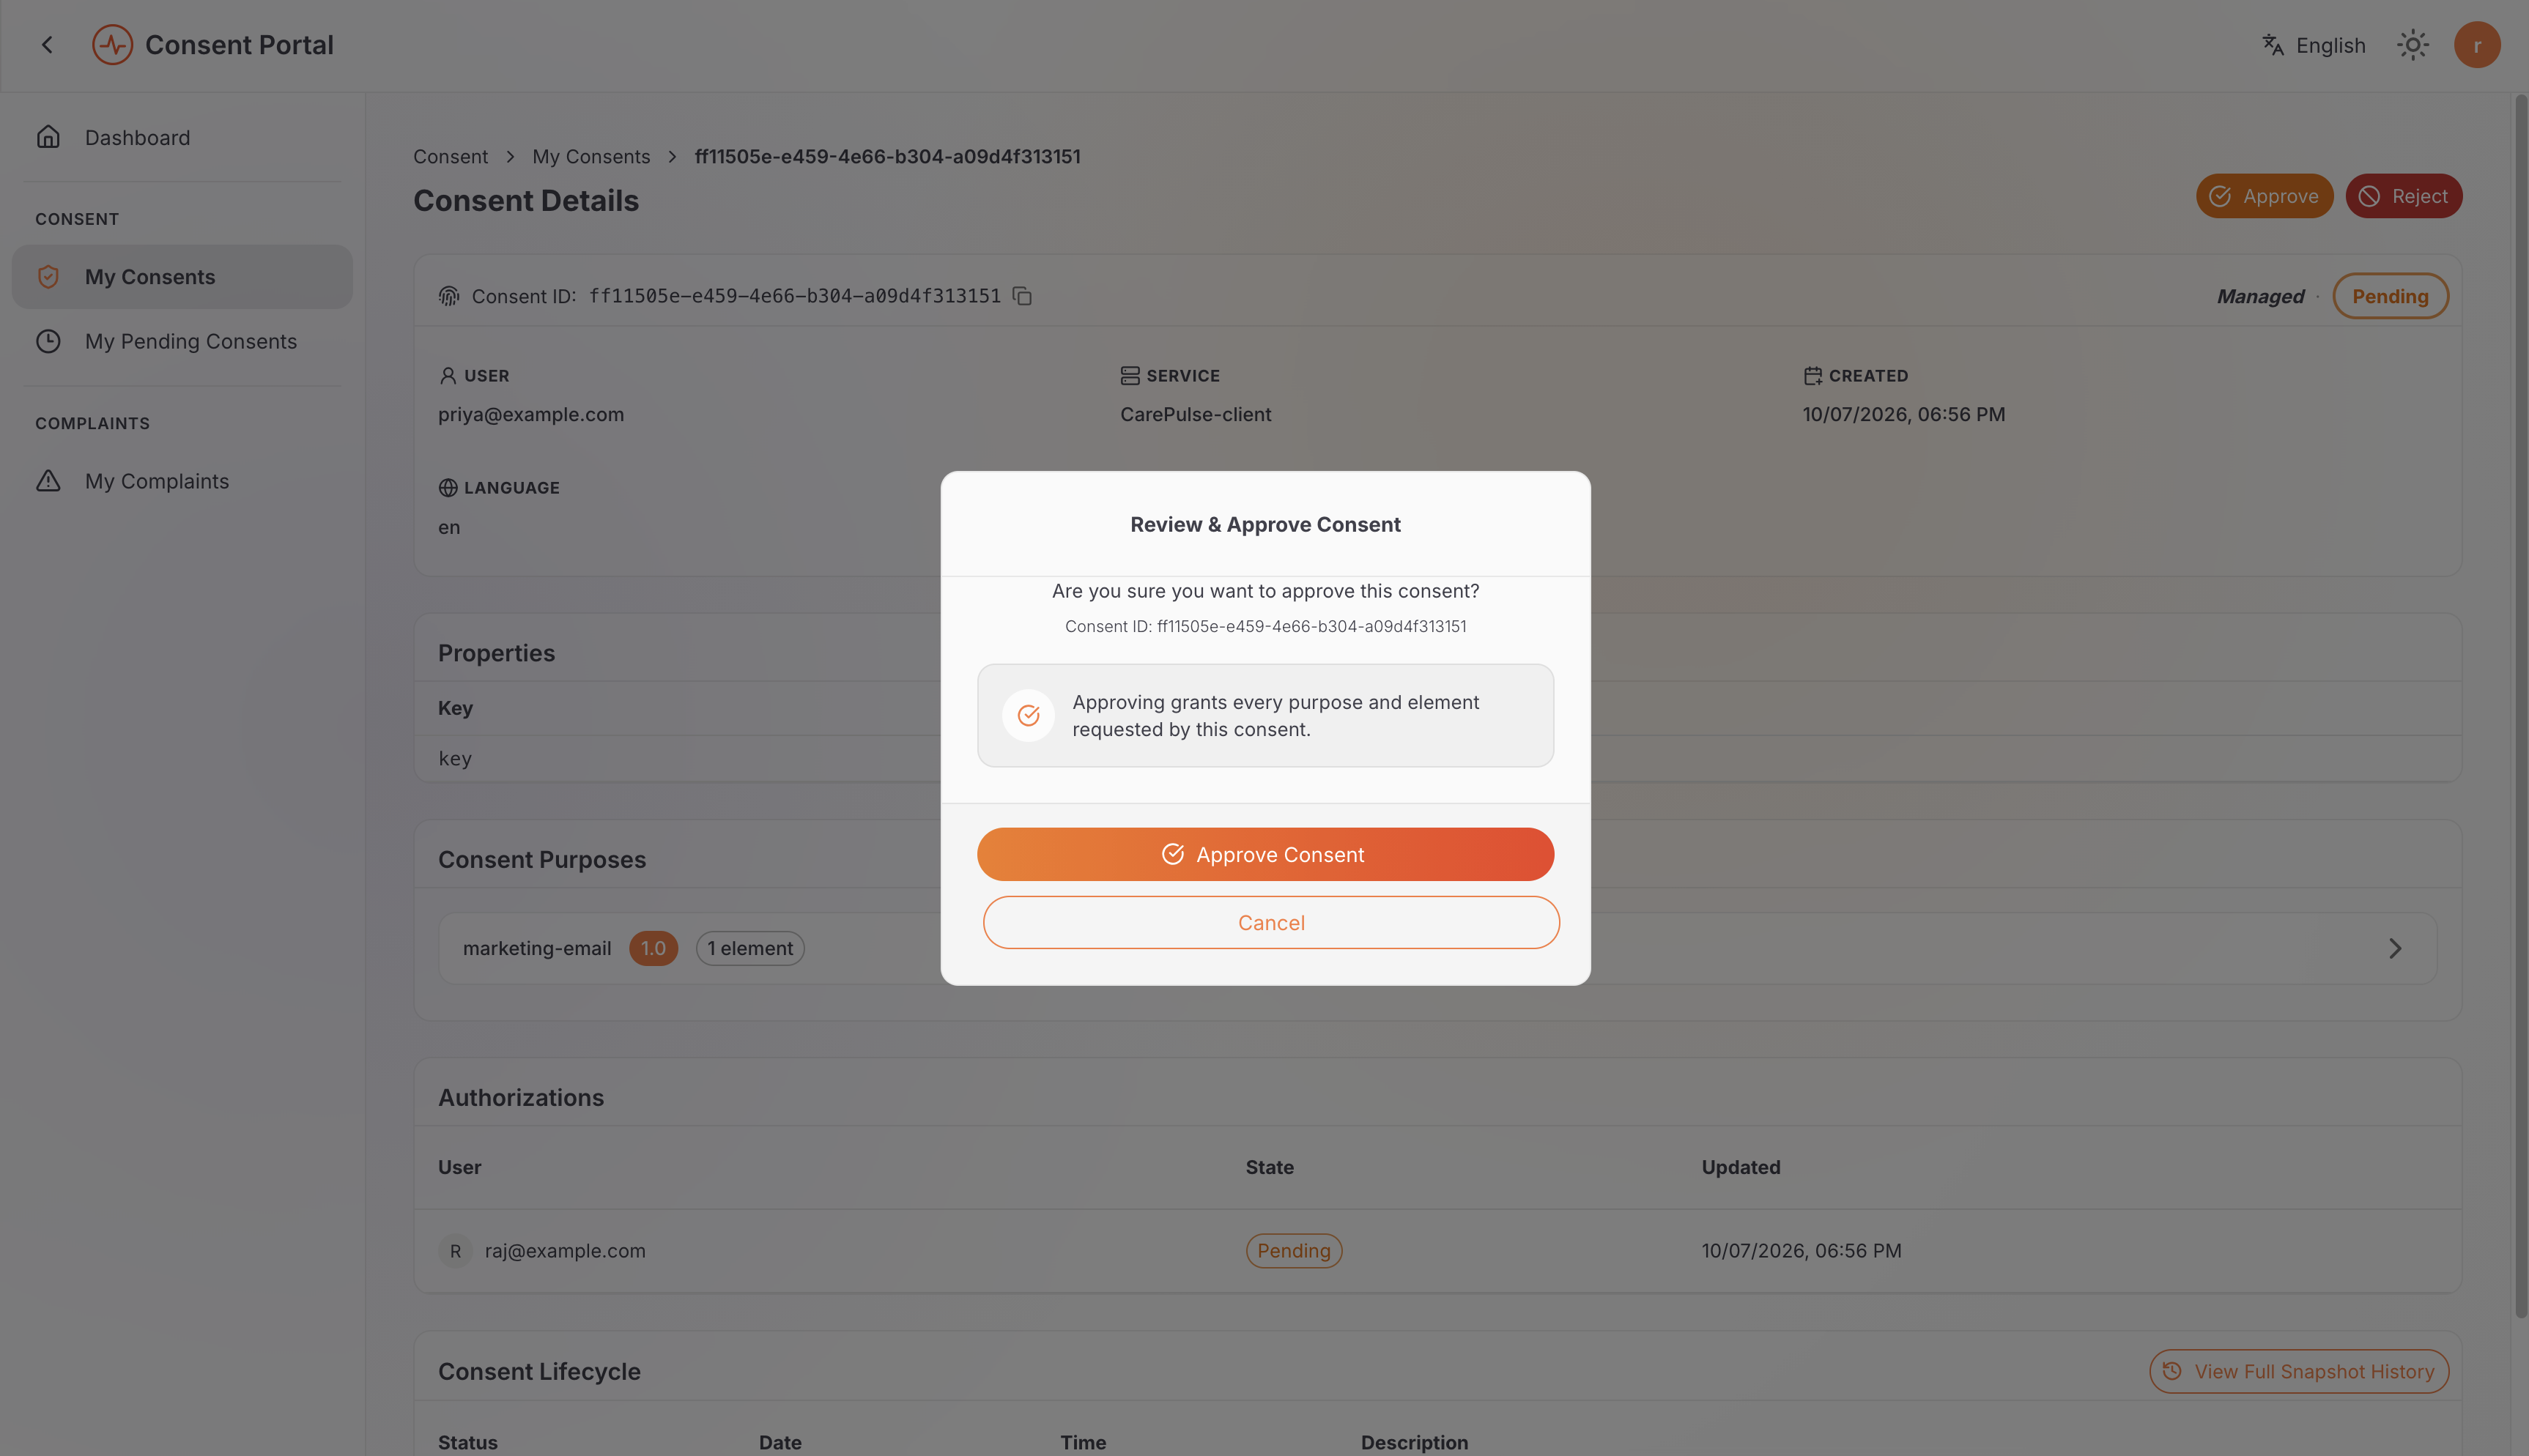
Select Approve and confirm.
-
Reopen the consent and confirm that Raj's authorization is
APPROVED. With this single required authorizer, the aggregate consent is nowACTIVE. If several authorizers were supplied, it remainsPENDINGuntil every required authorizer approves.
Raj can inspect the pending consent directly before approving it:
curl \
  "${BASE_URL}/api/users/v1/me/consents?state=PENDING&relation=AUTHORIZER&attributes=purposes,authorizations" \
  -H "Authorization: Bearer ${RAJ_ACCESS_TOKEN}"
Approve the consent with Raj's token:
curl -X POST \
  "${BASE_URL}/api/users/v1/me/consents/<consent-id>/authorize" \
  -H "Authorization: Bearer ${RAJ_ACCESS_TOKEN}" \
  -H "Content-Type: application/json" \
  -d '{ "state": "APPROVED" }'
A successful authorization has no required response body.
Verify as the data subject
-
Sign back in as Priya and open My Consents, choosing Personal.
-
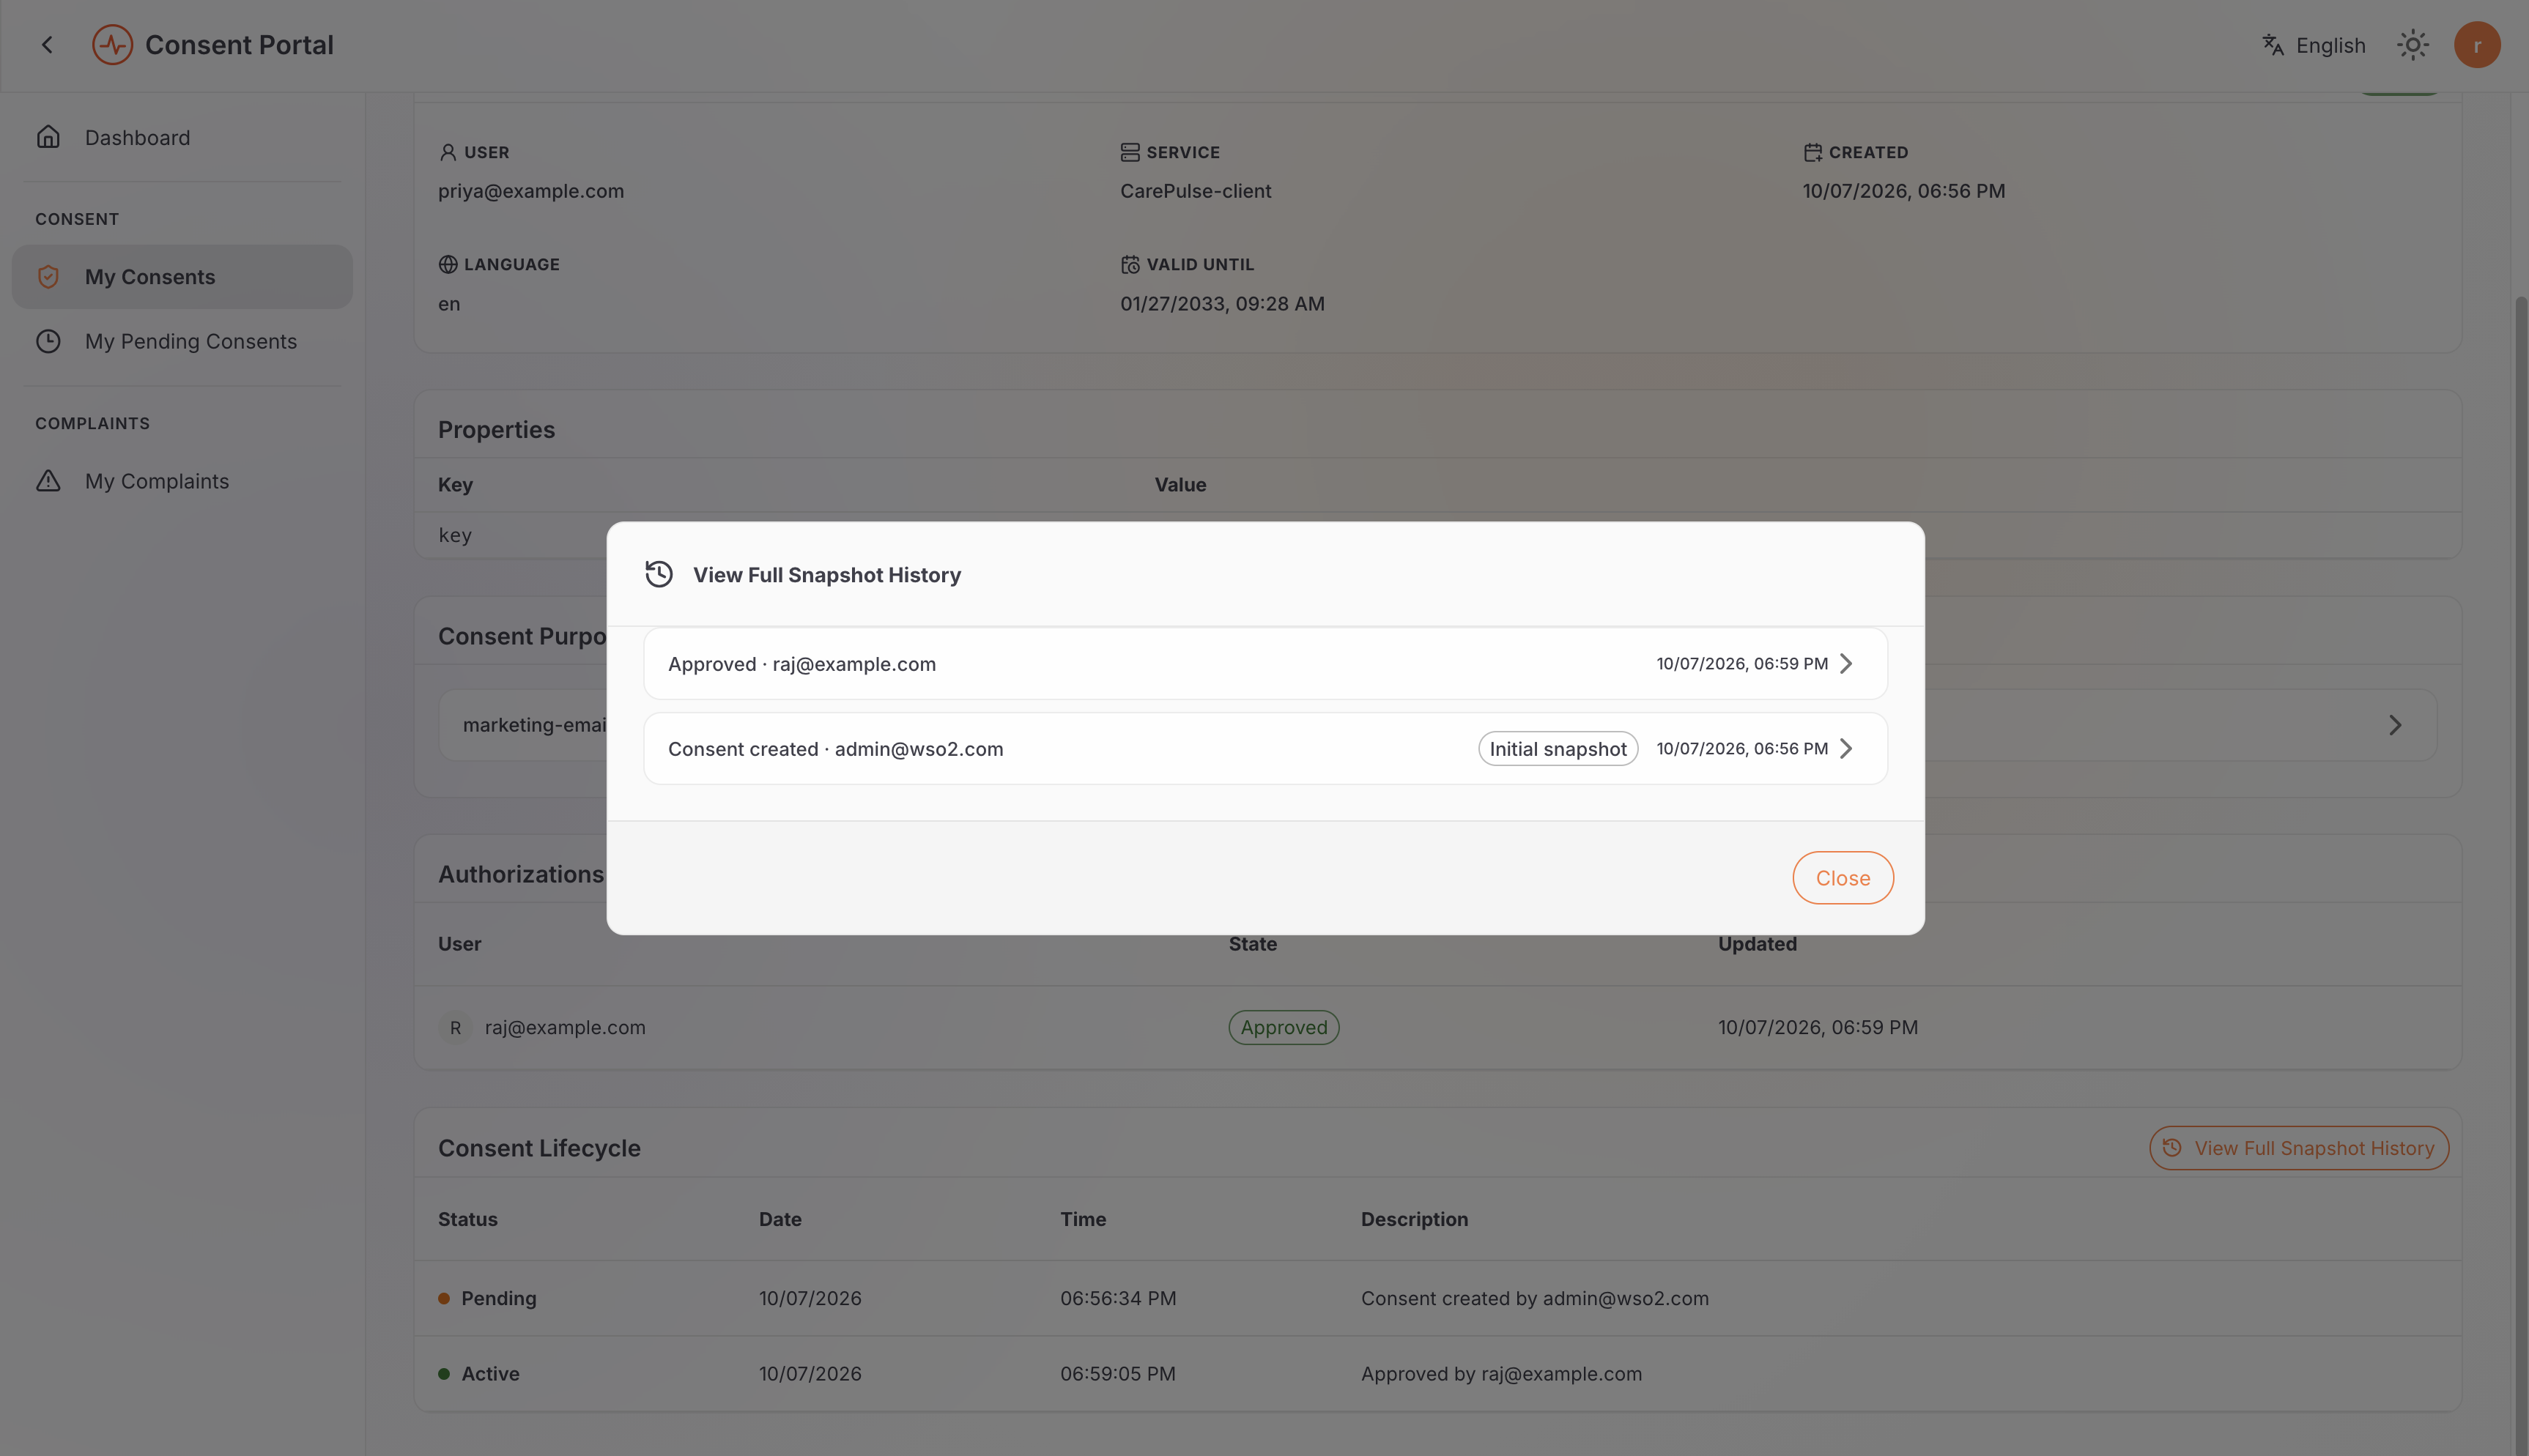
Open the consent and verify that it is
ACTIVEand records Raj's approved authorization. -
Inspect Consent Lifecycle and View Full Snapshot History to confirm that the authorization and aggregate state transition were audited.
The equivalent subject-scoped query is:
curl \
  "${BASE_URL}/api/users/v1/me/consents?relation=SUBJECT&attributes=purposes,authorizations" \
  -H "Authorization: Bearer ${ACCESS_TOKEN}"
Expected result: Priya and Raj see the same consent through different relationships. Only the listed authorizer can record that delegated decision, and the consent becomes usable only after all required authorizers approve. Relationship validation and downstream enforcement remain the Data Fiduciary's responsibility; this flow proves storage, authorization, state resolution, and audit behavior in the accelerator.
Create a co-authorized consent
Unlike the delegated flow above, a co-authorized consent names the subject as one of the authorizers herself, alongside at least one other person. This demonstrates that pattern using the same purpose and element from Define a purpose and its data element.
Portal: Both Priya and Raj act from their own My Consents,
filtered to Managed — since each has their own entry in
authorizations, each sees Approve/Reject for their own decision.
- Using the Consent API Invoker's client-credentials token, create a consent
whose
subjectIdis Priya and whoseauthorizationslist names both Priya and Raj:
curl -X POST \
  "${BASE_URL}/api/identity/consent-mgt/v2.0/consents" \
  -H "Authorization: Bearer ${ACCESS_TOKEN}" \
  -H "Content-Type: application/json" \
  -d '{
    "subjectId": "priya@example.com",
    "serviceId": "CarePulse-client",
    "purposes": [
      {
        "id": "<marketing-email-purpose-id>",
        "elements": [
          { "id": "<contact-email-element-id>" }
        ]
      }
    ],
    "language": "en",
    "expiryTime": 1990411096000,
    "authorizations": [
      { "userId": "priya@example.com", "type": "USER" },
      { "userId": "raj@example.com", "type": "USER" }
    ],
    "properties": {}
  }'
Because at least one authorization is supplied, the consent is created
PENDING, even though the subject is also an authorizer.
- Sign in as Priya, open My Consents, filter to Managed, and approve her own entry:
curl -X POST \
  "${BASE_URL}/api/users/v1/me/consents/<consent-id>/authorize" \
  -H "Authorization: Bearer ${ACCESS_TOKEN}" \
  -H "Content-Type: application/json" \
  -d '{ "state": "APPROVED" }'
Reopening the consent now shows Priya's own decision recorded, while the
consent as a whole stays PENDING until Raj also decides.
-
Sign in as Raj and approve the same consent with his own token, the same way as in Approve as the guardian or delegate above.
-
Reopen the consent as either Priya or Raj. With both authorizations
APPROVED, the aggregate consent is nowACTIVE, and either of them can revoke it going forward — not only whoever approved it first.
Expected result: both named authorizers, including the subject herself, had to approve independently before the consent became active — demonstrating that co-authorized consent is distinct from both Direct Consent (no authorizers) and Delegated Consent (the subject has no entry at all).
Next Steps
- Learn: Consent: Story-based overview of how consent collection, review, and withdrawal fit together.
- Continue with Complaint Management to submit, manage, and resolve a grievance.
- Try Out: All Flows: End-to-end Try Out guide covering consents and event notifications.