Complaint Management
This guide walks you through submitting, managing, and resolving a grievance using both the Consent Portal and the Complaints REST API.
The portal provides separate interfaces for a Data Principal and a Complaint Officer. This walkthrough uses a single case to demonstrate submission, file attachments, public vs. internal communication, status transitions, statutory due dates, and resolution.

Prerequisites and Roles
Before starting, ensure users and roles are configured:
| Role | User Persona | Portal Interface | API Namespace |
|---|---|---|---|
dpdp-consent-user | Data Principal | My Complaints | /api/dpdp/complaints/v1/me/complaints |
dpdp-consent-dpo | Complaint Officer / DPO | Administration > Complaints | /api/dpdp/complaints/v1/complaints |
To test the REST APIs, define the server variables and obtain two distinct OAuth 2.0 access tokens:
BASE_URL: Base URL of your WSO2 Identity Server instance (e.g.,https://localhost:9443).DATA_PRINCIPAL_TOKEN: Scoped to self-service endpoints (complaints:read:self,complaints:write:self).DPO_TOKEN: Scoped to organization-wide complaint handling (complaints:read:any,complaints:write:any).
To generate these tokens easily, create two Machine-to-Machine (M2M) applications in the WSO2 Identity Server Console (Applications > New Application > Machine-to-Machine) using the Client Credentials grant:
- Data Principal M2M App: Authorize for the Complaints API with
complaints:read:selfandcomplaints:write:self. - DPO M2M App: Authorize for the Complaints API with
complaints:read:anyandcomplaints:write:any.
Set your environment variables and request the tokens:
# Environment variables
export BASE_URL="https://localhost:9443"

# Obtain Data Principal token (scoped: complaints:read:self complaints:write:self)
DATA_PRINCIPAL_TOKEN=$(curl -s -X POST "${BASE_URL}/oauth2/token" \
  -H "Content-Type: application/x-www-form-urlencoded" \
  -d "grant_type=client_credentials" \
  -d "client_id=${DATA_PRINCIPAL_CLIENT_ID}" \
  -d "client_secret=${DATA_PRINCIPAL_CLIENT_SECRET}" \
  -d "scope=complaints:read:self complaints:write:self" | jq -r '.access_token')

# Obtain DPO token (scoped: complaints:read:any complaints:write:any)
DPO_TOKEN=$(curl -s -X POST "${BASE_URL}/oauth2/token" \
  -H "Content-Type: application/x-www-form-urlencoded" \
  -d "grant_type=client_credentials" \
  -d "client_id=${DPO_CLIENT_ID}" \
  -d "client_secret=${DPO_CLIENT_SECRET}" \
  -d "scope=complaints:read:any complaints:write:any" | jq -r '.access_token')
In local testing against WSO2 Identity Server with its default self-signed certificate, curl will reject the certificate by default. Add -k (or --insecure) to your curl commands during local testing to bypass SSL verification. In production environments, omit -k and use trusted CA-signed certificates or pass your CA certificate with --cacert.
Use ${DATA_PRINCIPAL_TOKEN} for self-service (/me/complaints) operations and ${DPO_TOKEN} for officer (/complaints) operations throughout the examples below.
Step 1: Submit the Complaint
Via Consent Portal (Data Principal)
-
Sign in to the Consent Portal as the Data Principal.
-
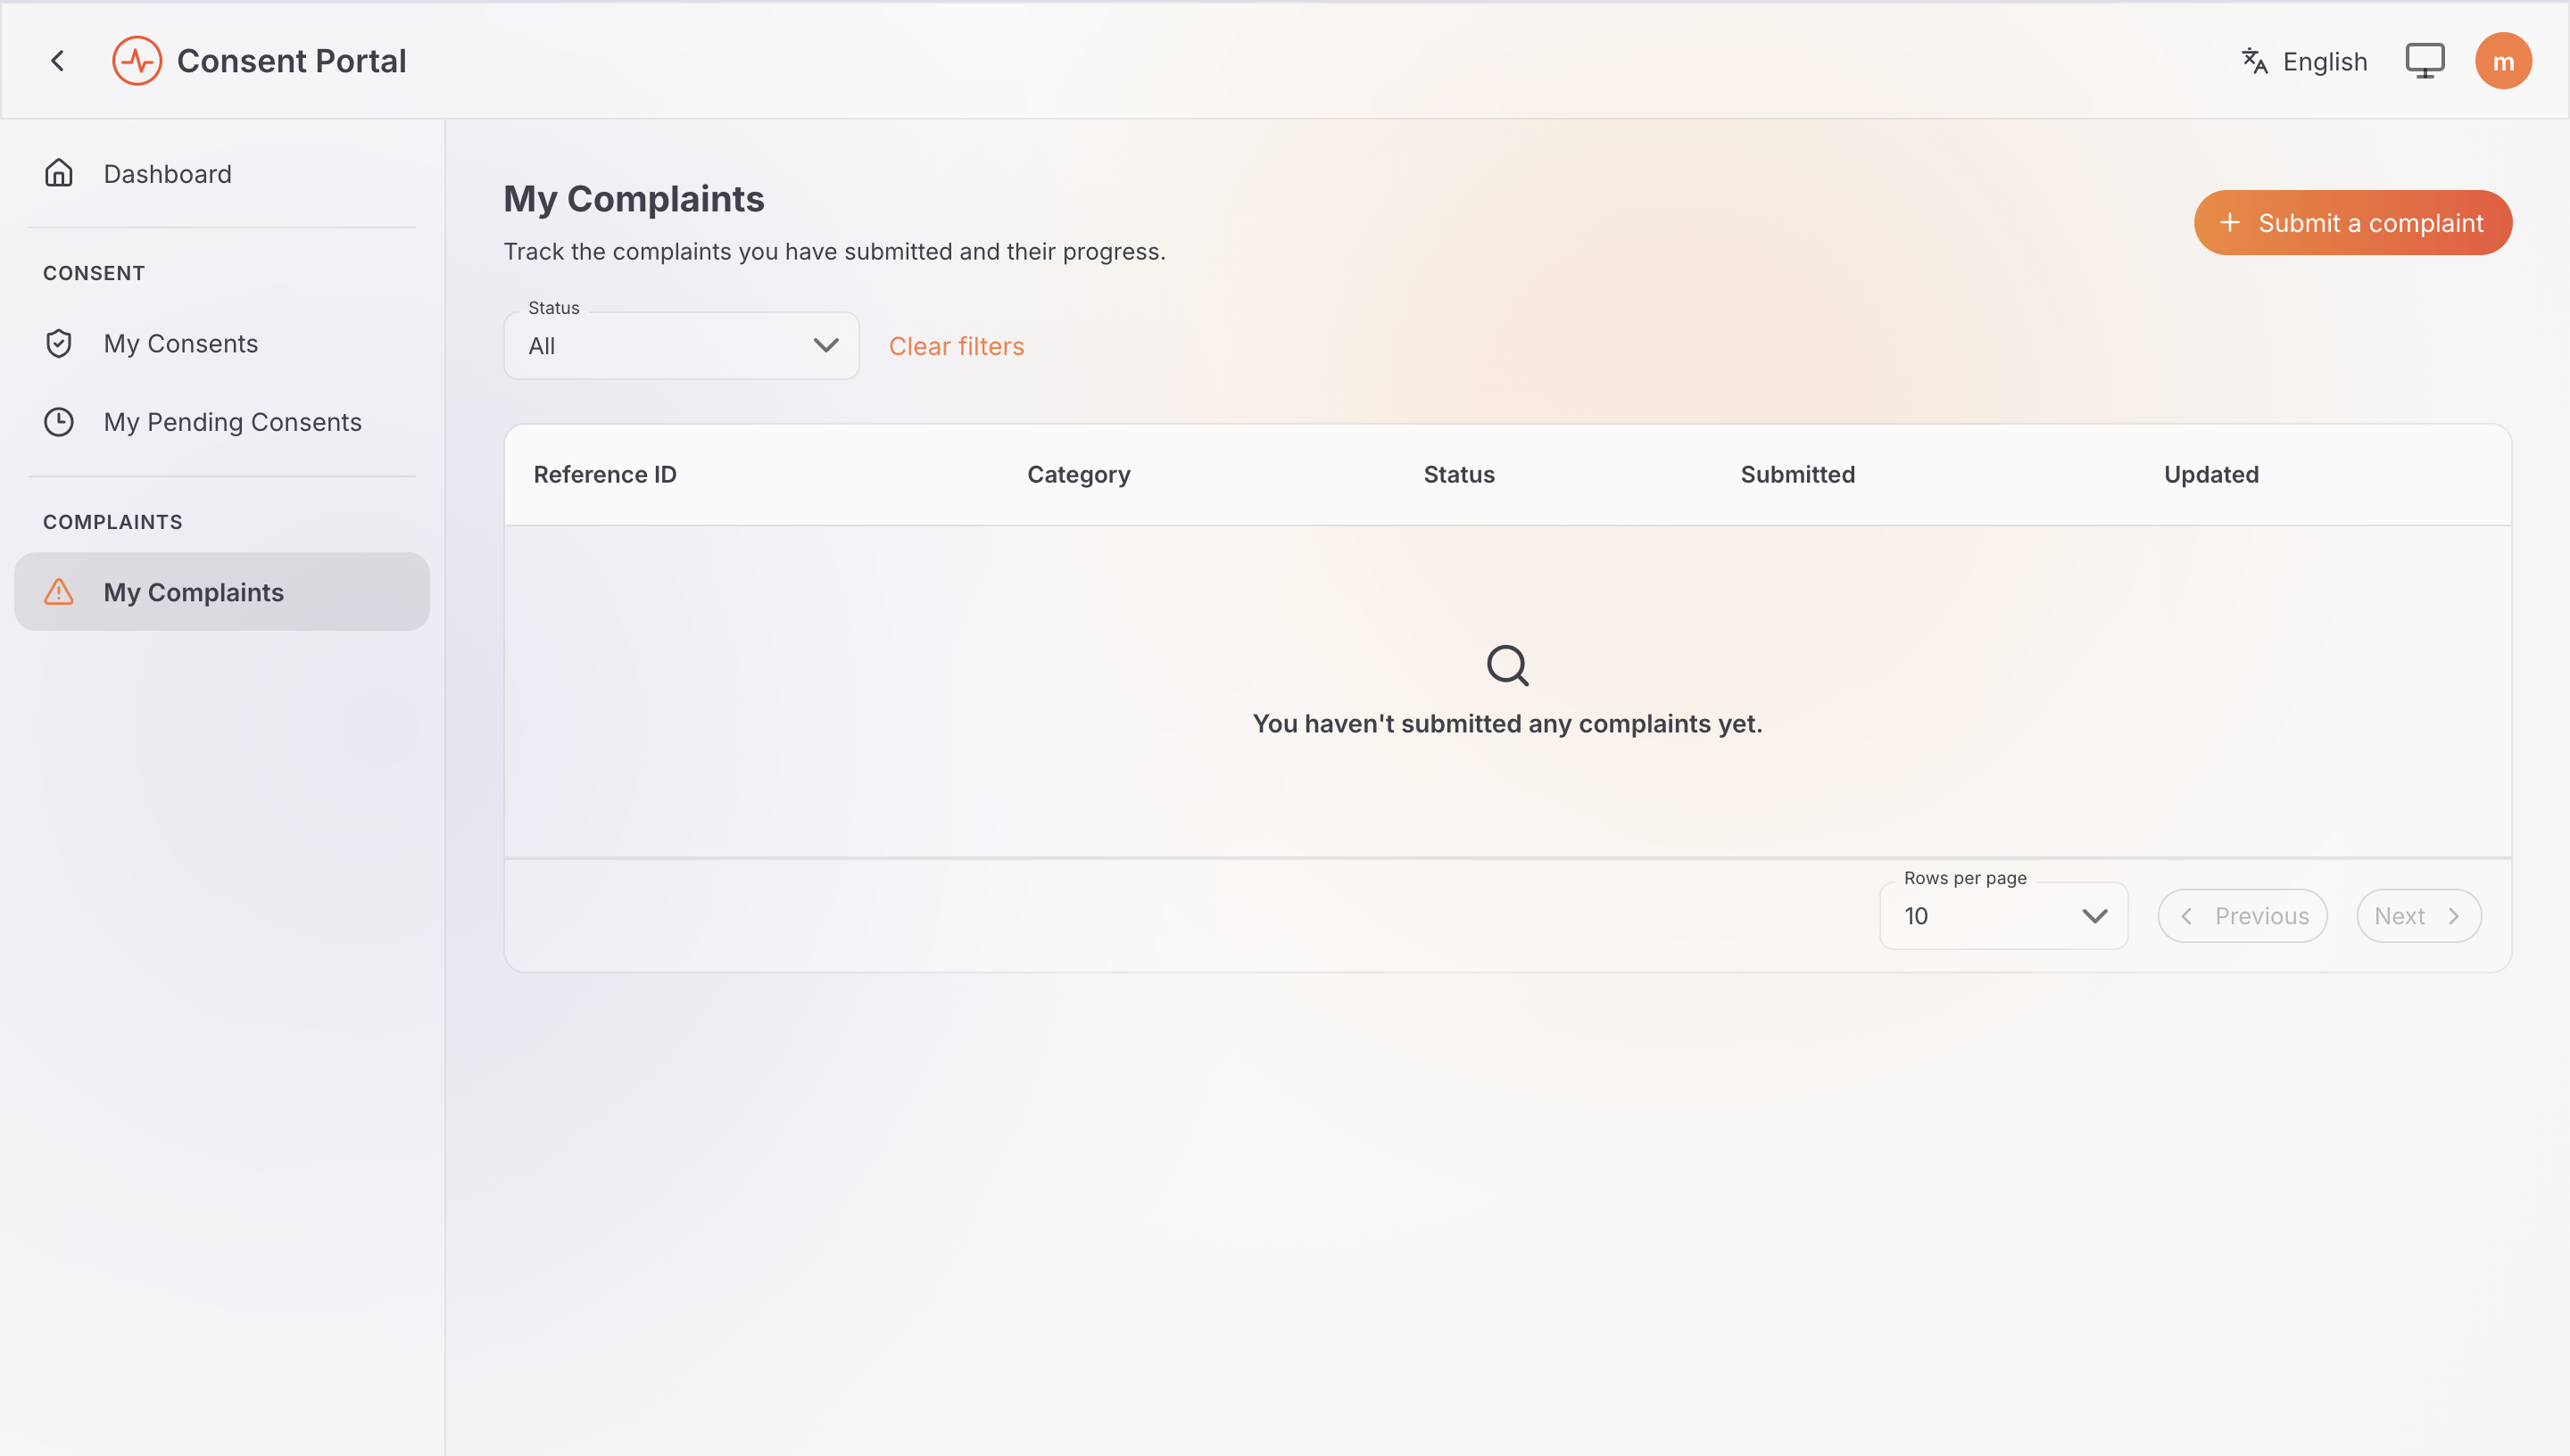
In the navigation sidebar under COMPLAINTS, click My Complaints.
-
On the top-right, click + Submit a complaint.
-
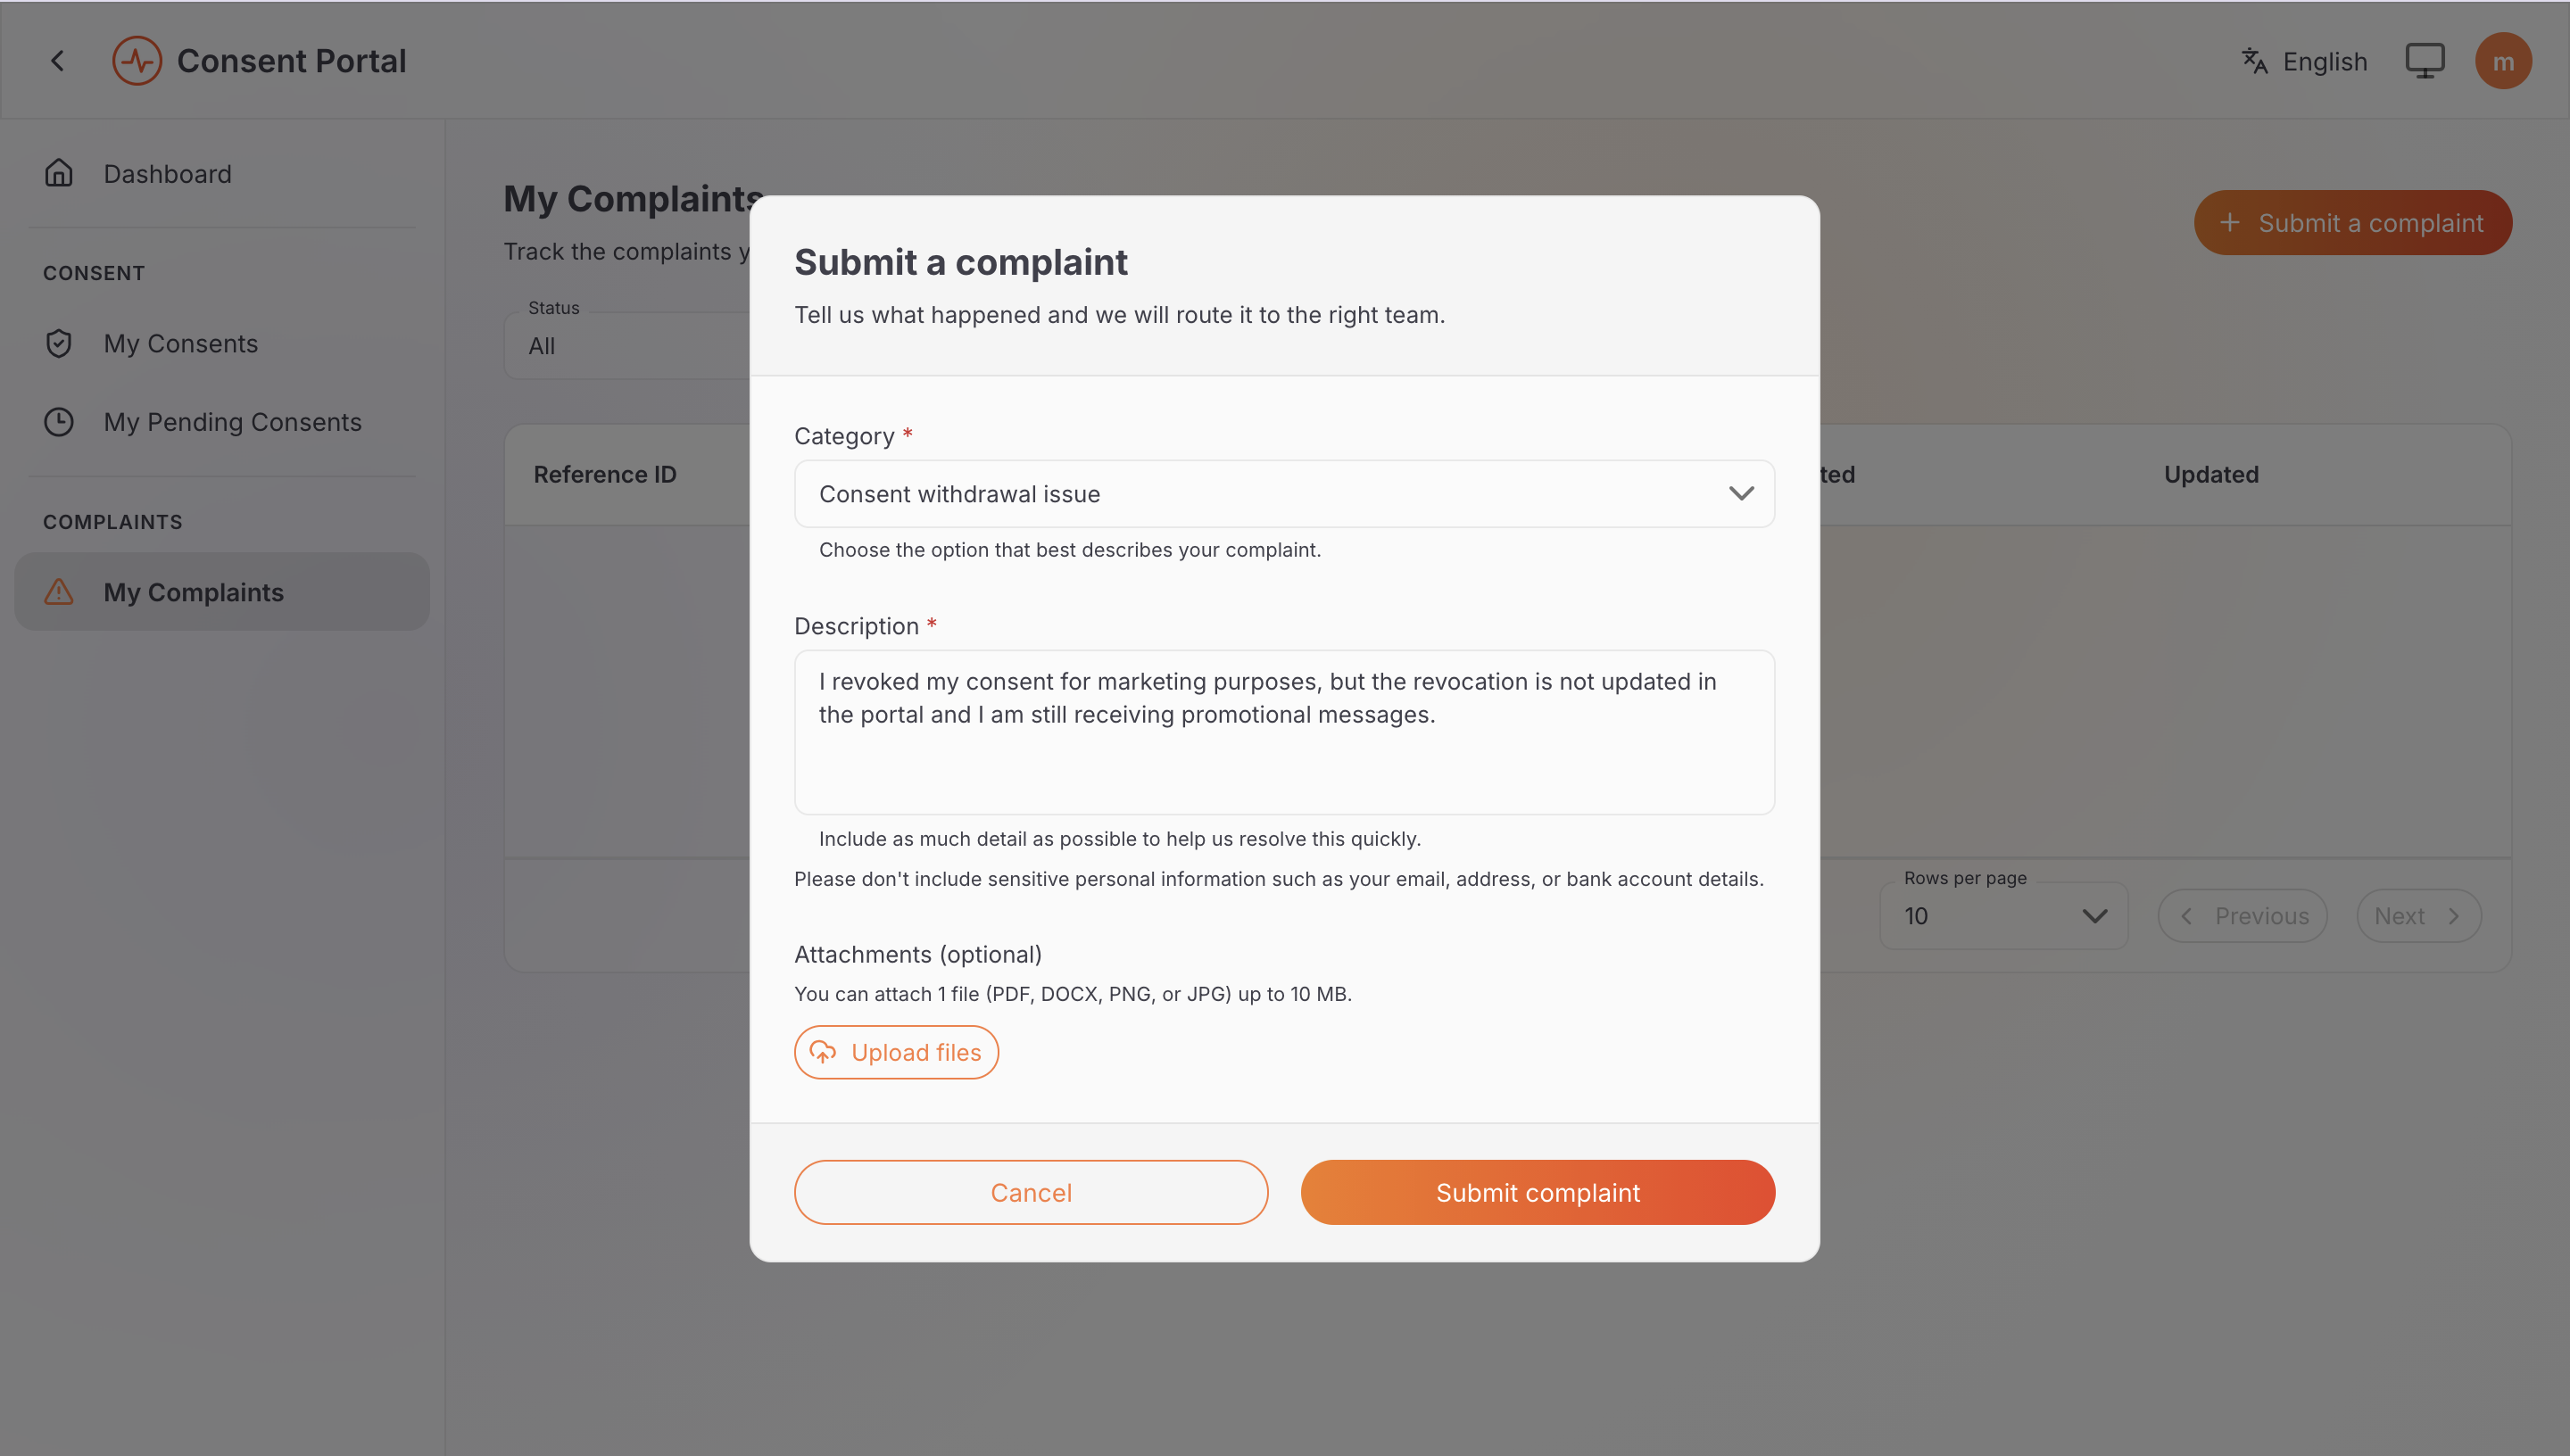
In the modal dialog:
- Category: Select the category that best describes the issue (for example,
Consent withdrawal issue). - Description: Enter the details of the complaint without sensitive personal data (e.g., "I revoked my consent for marketing purposes, but the revocation is not updated in the portal and I am still receiving promotional messages.").
- Attachments (optional): Click Upload files to attach supporting evidence (e.g., a screenshot of the unwanted message). Supported formats include PDF, DOCX, PNG, and JPG up to 10 MB.
- Click Submit complaint.
- Category: Select the category that best describes the issue (for example,
Attaching evidence is critical for fast and conclusive grievance investigations:
- Supported Formats: PNG, JPG, PDF, and DOCX (up to 10 MB per file, max 5 files).
- Attachments Tab: Both Data Principals and Complaint Officers can view, inspect, and download all case attachments at any time via the dedicated Attachments tab in the case detail workspace.
- Follow-up Uploads: Complainants and officers can also upload additional files when posting follow-up messages in the activity feed.
-
A confirmation banner displays stating your complaint has been submitted, and the complaint appears in the table with its Reference ID (e.g.,
CMP-2026-00001), status (Open), and submission date.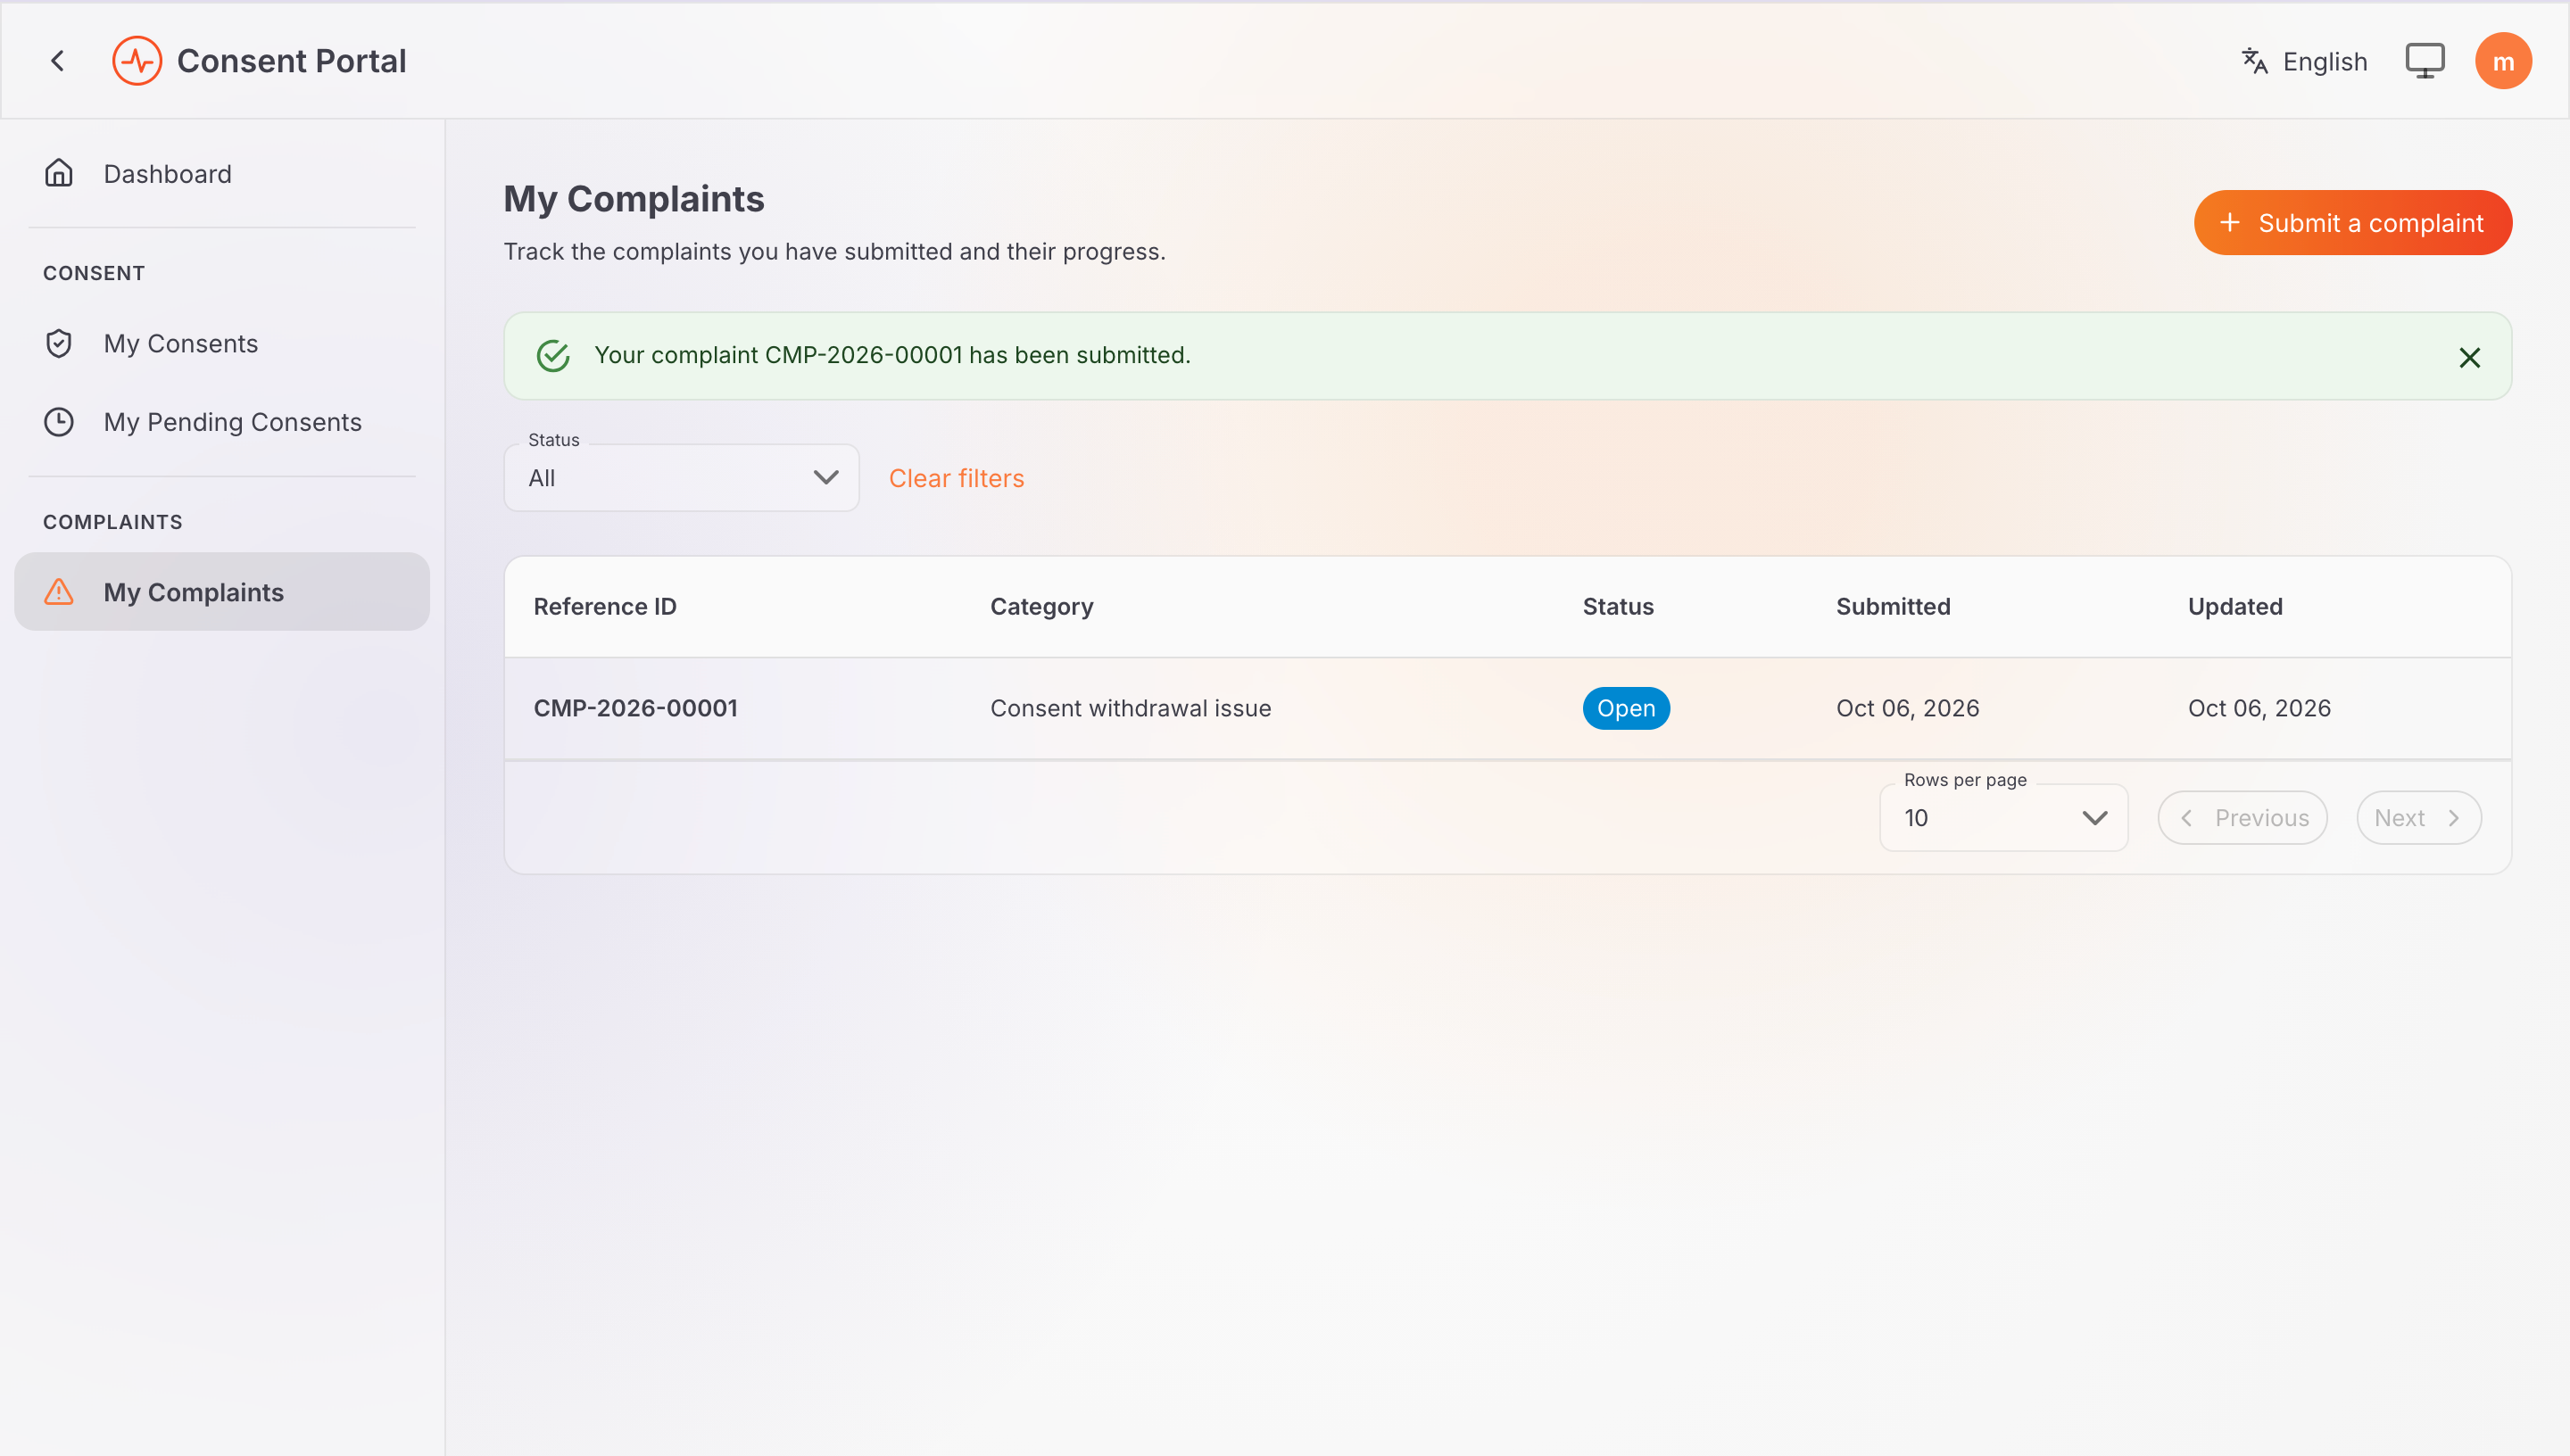
-
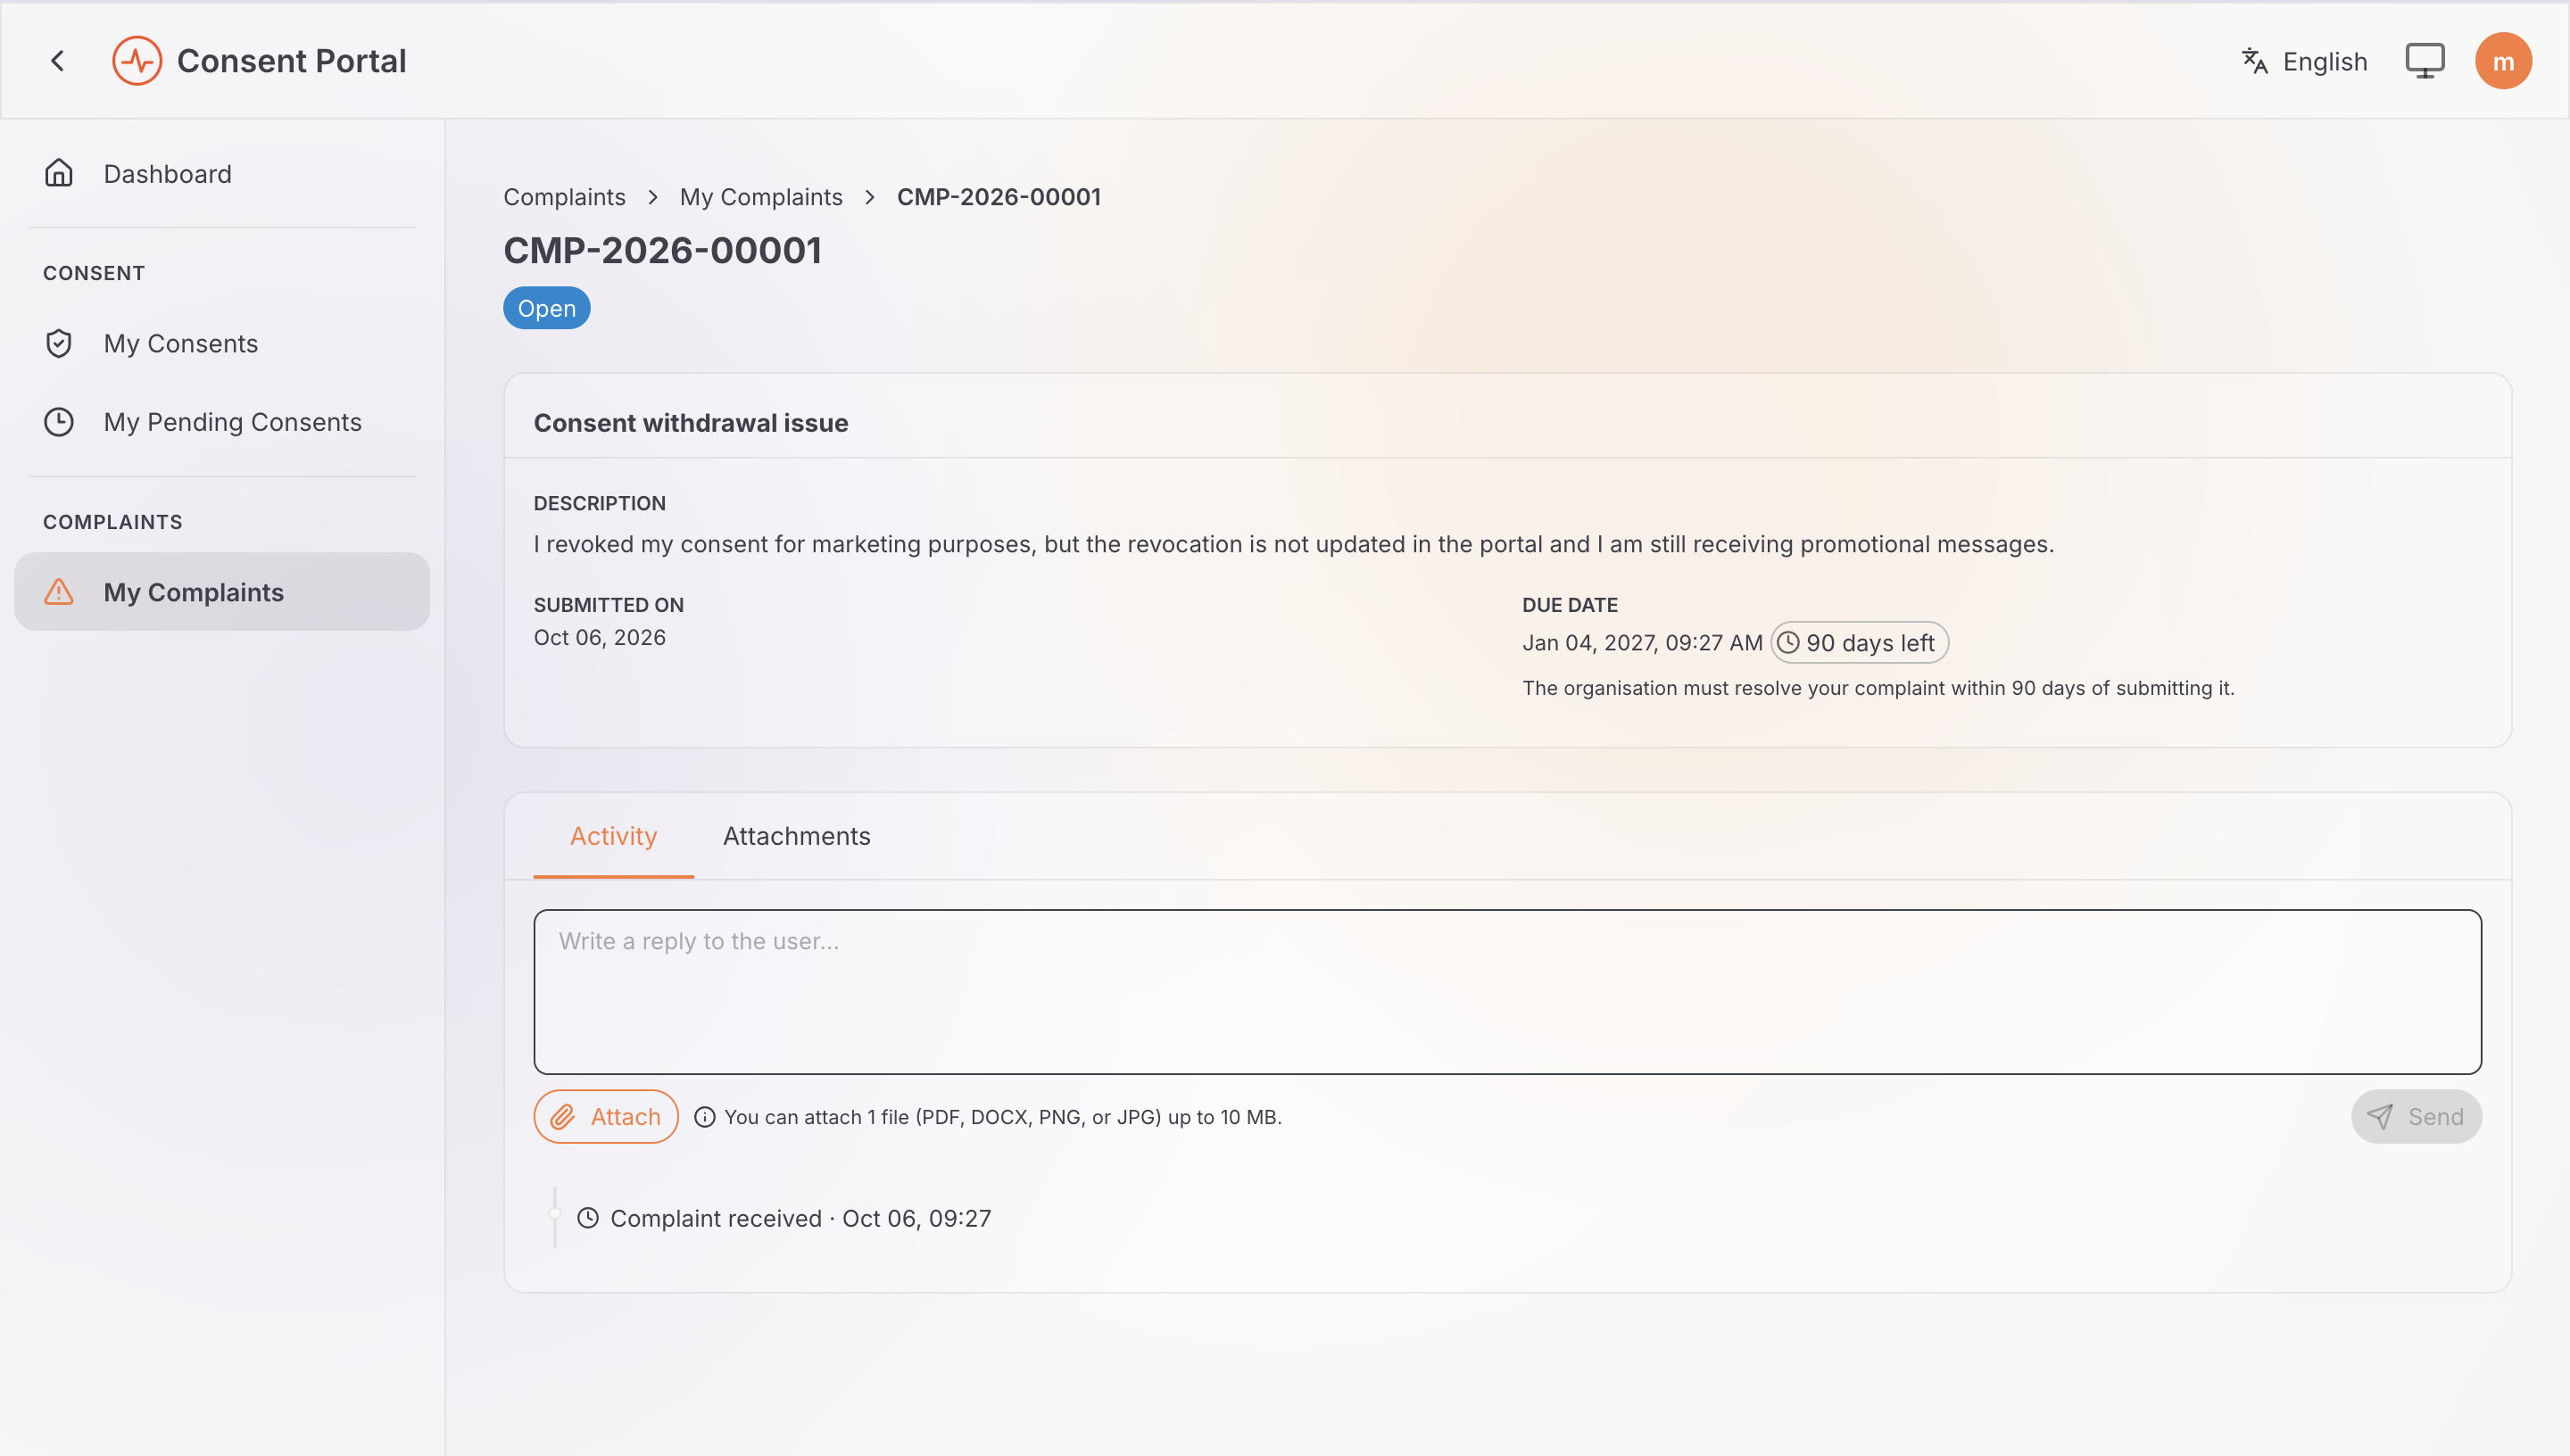
Click on the complaint row to open its detail view:
- Review the assigned status and statutory deadline (e.g., 90 days left).
- The Activity tab shows the event timeline (Complaint received) and includes a composer to post public follow-up messages or upload additional files.
- The Attachments tab displays any evidence files submitted with the grievance.
Via REST API
The self-service API derives the identity of the complainant from the OAuth bearer token (do not pass userId in the payload). Use the Data Principal token (DATA_PRINCIPAL_TOKEN):
curl -X POST \
  "${BASE_URL}/api/dpdp/complaints/v1/me/complaints" \
  -H "Authorization: Bearer ${DATA_PRINCIPAL_TOKEN}" \
  -H "Content-Type: application/json" \
  -d '{
    "subjectCategory": "CONSENT_WITHDRAWAL_ISSUE",
    "description": "I revoked my consent for marketing purposes, but the revocation is not updated in the portal and I am still receiving promotional messages."
  }'
Representative 201 Created Response:
{
  "id": "fbda5af9-f01b-47c1-8cd6-0268e6562614",
  "referenceId": "CMP-2026-00001",
  "subjectCategory": "CONSENT_WITHDRAWAL_ISSUE",
  "priority": "HIGH",
  "status": "OPEN",
  "userId": "portal-user",
  "description": "I revoked my consent for marketing purposes, but the revocation is not updated in the portal and I am still receiving promotional messages.",
  "submittedAt": 1788231000000,
  "updatedAt": 1788231000000,
  "statutoryDueDate": 1790823000000
}
Step 2: Handle and Investigate the Complaint
Via Consent Portal (Complaint Officer)
-
Sign in to the Consent Portal with a user holding
dpdp-consent-dpo. -
In the navigation sidebar under ADMINISTRATION, click Complaints.
-
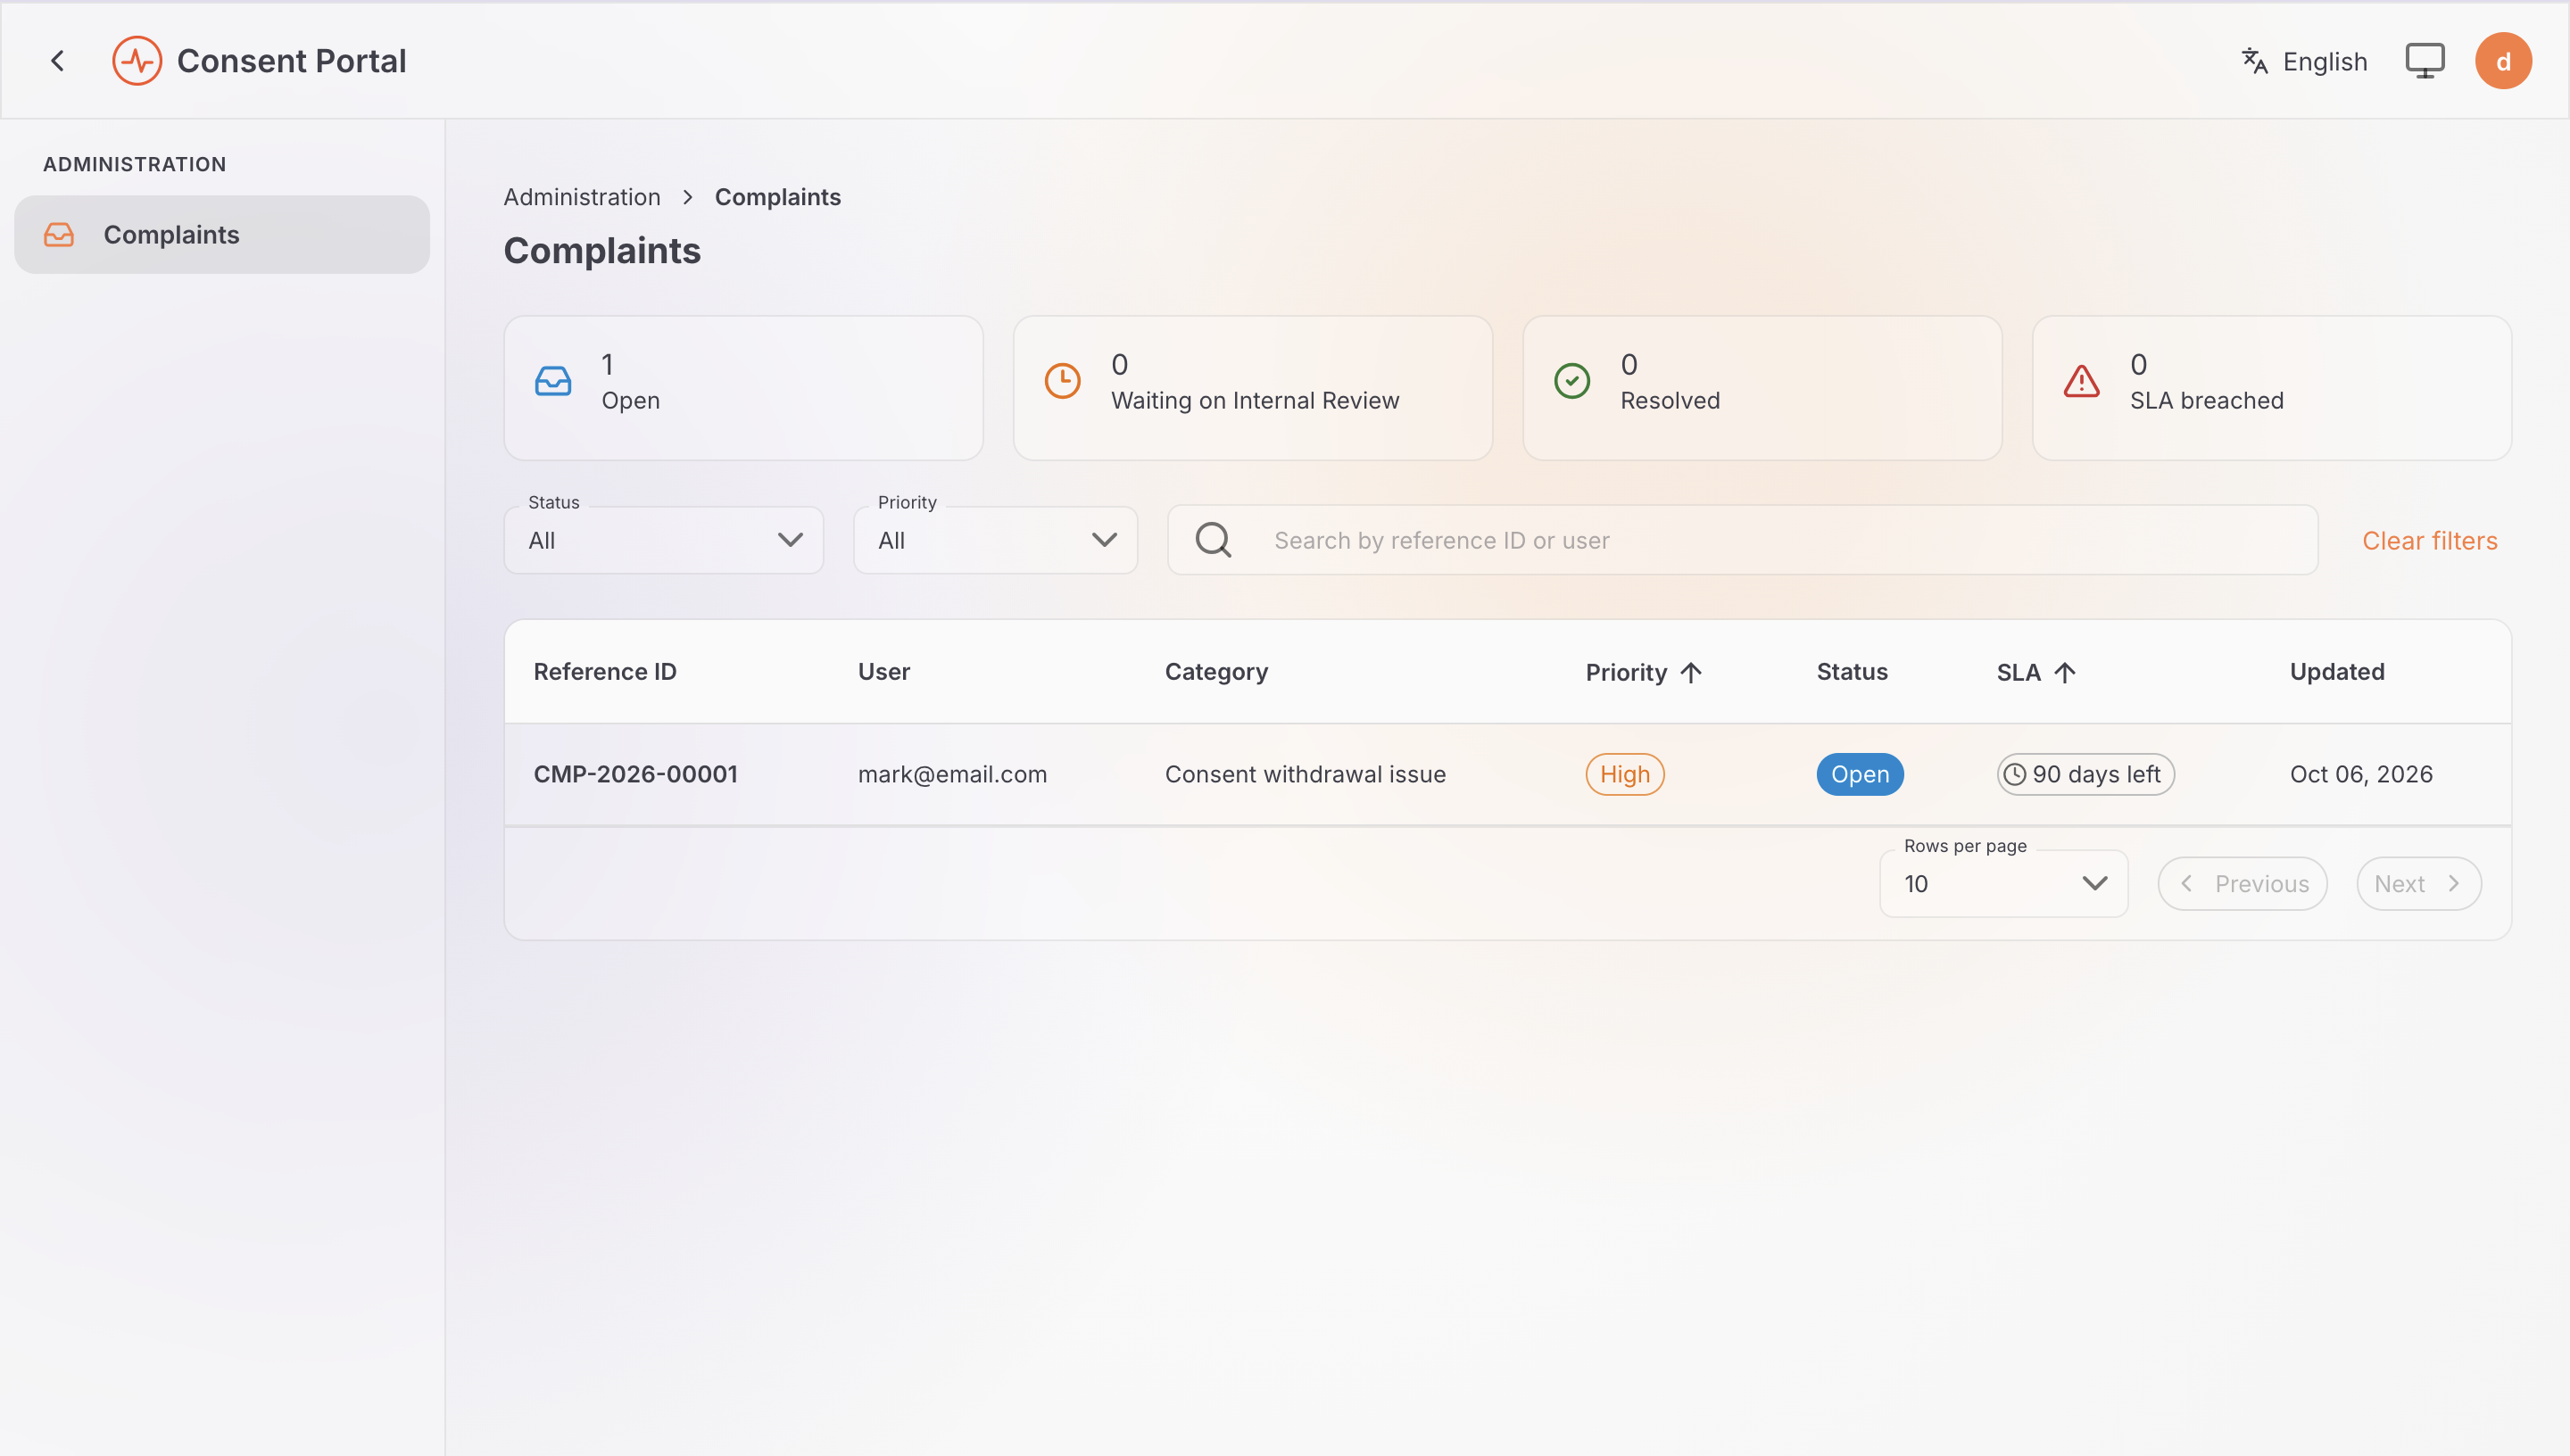
The queue displays overview metrics (Open, Waiting on Internal Review, Resolved, SLA breached), filtering options, and the list of tenant complaints with priority and SLA tracking.
-
Click on the complaint (
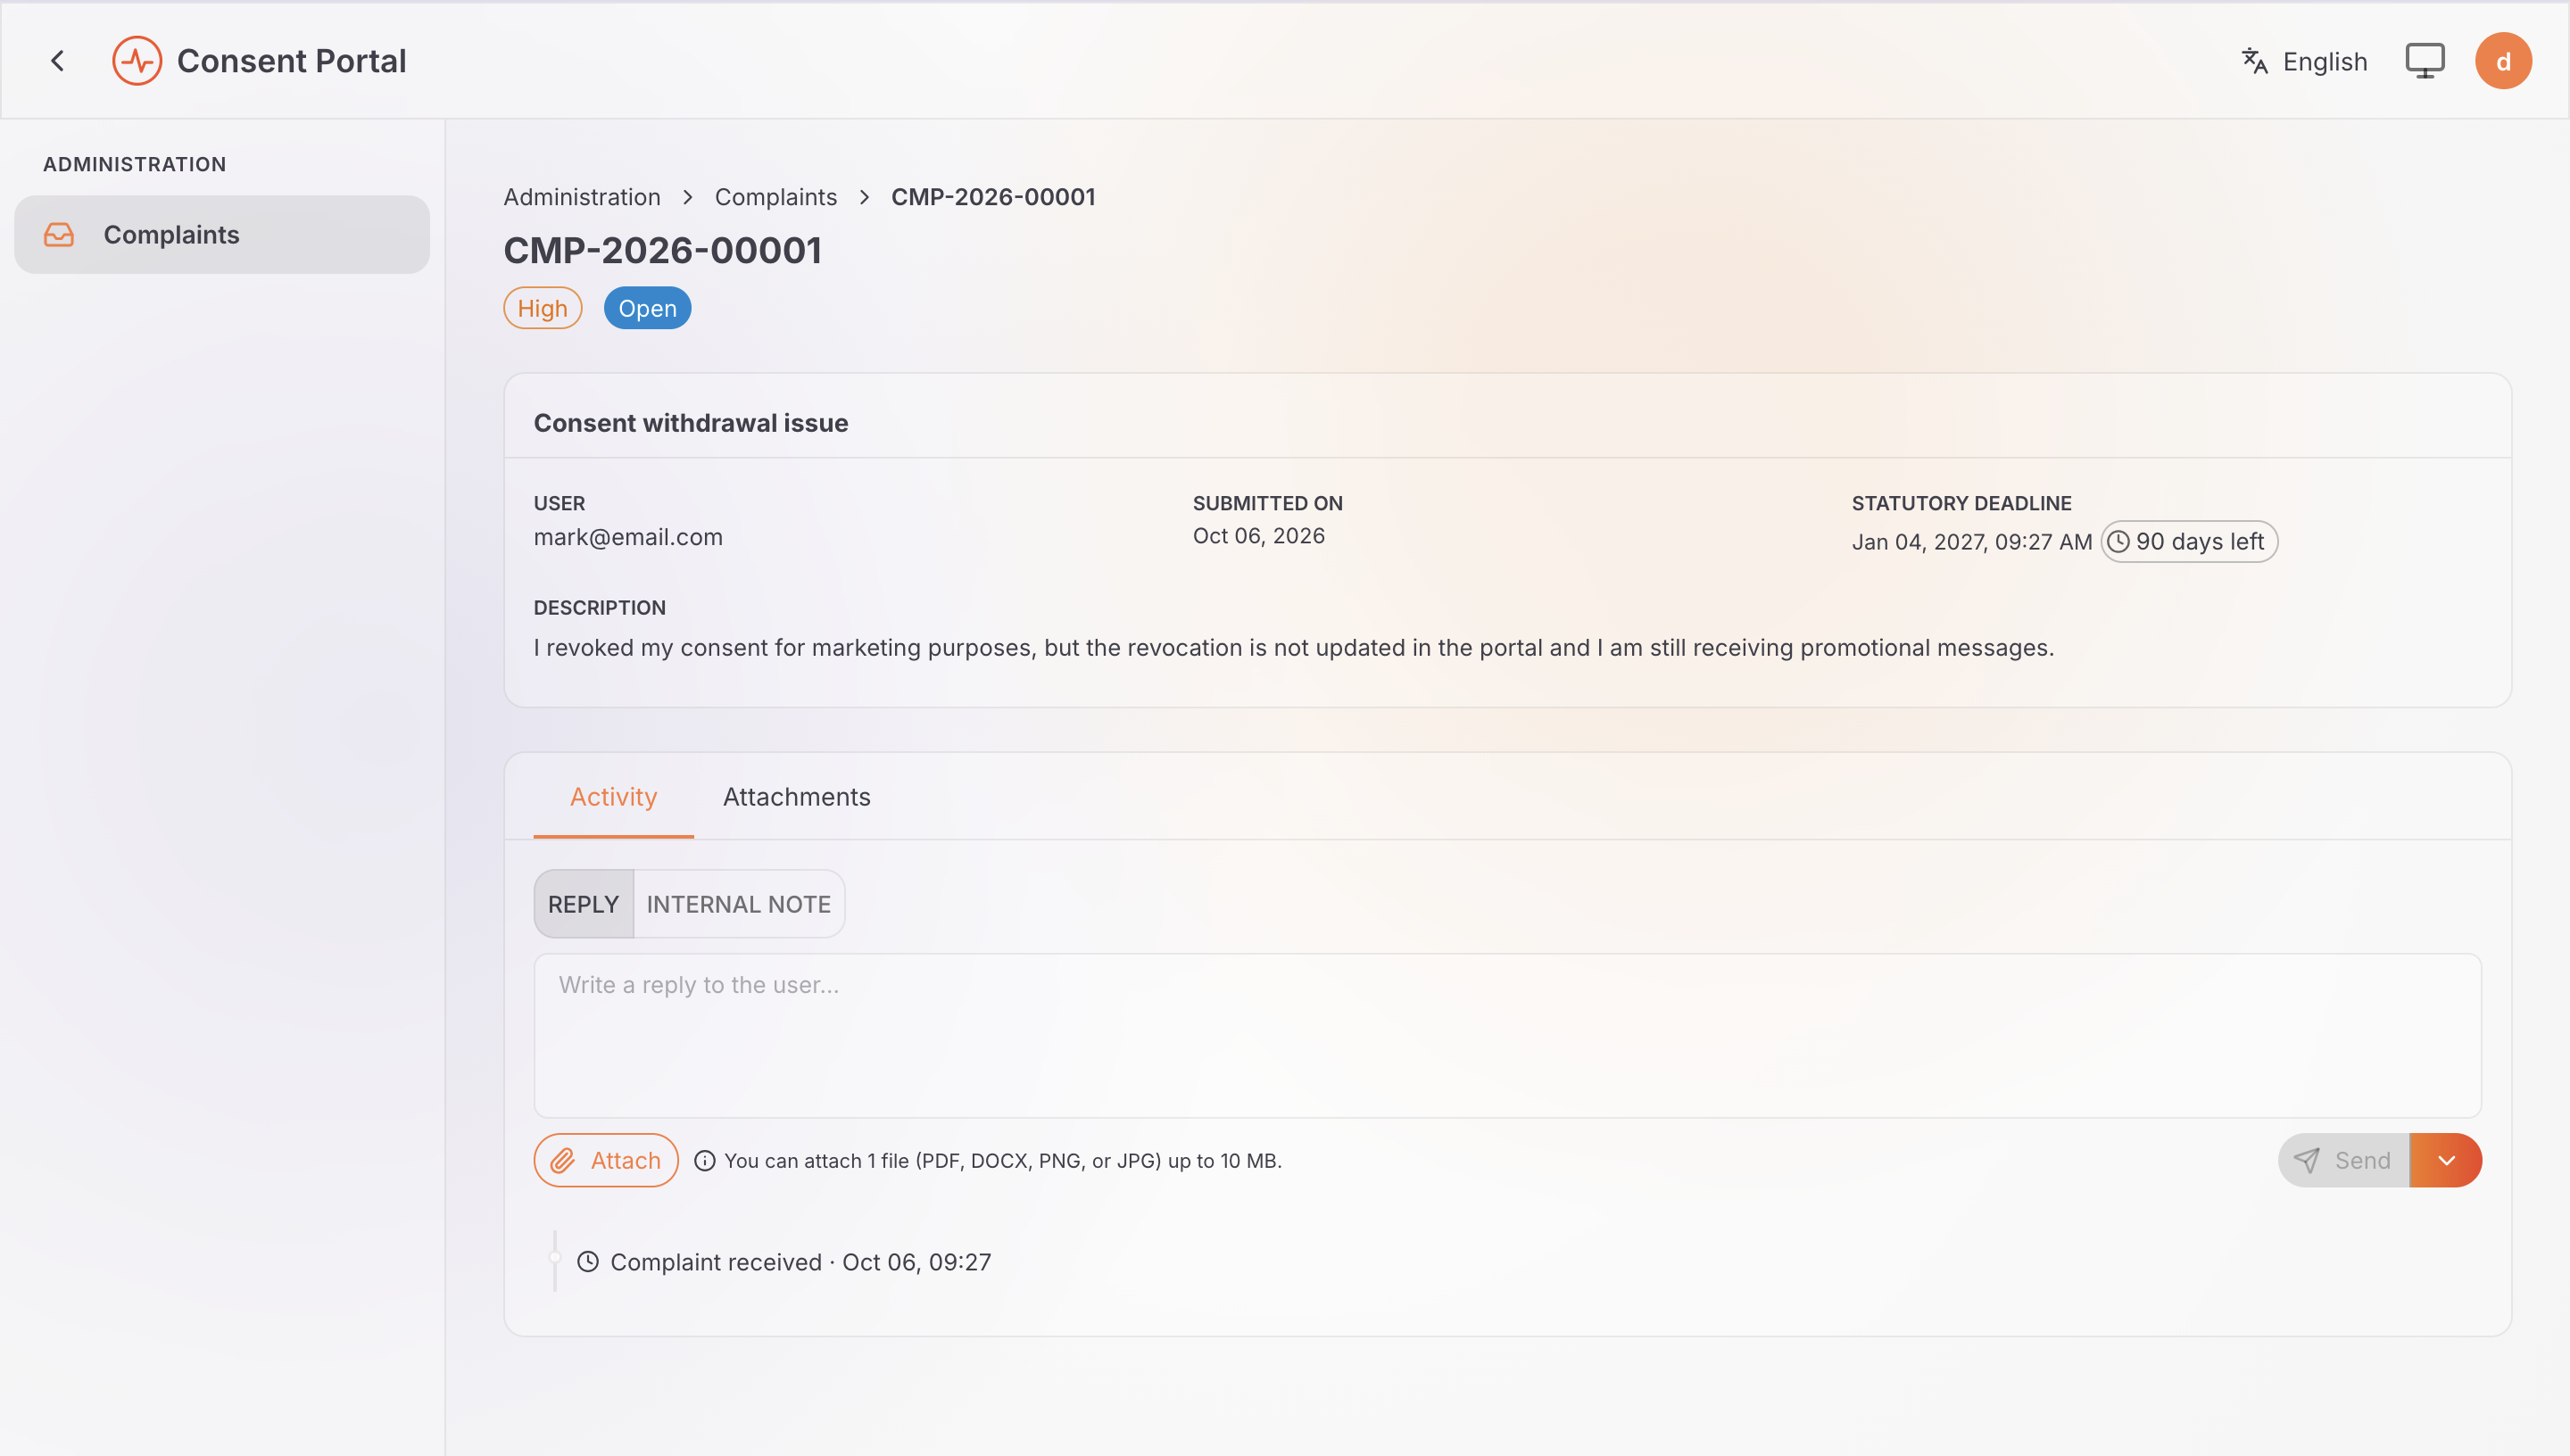
CMP-2026-00001) to open the investigation workspace:- Review complainant details, submission timestamp, description, and statutory due date.
- Switch to the Attachments tab to inspect and download evidence uploaded by the complainant.
- Choose between REPLY (sends a public message visible to the Data Principal) and INTERNAL NOTE (records private notes visible strictly to officers).
-
Send a public reply (e.g., "We are reviewing your request.").
-
Click INTERNAL NOTE, enter an investigation finding (e.g., "Verified delivery logs: revoke event delivery to marketing processor failed. Requesting manual sync."), and click Send.
Internal Note ConfidentialityInternal notes remain visible strictly to officers; they are never shown to the Data Principal in their portal view.
-
Sign back in as the Data Principal, navigate to My Complaints, and verify that the public reply is visible in the timeline while the internal note is hidden.
Via REST API (Officer Reply & Status Update)
An officer can send a message and transition the case status in a single request using the DPO token (DPO_TOKEN):
curl -X POST \
  "${BASE_URL}/api/dpdp/complaints/v1/complaints/<complaint-id>/comments" \
  -H "Authorization: Bearer ${DPO_TOKEN}" \
  -H "Content-Type: application/json" \
  -d '{
    "message": "We are reviewing your request.",
    "isPublic": true,
    "toStatus": "IN_PROGRESS"
  }'
Representative 200 OK Response:
{
  "id": "4af15889-f1f7-48c9-af02-f8e903b3a573",
  "actorUserId": "complaint-officer",
  "actorRole": "COMPLAINT_OFFICER",
  "message": "We are reviewing your request.",
  "isPublic": true,
  "fromStatus": "OPEN",
  "toStatus": "IN_PROGRESS",
  "createdTime": 1788231600000
}
To create an internal note via API, set "isPublic": false in the payload above using ${DPO_TOKEN}.
Step 3: Resolve the Complaint
Via Consent Portal
-
In the Complaint Officer view, open the send button status menu on the comment composer.
-
Select
RESOLVED, enter a final resolution message explaining the actions taken, and submit. -
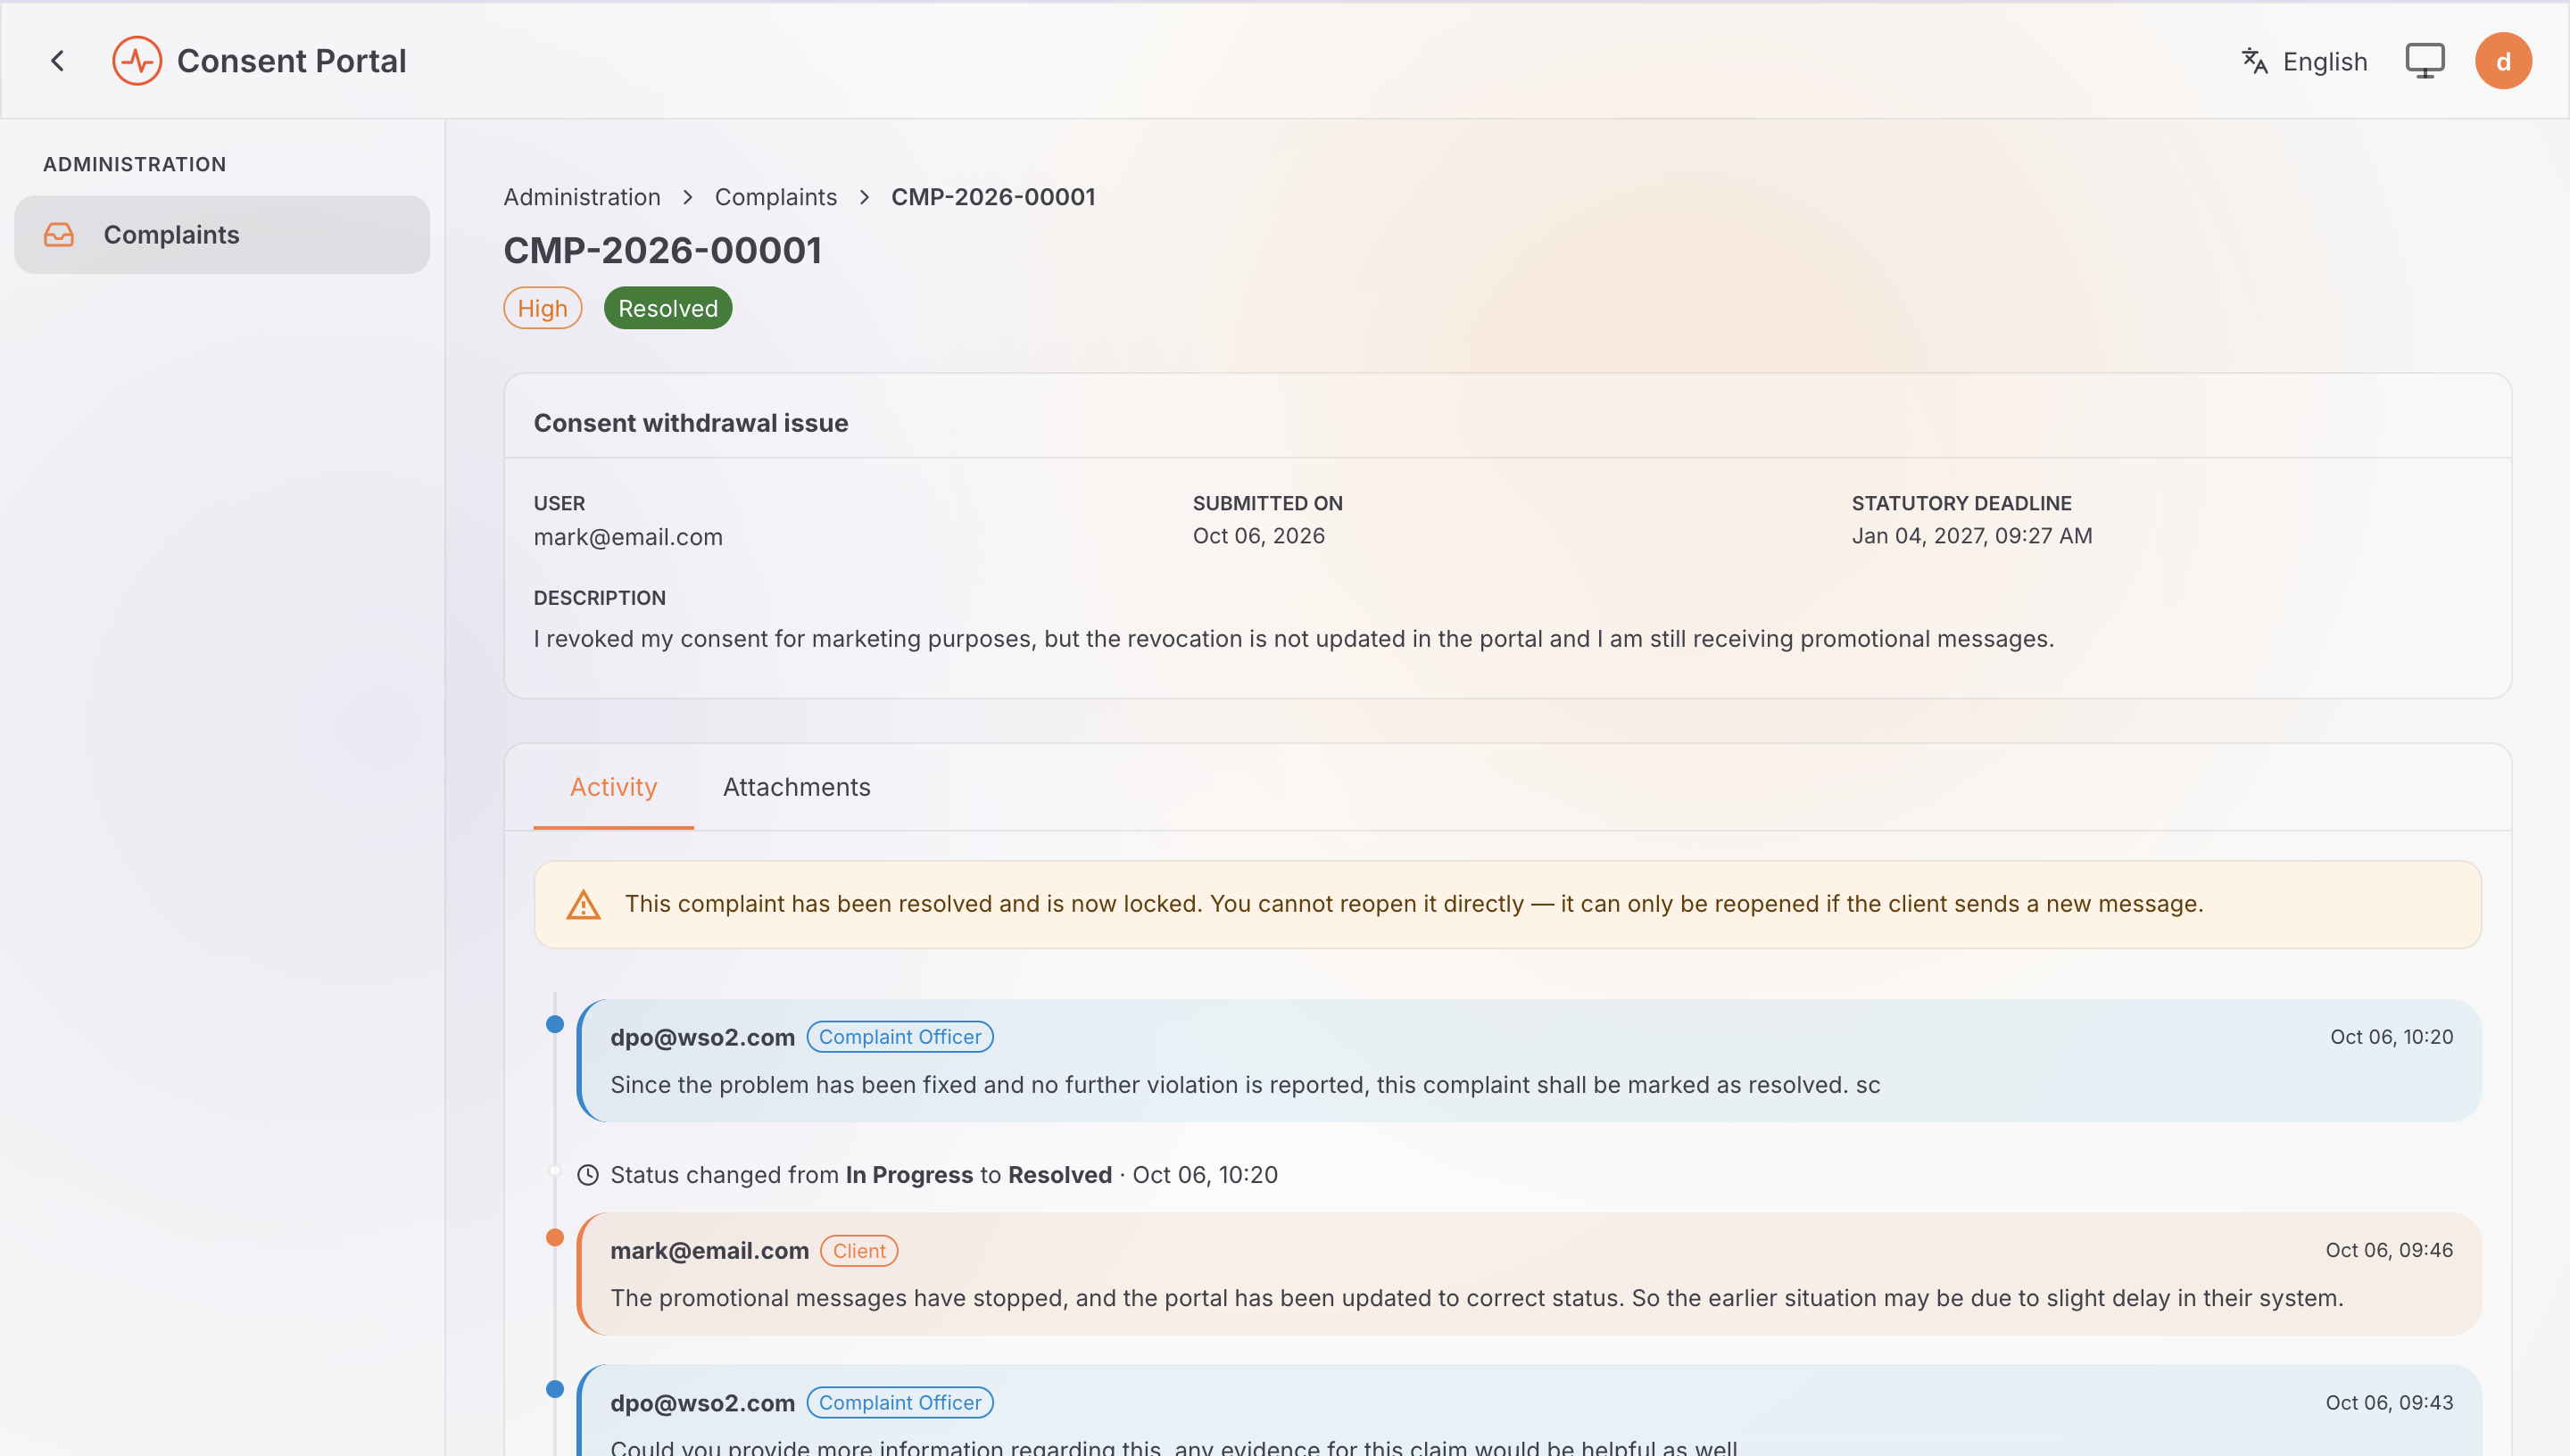
The complaint transitions to Resolved, and an advisory banner confirms that the case is locked and can only be reopened if the client sends a new message:
-
Sign back in as the Data Principal under My Complaints to verify that the resolution message and
RESOLVEDstatus are reflected in their portal timeline.
Via REST API
To transition the complaint status to RESOLVED via the API, send a comment using ${DPO_TOKEN} with "toStatus": "RESOLVED":
curl -X POST \
  "${BASE_URL}/api/dpdp/complaints/v1/complaints/<complaint-id>/comments" \
  -H "Authorization: Bearer ${DPO_TOKEN}" \
  -H "Content-Type: application/json" \
  -d '{
    "message": "The marketing processor synchronization has been restored, and promotional notifications are stopped.",
    "isPublic": true,
    "toStatus": "RESOLVED"
  }'
Next Steps
- Learn: Complaints: Story-based overview of grievance handling.
- Try Out: All Flows: End-to-end Try Out guide covering consents and event notifications.
- Developer Guide: Grievances: Full API specifications, attachment limits, and email template customization.